Kodi Community Forum

Full Version: GPIO-to-virtual-gamepad peripheral addon for Arcade Joystick & Buttons on GPIO?
You're currently viewing a stripped down version of our content. View the full version with proper formatting.
Can I suggest that the the Kodi Game project includes a "peripheral.GPIO-to-virtual-gamepad" add-on for for generic input support for direct-attached DIY arcade-controllers as virtual gamepads via GPIO-pins on a Raspberry Pi?

Having such an 'GPIO-to-virtual-gamepad' (in reality 'GPIO-to-virtual-keyboard') input-driver and a default mapping as an peripheral-addon in Kodi would enable any end-user to directly attach arcade-style 4-way or 8-way joysticks and buttons directly to the GPIO-pins (general-purpose input/output pins) on a Raspberry Pi without having to have programming-skills or having to add the cost and complexity of having to add a third-party GPIO HAT/Bonnet/Shield, custom controller-PCB, or USB-adapters. 

This direct-attach wires (a.k.a. "wire harness") to GPIO-pins makes for a very clean design and a unified method to attach commonly available DIY arcade joysticks and buttons to all single-board computers that feature the same GPIO-header as the Raspberry Pi series. These pictures below are a couple Adafruit examples (originally published on 2013-06-03 so the details on recommended GPIO-pin layout might have changed since then):
  Image 
That is, this would enable users to create a virtual-gamepad with the GPIO-pins (or even two virtual-gamepads with the GPIO-pins), as in reality you actually haved wired the micro switch (miniature snap-action switch) on the back of each DIY arcade-style joystick and button direct to an individual GPIO pin on your Raspberry Pi and the GPIO-to-virtual-keyboard peripheral addon for Kodi Game project would help you create the mappings that you need.

Image

These classic arcade-style joysticks (a.k.a. "stick" or "rocker") and 30/24-mm buttons of SANWA/Seimitsu-type can also be bought really cheap in DIY-kits or as single arcade sticks and individual buttons from China (just do a search for "sanwa AND arcade" or "seimitsu AND arcade" on some Chinese shopping sites). But I would be willing to bet that Adafruit would sponsor any interested developers from Team-Kodi with thier matching kits of joysticks and buttons if they asked.
 
Image ImageImage  Image


Anyway, for a basic addon could you maybe base it on Adafruit-Retrogame, GPIOnext, GPioneer, or similar simple Python-based GPIO-to-virtual-keyboard utility code designed for these types of arcade-style GPIO controllers?
 
However, I read though that for a little more serious installations many people instead recommend either the "mk_joystick_rpi" or "WiringPI" C/C++-based code from projects (which the Recalbox and RetroPie distros uses) because with those you can get you two (2) 8-way joysticks and up to eighteen (18) buttons only using GPIO pins on a single Raspberry Pi, (which allows for 2-players and is more than enough to have the equivalent of two SNES gamepads using arcade controls).
 
If I'm understanding this correctly, this issue can't (or shouldn't) be handled 100% in Kodi. At least for me, I don't want Kodi or its add-ons installing system drivers. This should be done as part of the OS configuration. Once it's installed, it might work mostly OOTB with a generic keyboard or joystick profile. You may need to create a new keymap (which I'm sure would be a welcome contribution to peripheral.joystick).

If you're wanting an "zero configuration" (for the end user) installation of the driver, you could look into having it included in Kodi-specific distros like LibreELEC.
(2018-01-02, 20:31)MrTarantula Wrote: [ -> ]If I'm understanding this correctly, this issue can't (or shouldn't) be handled 100% in Kodi. At least for me, I don't want Kodi or its add-ons installing system drivers. This should be done as part of the OS configuration. Once it's installed, it might work mostly OOTB with a generic keyboard or joystick profile. You may need to create a new keymap (which I'm sure would be a welcome contribution to peripheral.joystick).

If you're wanting an "zero configuration" (for the end user) installation of the driver, you could look into having it included in Kodi-specific distros like LibreELEC.
 LibreElec I believe already has an addon supporting GPIO I/O:
https://github.com/LibreELEC/LibreELEC.t...package.mk
(2018-01-02, 20:31)MrTarantula Wrote: [ -> ]If I'm understanding this correctly, this issue can't (or shouldn't) be handled 100% in Kodi. At least for me, I don't want Kodi or its add-ons installing system drivers. This should be done as part of the OS configuration. Once it's installed, it might work mostly OOTB with a generic keyboard or joystick profile. You may need to create a new keymap (which I'm sure would be a welcome contribution to peripheral.joystick).
I guess your point is that this will also need some software glue that links Raspberry Pi GPIO-connected controls (micro switches) to “virtual” keyboard input, meaning drivers as system dependencies already in installed on the Linux distro before users could simply just install a peripheral addon for Kodi?

Perhaps you need to install GPIO driver to read GPIO input, and perhaps you don’t, I don’t know. In any case, I do however know that many if not most Linux distributions for Raspberry Pi already have drivers and libraries pre-installed that can read GPIO input.

 
(2018-01-02, 20:31)MrTarantula Wrote: [ -> ]If you're wanting an "zero configuration" (for the end user) installation of the driver, you could look into having it included in Kodi-specific distros like LibreELEC.
Yes "zero configuration" (for the end-user) is indeed to final 'plug-and-play' solution that I am personally hoping for here.

[EDIT]: I see that zachmorris also pointed out that LibreELEC already have a module that supports control of Raspberry Pi GPIO input (and output) so maybe a Kodi peripheral addon could use that as system dependency if a system driver for GPIO input is needed?

Found a previous dicussion thread here about RPi.GPIO add-on available from OpenELEC used in OSMC for push buttons => https://forum.kodi.tv/showthread.php?tid=260817

It refers to the use of the RPi.GPIO Python library https://www.raspberrypi-spy.co.uk/2012/0...n-library/

"The RPi.GPIO Python library allows you to easily configure and read-write the input/output pins on the Pi’s GPIO header within a Python script. Thankfully this library is now including in the standard Raspbian image available from the Raspberry Pi Foundations Download Page. If you are using a fresh image you don’t need to install."

https://pypi.python.org/pypi/RPi.GPIO

"Note that this module is unsuitable for real-time or timing critical applications. This is because you can not predict when Python will be busy garbage collecting. It also runs under the Linux kernel which is not suitable for real time applications - it is multitasking O/S and another process may be given priority over the CPU, causing jitter in your program. "
That's probably as good as it will get. I wouldn't put the responsibility of having every configuration of every kit on the LibreELEC devs. I also wouldn't expect them to have GPIO->joystick/keyboard set as the default. I don't see a way where there isn't a little bit of user configuration to bridge the gap between GPIO and peripheral.joystick. Such is the way of Linux. I'm sure it can be scripted, though.

Another option would be for an enterprising developer to fork LibreELEC as purely an arcade setup and add/maintain the desired drivers and configurations.
I've written GPIO drivers for other software. I plan to add one for Kodi too. This will need to happen after the input work for my player manager, because every time the API changes it takes HOURS to simply update all the code that depends on it. Once the input system is complete I'll start accumulating my hoard of peripheral add-ons.
(2018-01-03, 20:23)garbear Wrote: [ -> ]I've written GPIO drivers for other software. I plan to add one for Kodi too. This will need to happen after the input work for my player manager, because every time the API changes it takes HOURS to simply update all the code that depends on it. Once the input system is complete I'll start accumulating my hoard of peripheral add-ons.
 This is one of the few times I'm glad to be wrong. I assumed it wasn't directly possible to go straight from GPIO to Kodi peripheral libraries. Lower-level programming is basically magic to me.
(2018-01-03, 17:29)MrTarantula Wrote: [ -> ]I wouldn't put the responsibility of having every configuration of every kit on the LibreELEC devs. I also wouldn't expect them to have GPIO->joystick/keyboard set as the default. I don't see a way where there isn't a little bit of user configuration to bridge the gap between GPIO and peripheral.joystick. 
If garbear or someone else decide to make a such a GPIO peripheral addon for Kodi (and LibreELEC) then I do not see why they could then not also simply decide on a default GPIO-pin layout to use as standard for joystick-1 and joystick-2 which would work out-of-the-box on Raspberry Pi B+/2/3, just as a reference if nothing else. The existing peripheral.joystick is a binary-addon for Kodi which also contain drivers and default mappings for a multitude of gamepads and joysticks.

Please understand that there is need to to have "every configuration of every kit" as technically all DIY arcade kits work exactly the same, they are all loose buttons and does not have different configurations as far as connecting them to GPIO pins. You need to remember that each arcade push-button is just a simple micro switch that operate in "push-to-make" mode, meaning it open the loop when press and a spring resets it to closed when released, and the same goes for an arcade joystick which is just four micro switches (one for up, down, left, and right respectivly). So as long as we have a default GPIO-pin layout to use as standard for Kodi then we just need to always connect the correct micro switch to the same GPIO pin and it will always work the same for everyone.

If the Kodi (and LibreELEC) wiki would contain a default supported layout reference of which GPIO-pins to use for this addon to work out-of-the-box and the users choose to follow wiki page to the letter then why should it not be able to work out-of-the-box? 
 
(2018-01-03, 20:23)garbear Wrote: [ -> ]I've written GPIO drivers for other software. I plan to add one for Kodi too. 
That is great to hear! Should we try to find yourself and Team Kodi a sponsor of DIY-kits with arcade joysticks & push-buttons? ...I know Xgaming Xgaming donated hardware in the past, so maybe ask for their 2-player or 1-player kits?
 
For reference regarding default GPIO-pins layout, this is what some of the other emulator distro projects have already done; they have each decided to support one standard of GPIO-pins to use by default which will work out-of-the-box, and while they allow users to deviate from that set layout standard and even explain what changes will need to be made it will just not work out-of-the-box.

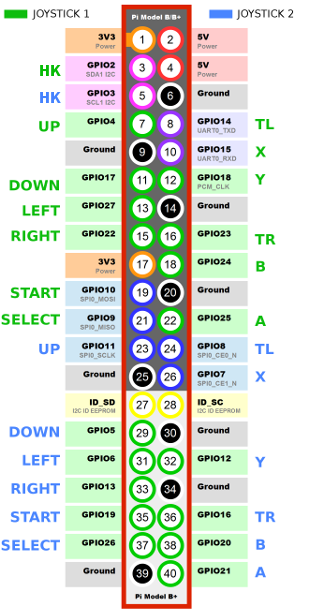
Personally I think that as a common case the recommended default supported layout reference of which GPIO-pins to use could be copied from the Recalbox (recalboxOS) project as they have simple documentation of how to connect two joysticks and enough buttons for 2-players, (recalboxOS is build with the "mk_arcade_joystick_rpi" driver from their "hotkeybtn" branch):
 
Here are otherwise a few wiki pages from other projects which have different default layouts for GPIO controllers, a "joystick connection matrix" if you will, and while some GPIO-pins layouts support 2-players/joysticks by default, other layouts only support 1-player/joystick by default, (where the first picture below is the default GPIO pin-layout from the "mk_arcade_joystick_rpi" driver from their "hotkeybtn" branch):
 

 Image
(2018-01-04, 13:47)RockerC Wrote: [ -> ]Here are otherwise a few wiki pages from other projects which have different default layouts for GPIO controllers, a "joystick connection matrix" if you will, and while some GPIO-pins layouts support 2-players/joysticks by default, other layouts only support 1-player/joystick by default, (where the first picture below is the default GPIO pin-layout from the "mk_arcade_joystick_rpi" driver from their "hotkeybtn" branch):
  Image 
 
As you can see from the above picture is the default GPIO pin-layout from the "mk_arcade_joystick_rpi" driver from their "hotkeybtn" branch; using dedicated GPIO-pins on Raspberry Pi 2/3 you have the possibility of using a total of 26 micro-switches, and as such you have 13 GPIO-pins per player.  Assuming that you use one four-direction joystick per player (which use one GPIO-pin per direction and player) you are eft with a total of 18 GPIO-pins, meaning 9 arcade-style push-buttons per player.

These suggested default mapping are design for one four-direction joystick plus 9 buttons per player as standard, where 6 buttons are for 'fire', two addional two buttons are for 'coin' and 'player start', and the final button is used as a 'HK' ("Hot-Key") button per player. Such hotkey can act as a keyboard shift-key to add one addional function to each of the original 10 buttons per player, and those hotkey + buttons presses would normally be mapped to shared/common functions, such as example 'in-game OSD', 'exit from game', 'pause', 'game reset', and other functions that you might normally not use. Or you might just map that 'HK' ("Hot-Key") button to Kodi's in-game OSD and leave it at that.

Anyway, would probably want map the joystick/buttons GPIO pins to emulated keyboard keys to match the MAME default key codes mappings (same pre-loaded normal keyboard keys preset maps as coded in by Ultimarc I-PAC-2 by default):

http://www.ultimarc.com/ipac2.html (also see http://easyemu.mameworld.info/mameguide/...trols.html )

Default controls for Player-1 - Common joystick-control and buttons specificly needed for Player-1 (one player)

Note! Fun a practical fact from retro-gaming emulator playing history; Physical joystick and buttons for "Player-1" in MAME and similar arade-emulators are traditionally mapped to keyboard keys located on the right-side of a English (US) QWERTY keyboard layout, and the reason for that is simply because the Keyboard Arrow-Keys for Right, Left, Up, and Down are located on the right-side of a English (US) QWERTY keyboard layout, so all the default control keys for "Player-1" are within easy reach on the right-side of the keyboard without easy reach and you do not have to cross your arms with that of the person using "Player-2" default control keys if using same shared physical keyboard.

5  = Insert coin button for Player-1, a.k.a. "Coin 1" or "Coin (Left)" button (Player-1)
1  = Player-1 start button for starting player-1 or choosing the first player/controller to play the game - This button has an icon representing 'one man alone' as standard (Player-2)

Right, Left, Up, Down (Keyboard Arrow-Keys)  = Joystick-controller-keys for Right, Left, Up, and Down (Player-1)
Left Ctrl = Switch/Fire 1 (Player-1)
Left Alt  = Switch/Fire 2 (Player-1)
Space  = Switch/Fire 3 (Player-1)
Left Shift  = Switch/Fire 4 (Player-1)
Z  = Switch/Fire 5 (Player-1)
X  = Switch/Fire 6 (Player-1)
C  = Switch/Fire 7 (Player-1) <= Normally "Switch/Fire 7" and "Switch/Fire 8" buttons are not mapped as standard, so only add if you happen to have extra GPIO pins to spare!
V  = Switch/Fire 8 (Player-1) <= Normally "Switch/Fire 7" and "Switch/Fire 8" buttons are not mapped as standard, so only add if you happen to have extra GPIO pins to spare!

Default controls for Player-2 - Common joystick-control and buttons specificly needed for Player-2 (two players)

Note! Fun a practical fact from retro-gaming emulator playing history; Physical joystick and buttons for "Player-2" in MAME and similar arade-emulators are traditionally mapped to keyboard keys located on the left-side of a English (US) QWERTY keyboard layout, and the reason for that is simply because the Keyboard Arrow-Keyed used for Right, Left, Up, and Down by "Player-1" are located on the right-side of a English (US) QWERTY keyboard layout, so all the default control keys for "Player-2" are all within easy reach on the left-side of the keyboard and you do not have to cross your arms with that of the person using "Player-1" default control keys if using same shared physical keyboard.

6  = Insert coin button for Player-2, a.k.a. "Coin 1" or "Coin (Left)" button (Player-2)
2  = Player-2 start button for starting player-2 or choosing second player/controller to play the game - This button has an icon representing 'two men side-by-side' as standard (Player-2)

G, D, R, F  = Joystick-controller-keys for Right, Left, Up, and Down (Player-2)
A  = Switch/Fire 1 (Player-2)
S  = Switch/Fire 2 (Player-2)
Q  = Switch/Fire 3 (Player-2)
W  = Switch/Fire 4 (Player-2)
I  = Switch/Fire 5 (Player-2)
K  = Switch/Fire 6 (Player-2)
J  = Switch/Fire 7 (Player-2) <= Normally "Switch/Fire 7" and "Switch/Fire 8" buttons are not mapped as standard, so only add if you happen to have extra GPIO pins to spare!
L  = Switch/Fire 8 (Player-2) <= Normally "Switch/Fire 7" and "Switch/Fire 8" buttons are not mapped as standard, so only add if you happen to have extra GPIO pins to spare!

And some special shared system buttons bellow accessed via hot-key or additional physicial buttons:

Note! These additional special shared system buttons listed bellow are not nessesary needed if you do not have enough physical buttons/GPIO-pins available and normally there would not be buttons for these on the exterior of an arcade cabinet but instead either a keyboard, extra hidden buttons inside. or access via a "hot-key" ("HK") as a shift-key to add one additional function to each fire-button for each player.

"HK Player-1" (Hot-Key for Player-1) = Right-Shift Key on keybaord as the hotkey for Player-1 (a.k.a. Player-1 shift-key)
"HK Player-2" (Hot-Key for Player-2) = Left-Shift Key on keybaord as the hotkey for Player-2 (a.k.a. Player 2 shift-key)

Hotkey (shift key) mapping could include for example these:

Tab  = Access in-game menu (in-game OSD)
Esc  = Exit from game
P  = Pause the game
F3  = Game Reset
F7  = Load a saved game state.
"~" or "¬" (Above Tab)  = Volume Control
F6  = Enable / Disable Cheat if cheats are enabled