• 1
  • 2
  • 3(current)
  • 4
  • 5
  • 8
XBOX 360 Media Remote on XBMCbuntu
#31
Looking forward to your instructions! Thank you.
Reply
#32
Use Any IR Remote In The House

This tutorial will show you how to use ANY IR remote in your house to control XBMC.
I have used this method with COMPLETE success on many remotes. I have yet to find one that wont work.

To demonstrate this tecnichique I will download and install the latest XBMCbuntu Live CD (Frodo 12.2) to verify it works "out of the box"
If you deviatiete from the Live CD XBMCbuntu install you are on your own installing and configuring LIRC.

1. Download & burn Live CD

2. Install XBMCbuntu 12.2

3. Select update installer, Continue

4. Select Download updates while installing and also select install third party software.

5. Setup your username & password. Select login automatically (if desired)

6. When install is finidshed click yes to restart.

7. If all went well you have an XBMC interface and a fresh install. MCE remotes should work at this point.

8. Click the power button on the bottom left of the screen and select EXIT

9. Login using the XBMCbuntu (NOT XBMC) session and select your username and password , The XBMCbuntu desktop should appear.

10. At this point I like to install LXterminal (easier to read and supports copy paste) and mousepad (lightweight editor).

Code:
sudo apt-get install lxterminal mousepad

11. Open TWO (2) lxterminal's. In the start menu under accessories (if its not there alt-F2 and type lxterminal)

13. Get your remote and IR receiver plugged in and type in the lxterminal

Code:
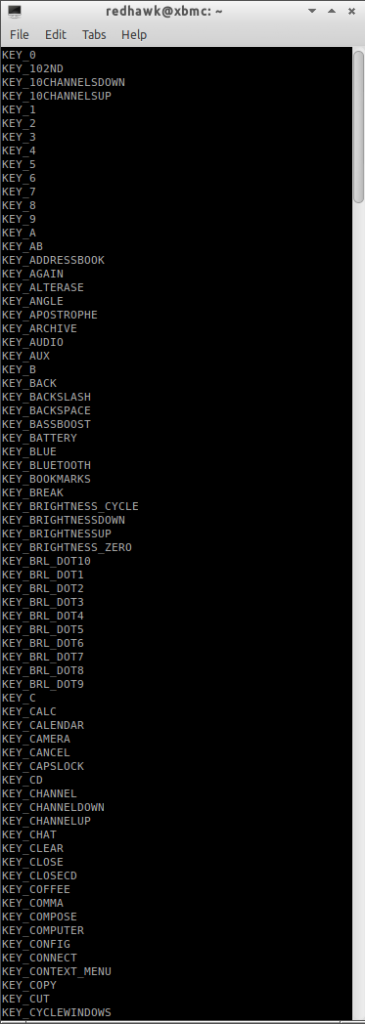
irrecord -list namespace

These are the names you can give the buttons on your remote.

Image

14. Ok, this is where it starts to happen. In the second lxterminal window type

Code:
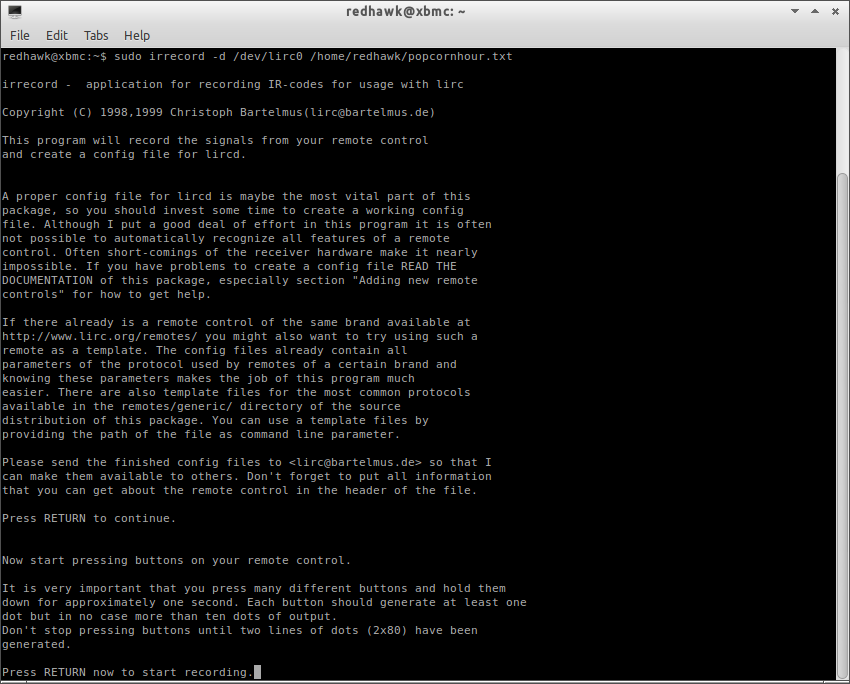
sudo irrecord -d /dev/lirc0 /home/your-xbmc-user-name/myremote.txt


15. Mine was lirc0 yours may be different. Check by doing

Code:
ls /dev

and looking for the lirc device name.

16. Read and follow the directions in the terminal after typing sudo irrecord -d /dev/lirc0 /home/your-xbmc-user-name/myremote.txt.

Image


17. I have selected the old popcornhour media remote for this demonstration (This remote will NOT, and did NOT, work with XBMC unless you follow these example steps, that's the purpose of this demonstration)
This remote has some good buttons for XBMC (stop play pause numbers arrows red green blue yellow menu...etc)

Image
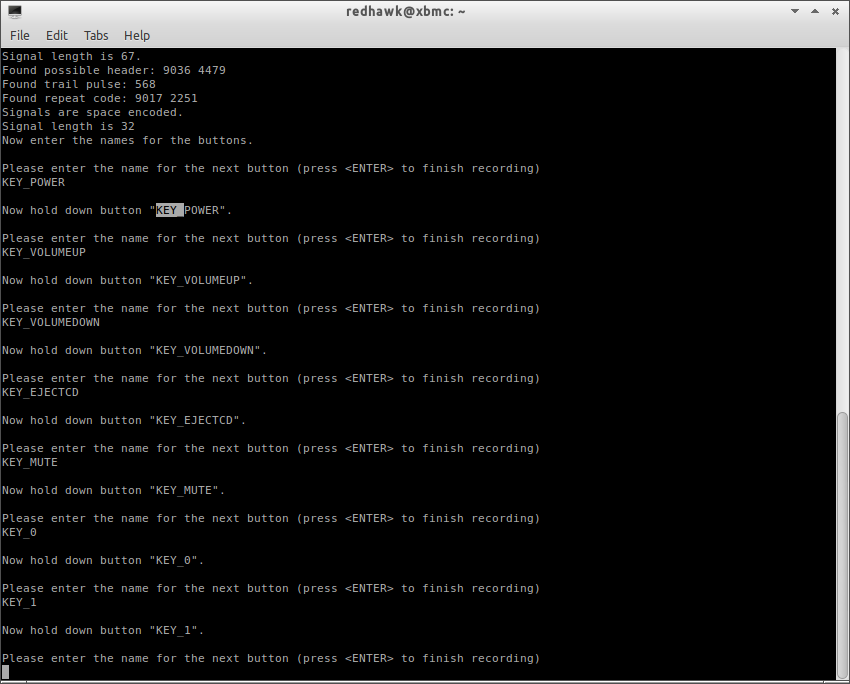
18. Now we want to start naming and selecting the buttons on the remote.
We will start with the power button.

19 Type in the name of the button you want to use as found on the other lxterminal window
We will call it

Code:
KEY_POWER

Hit enter.
Hold down the power button.

20. Thats it you just named the power button. Move on the the next button and repeat the process.
See the screenshot

Image

Here are the button names I used

Code:
    KEY_POWER            
          KEY_VOLUMEUP            
          KEY_VOLUMEDOWN          
          KEY_EJECTCD              
          KEY_MUTE                
          KEY_0                    
          KEY_1                    
          KEY_2                    
          KEY_3                    
          KEY_4                    
          KEY_5                    
          KEY_6                    
          KEY_7                    
          KEY_8                    
          KEY_9                    
          KEY_PAGEUP              
          KEY_PAGEDOWN            
          KEY_BACK                
          KEY_TITLE                
          KEY_INFO                
          KEY_DISPLAYTOGGLE        
          KEY_SELECT              
          KEY_LEFT                
          KEY_RIGHT                
          KEY_UP                  
          KEY_DOWN                
          KEY_MENU                
          KEY_PREVIOUS            
          KEY_PLAY                
          KEY_NEXT                
          KEY_REWIND              
          KEY_FASTFORWARD          
          KEY_STOP                
          KEY_PAUSE                
          KEY_SUBTITLE            
          KEY_RED                  
          KEY_GREEN                
          KEY_YELLOW              
          KEY_BLUE

When you're finished press enter to stop the process.

21. Open a root file manager by doing alt-F2 and type
Code:
gksudo pcmanfm

Navigate to /etc/lirc/lircd.conf and open with mousepad.

22. Place the contens of the file you just created (copy and paste) into /etc/lirc/lircd.conf

It sould look like this

Code:
#This configuration has been automatically generated via
#the Ubuntu LIRC package maintainer scripts.
#
#It includes the default configuration for the remote and/or
#transmitter that you have selected during package installation.
#
#Feel free to add any custom remotes to the configuration
#via additional include directives or below the existing
#Ubuntu include directives from your selected remote and/or
#transmitter.

#Configuration for the Windows Media Center Remotes (new version Philips et al.) remote:
include "/usr/share/lirc/remotes/mceusb/lircd.conf.mceusb"


begin remote

  name  popcornhour
  bits           16
  flags SPACE_ENC|CONST_LENGTH
  eps            30
  aeps          100

  header       9036  4479
  one           586  1671
  zero          586   537
  ptrail        568
  repeat       9017  2251
  pre_data_bits   16
  pre_data       0x20D3
  gap          108169
  toggle_bit_mask 0x0

      begin codes
          KEY_POWER                0x52AD
          KEY_VOLUMEUP             0x728D
          KEY_VOLUMEDOWN           0x4AB5
          KEY_EJECTCD              0x22DD
          KEY_MUTE                 0x8A75
          KEY_0                    0xD827
          KEY_1                    0x827D
          KEY_2                    0xC03F
          KEY_3                    0x42BD
          KEY_4                    0xA25D
          KEY_5                    0xE01F
          KEY_6                    0x629D
          KEY_7                    0xAA55
          KEY_8                    0xE817
          KEY_9                    0x6A95
          KEY_PAGEUP               0x9A65
          KEY_PAGEDOWN             0x5AA5
          KEY_BACK                 0xE21D
          KEY_TITLE                0xA05F
          KEY_INFO                 0xD22D
          KEY_DISPLAYTOGGLE        0x906F
          KEY_SELECT               0x40BF
          KEY_LEFT                 0xC23D
          KEY_RIGHT                0x807F
          KEY_UP                   0x609F
          KEY_DOWN                 0x50AF
          KEY_MENU                 0xCA35
          KEY_PREVIOUS             0x48B7
          KEY_PLAY                 0x0AF5
          KEY_NEXT                 0x8877
          KEY_REWIND               0x708F
          KEY_FASTFORWARD          0xB04F
          KEY_STOP                 0x32CD
          KEY_PAUSE                0x2AD5
          KEY_SUBTITLE             0x1AE5
          KEY_RED                  0xFA05
          KEY_GREEN                0x7887
          KEY_YELLOW               0x3AC5
          KEY_BLUE                 0xB847
      end codes

end remote

Be sure to note the name of your remote above (I have named mine popcornhour). We will need it in a few.
Close the root filemanager and open a regular user one (folder icon with the arrow on it in the taskbar)

23. Now we want to create a new file in the /home/your-xbmc-user/.xbmc/userdata directory.
Call it
Code:
Lircmap.xml
Note the first letter is a capital

24. This file is created from scratch but you can likely use some of mine.
Open it witrh mousepad and paste something like this (yours will be different depending on the button names you used. Modify as required.)
Dont forget to change the name of the remote if you changed it earlier (popcornhour)

Code:
<!-- This file contains the mapping of LIRC keys to XBMC keys used in Keymap.xml  -->
<!--                                                                              -->
<!-- How to add remotes                                                           -->
<!-- <remote device=name_Lirc_calls_the_remote>                                 -->
<!--                                                                              -->
<!-- For the commands the layout following layout is used                         -->
<!-- <XBMC_COMMAND>LircButtonName</XBMC_COMMAND>                                  -->
<!--                                                                              -->
<!-- For a list of XBMC_COMMAND's check out the <remote> sections of keymap.xml   -->

<lircmap>

<remote device="popcornhour">

<power>KEY_POWER</power>
<volumeplus>KEY_VOLUMEUP</volumeplus>
<volumeminus>KEY_VOLUMEDOWN</volumeminus>
<eject>KEY_EJECTCD</eject>
<mute>KEY_MUTE</mute>

<zero>KEY_0</zero>
<one>KEY_1</one>
<two>KEY_2</two>
<three>KEY_3</three>
<four>KEY_4</four>
<five>KEY_5</five>
<six>KEY_6</six>
<seven>KEY_7</seven>
<eight>KEY_8</eight>
<nine>KEY_9</nine>
<zero>KEY_0</zero>

<pageplus>KEY_PAGEUP</pageplus>
<pageminus>KEY_PAGEDOWN</pageminus>
<back>KEY_BACK</back>
<title>KEY_TITLE</title>
<info>KEY_INFO</info>
<display>KEY_DISPLAYTOGGLE</display>

<select>KEY_SELECT</select>
<left>KEY_LEFT</left>
<right>KEY_RIGHT</right>
<up>KEY_UP</up>
<down>KEY_DOWN</down>
<menu>KEY_MENU</menu>

<skipminus>KEY_PREVIOUS</skipminus>
<play>KEY_PLAY</play>
<skipplus>KEY_NEXT</skipplus>
<reverse>KEY_REWIND</reverse>
<forward>KEY_FORWARD</forward>
<stop>KEY_STOP</stop>
<pause>KEY_PAUSE</pause>

<pageplus>KEY_PAGEUP</pageplus>
<pageminus>KEY_PAGEDOWN</pageminus>

<red>KEY_RED</red>
<green>KEY_GREEN</green>
<yellow>KEY_YELLOW</yellow>
<blue>KEY_BLUE</blue>

</remote>
</lircmap>

25. Studying that file you can get a good idea what each button will be doing.

26. Now we need one more file. /home/your-xbmc-user/.xbmc/userdata/keymaps/remote.xml
create it using mousepad and have it look like this. Again, yours might be slightly different.

Code:
<!-- This file contains the mapping of keys (gamepad, remote, and keyboard) to actions within XBMC -->
<!-- The <global> section is a fall through - they will only be used if the button is not          -->
<!-- used in the current window's section.  Note that there is only handling                       -->
<!-- for a single action per button at this stage.                                                 -->
<!-- For joystick/gamepad configuration under linux/win32, see below as it differs from xbox       -->
<!-- gamepads.                                                                                     -->

<!-- The format is:                      -->
<!--    <device>                         -->
<!--      <button>action</button>        -->
<!--    </device>                        -->

<!-- To map keys from other remotes using the RCA protocol, you may add <universalremote> blocks -->
<!-- In this case, the tags used are <obc#> where # is the original button code (OBC) of the key -->
<!-- You set it up by adding a <universalremote> block to the window or <global> section:       -->
<!--    <universalremote>             -->
<!--       <obc45>Stop</obc45>         -->
<!--    </universalremote>            -->

<!-- Note that the action can be a built-in function.                 -->
<!--  eg <B>XBMC.ActivateWindow(MyMusic)</B>                         -->
<!-- would automatically go to My Music on the press of the B button. -->

<!-- Joysticks / Gamepads:                                                                    -->
<!--   See the sample PS3 controller configuration below for the format.                      -->
<!--                                                                                          -->
<!--  Joystick Name:                                                                          -->
<!--   Do 'cat /proc/bus/input/devices' or see your xbmc log file  to find the names of       -->
<!--   detected joysticks. The name used in the configuration should match the detected name. -->
<!--                                                                                          -->
<!--  Button Ids:                                                                             -->
<!--   'id' is the button ID used by SDL. Joystick button ids of connected joysticks appear   -->
<!--   in xbmc.log when they are pressed. Use your log to map custom buttons to actions.      -->
<!--                                                                                          -->
<!--  Axis Ids / Analog Controls                                                              -->
<!--   Coming soon.                                                                           -->
<keymap>
  <global>
    <remote>
      <play>Play</play>
      <pause>Pause</pause>
      <stop>Stop</stop>
      <forward>FastForward</forward>
      <reverse>Rewind</reverse>
      <left>Left</left>
      <right>Right</right>
      <up>Up</up>
      <down>Down</down>
      <select>Select</select>
      <enter>FullScreen</enter>
      <pageplus>PageUp</pageplus>
      <pageminus>PageDown</pageminus>
      <back>ParentDir</back>
      <menu>ContextMenu</menu>
      <title>ContextMenu</title>
      <info>Info</info>
      <skipplus>SkipNext</skipplus>
      <skipminus>SkipPrevious</skipminus>
      <display>FullScreen</display>
      <start>XBMC.ActivateWindow(Favourites)</start>
      <record>Stop</record>
      <volumeplus>VolumeUp</volumeplus>
      <volumeminus>VolumeDown</volumeminus>
      <mute>Mute</mute>
      <power>XBMC.RestartApp()</power>
      <myvideo>XBMC.ActivateWindow(VideoLibrary,MovieTitles)</myvideo>
      <mymusic>XBMC.ActivateWindow(Weather)</mymusic>
      <mypictures>XBMC.ActivateWindow(MyPictures)</mypictures>
      <mytv>XBMC.ActivateWindow(VideoLibrary,TvShowTitles)</mytv>
      <zero>XBMC.RestartApp()</zero>
      <one>Number1</one>
      <two>JumpSMS2</two>
      <three>JumpSMS3</three>
      <four>JumpSMS4</four>
      <five>JumpSMS5</five>
      <six>JumpSMS6</six>
      <seven>JumpSMS7</seven>
      <eight>JumpSMS8</eight>
      <nine>JumpSMS9</nine>
      <hash>Screenshot</hash>
    <!-- <star>EjectTray()</star> -->
    <xbox>scanitem</xbox>
    </remote>
  </global>
  <Home>
    <remote>
      <info>XBMC.ActivateWindow(SystemInfo)</info>
      <clear>XBMC.ActivateWindow(Weather)</clear>
      <hash>Screenshot</hash>
    </remote>
  </Home>
  <MyFiles>
    <remote>
      <clear>Delete</clear>
      <zero>Highlight</zero>
      <star>Move</star>
      <hash>Rename</hash>
    </remote>
  </MyFiles>
  <MyMusicPlaylist>
    <remote>
      <back>Playlist</back>      <!-- Close playlist -->
      <clear>Delete</clear>
      <zero>Delete</zero>
    </remote>
  </MyMusicPlaylist>
  <MyMusicPlaylistEditor>
    <remote>
      <zero>Queue</zero>
    </remote>
  </MyMusicPlaylistEditor>
  <MyMusicFiles>
    <remote>
      <zero>Queue</zero>
      <star>Queue</star>
    </remote>
  </MyMusicFiles>
  <MyMusicLibrary>
    <remote>
      <zero>Queue</zero>
      <star>Queue</star>
    </remote>
  </MyMusicLibrary>
  <FullscreenVideo>
    <remote>
      <zero>Number0</zero>
      <one>Number1</one>
      <two>Number2</two>
      <three>Number3</three>
      <four>Number4</four>
      <five>Number5</five>
      <six>Number6</six>
      <seven>Number7</seven>
      <eight>Number8</eight>
      <nine>Number9</nine>
      <left>StepBack</left>
      <right>StepForward</right>
      <up>BigStepForward</up>
      <down>BigStepBack</down>
      <back>SmallStepBack</back>
      <menu>OSD</menu>
      <start>TakeScreenshot</start>
      <select>AspectRatio</select>
      <title>CodecInfo</title>
      <info>Info</info>
      <teletext>XBMC.ActivateWindow(Teletext)</teletext>
      <display>ShowSubtitles</display>
      <subtitle>ShowSubtitles</subtitle>
      <star>EjectTray()</star>
      <language>AudioNextLanguage</language>
      <hash>Screenshot</hash>
    </remote>
  </FullscreenVideo>
  <VideoTimeSeek>
    <remote>
      <select>Select</select>
      <enter>Select</enter>
    </remote>
  </VideoTimeSeek>
  <FullscreenInfo>
    <remote>
      <title>CodecInfo</title>
      <info>Close</info>
      <menu>OSD</menu>
    </remote>
  </FullscreenInfo>
  <PlayerControls>
    <remote>
      <menu>Close</menu>
    </remote>
  </PlayerControls>
  <Visualisation>
    <remote>
      <left>PreviousPreset</left>
      <right>NextPreset</right>
      <up>IncreaseRating</up>
      <down>DecreaseRating</down>
      <back>LockPreset</back>
      <title>CodecInfo</title>
      <select>XBMC.ActivateWindow(VisualisationPresetList)</select>
      <menu>XBMC.ActivateWindow(MusicOSD)</menu>
      <start>XBMC.ActivateWindow(MusicOSD)</start>
      <info>Info</info>
    </remote>
  </Visualisation>
  <MusicOSD>
    <remote>
      <menu>Close</menu>
      <title>Info</title>
      <info>CodecInfo</info>
    </remote>
  </MusicOSD>
  <VisualisationSettings>
    <remote>
      <menu>Close</menu>
      <back>Close</back>
    </remote>
  </VisualisationSettings>
  <VisualisationPresetList>
    <remote>
      <menu>Close</menu>
      <back>Close</back>
    </remote>
  </VisualisationPresetList>
  <SlideShow>
    <remote>
      <zero>ZoomNormal</zero>
      <one>ZoomLevel1</one>
      <two>ZoomLevel2</two>
      <three>ZoomLevel3</three>
      <four>ZoomLevel4</four>
      <five>ZoomLevel5</five>
      <six>ZoomLevel6</six>
      <seven>ZoomLevel7</seven>
      <eight>ZoomLevel8</eight>
      <nine>ZoomLevel9</nine>
      <info>CodecInfo</info>
      <skipplus>NextPicture</skipplus>
      <skipminus>PreviousPicture</skipminus>
      <title>Info</title>
      <select>Rotate</select>
      <back>PreviousMenu</back>
    </remote>
  </SlideShow>
  <ScreenCalibration>
    <remote>
      <select>NextCalibration</select>
      <zero>ResetCalibration</zero>
      <display>NextResolution</display>
      <xbox>NextResolution</xbox>
    </remote>
  </ScreenCalibration>
  <GUICalibration>
    <remote>
      <select>NextCalibration</select>
      <zero>ResetCalibration</zero>
    </remote>
  </GUICalibration>
  <SelectDialog>
    <remote>
      <back>Close</back>
    </remote>
  </SelectDialog>
  <VideoOSD>
    <remote>
      <back>PreviousMenu</back>
      <menu>Close</menu>
      <start>Close</start>
    </remote>
  </VideoOSD>
  <VideoMenu>
    <remote>
      <menu>OSD</menu>
      <back>PreviousMenu</back>
      <info>Info</info>
      <title>CodecInfo</title>
      <zero>Number0</zero>
      <one>Number1</one>
      <two>Number2</two>
      <three>Number3</three>
      <four>Number4</four>
      <five>Number5</five>
      <six>Number6</six>
      <seven>Number7</seven>
      <eight>Number8</eight>
      <nine>Number9</nine>
      <play>Select</play>
    </remote>
  </VideoMenu>
  <OSDVideoSettings>
    <remote>
      <back>Close</back>
      <menu>Close</menu>
      <start>Close</start>
    </remote>
  </OSDVideoSettings>
  <OSDAudioSettings>
    <remote>
      <back>Close</back>
      <menu>Close</menu>
      <start>Close</start>
    </remote>
  </OSDAudioSettings>
  <VideoBookmarks>
    <remote>
      <back>Close</back>
      <menu>Close</menu>
      <start>Close</start>
      <zero>Delete</zero>
    </remote>
  </VideoBookmarks>
  <MyVideoLibrary>
    <remote>
      <zero>Queue</zero>
      <clear>Delete</clear>
    </remote>
  </MyVideoLibrary>
  <MyVideoFiles>
    <remote>
      <zero>Queue</zero>
      <star>Queue</star>
    </remote>
  </MyVideoFiles>
  <MyVideoPlaylist>
    <remote>
      <back>Playlist</back>      <!-- Close playlist -->
      <clear>Delete</clear>
      <zero>Delete</zero>
    </remote>
  </MyVideoPlaylist>
  <VirtualKeyboard>
    <remote>
      <back>BackSpace</back>
      <star>Shift</star>
      <hash>Symbols</hash>
      <zero>Number0</zero>
      <one>Number1</one>
      <two>Number2</two>
      <three>Number3</three>
      <four>Number4</four>
      <five>Number5</five>
      <six>Number6</six>
      <seven>Number7</seven>
      <eight>Number8</eight>
      <nine>Number9</nine>
      <enter>Enter</enter>
      <pageminus>CursorLeft</pageminus>
      <pageplus>CursorRight</pageplus>
    </remote>
  </VirtualKeyboard>
  <ContextMenu>
    <remote>
      <title>Close</title>
      <back>Close</back>
    </remote>
  </ContextMenu>
  <FileStackingDialog>
    <remote>
      <back>Close</back>
    </remote>
  </FileStackingDialog>
  <Scripts>
    <remote>
      <info>info</info>
    </remote>
  </Scripts>
  <NumericInput>
    <remote>
      <zero>Number0</zero>
      <one>Number1</one>
      <two>Number2</two>
      <three>Number3</three>
      <four>Number4</four>
      <five>Number5</five>
      <six>Number6</six>
      <seven>Number7</seven>
      <eight>Number8</eight>
      <nine>Number9</nine>
      <enter>Enter</enter>
      <back>BackSpace</back>
    </remote>
  </NumericInput>
  <Weather>
    <remote>
      <back>PreviousMenu</back>
    </remote>
  </Weather>
  <Settings>
    <remote>
      <back>PreviousMenu</back>
    </remote>
  </Settings>
  <AddonBrowser>
    <remote>
    </remote>
  </AddonBrowser>
  <AddonInformation>
    <remote>
      <back>Close</back>
    </remote>
  </AddonInformation>
  <AddonSettings>
    <remote>
      <back>Close</back>
    </remote>
  </AddonSettings>
  <TextViewer>
    <remote>
      <back>Close</back>
    </remote>
  </TextViewer>
  <MyPicturesSettings>
    <remote>
      <back>PreviousMenu</back>
    </remote>
  </MyPicturesSettings>
  <MyProgramsSettings>
    <remote>
      <back>PreviousMenu</back>
    </remote>
  </MyProgramsSettings>
  <MyWeatherSettings>
    <remote>
      <back>PreviousMenu</back>
    </remote>
  </MyWeatherSettings>
  <MyMusicSettings>
    <remote>
      <back>PreviousMenu</back>
    </remote>
  </MyMusicSettings>
  <SystemSettings>
    <remote>
      <back>PreviousMenu</back>
    </remote>
  </SystemSettings>
  <MyVideosSettings>
    <remote>
      <back>PreviousMenu</back>
    </remote>
  </MyVideosSettings>
  <NetworkSettings>
    <remote>
      <back>PreviousMenu</back>
    </remote>
  </NetworkSettings>
  <AppearanceSettings>
    <remote>
      <back>PreviousMenu</back>
    </remote>
  </AppearanceSettings>
  <Profiles>
    <remote>
      <back>PreviousMenu</back>
    </remote>
  </Profiles>
  <systeminfo>
    <remote>
      <back>PreviousMenu</back>
    </remote>
  </systeminfo>
  <shutdownmenu>
    <remote>
      <back>PreviousMenu</back>
    </remote>
  </shutdownmenu>
  <submenu>
    <remote>
      <back>PreviousMenu</back>
    </remote>
  </submenu>
  <MusicInformation>
    <remote>
      <back>Close</back>
    </remote>
  </MusicInformation>
  <MovieInformation>
    <remote>
      <info>Close</info>
      <back>Close</back>
    </remote>
  </MovieInformation>
  <LockSettings>
    <remote>
      <menu>Close</menu>
      <back>PreviousMenu</back>
    </remote>
  </LockSettings>
  <ProfileSettings>
    <remote>
      <menu>Close</menu>
      <back>PreviousMenu</back>
    </remote>
  </ProfileSettings>
  <PictureInfo>
    <remote>
      <skipplus>NextPicture</skipplus>
      <skipminus>PreviousPicture</skipminus>
      <info>Close</info>
      <back>Close</back>
    </remote>
  </PictureInfo>
  <Teletext>
    <remote>
      <zero>number0</zero>
      <one>number1</one>
      <two>number2</two>
      <three>number3</three>
      <four>number4</four>
      <five>number5</five>
      <six>number6</six>
      <seven>number7</seven>
      <eight>number8</eight>
      <nine>number9</nine>
      <info>Info</info>
      <back>Close</back>
      <menu>Close</menu>
      <start>Close</start>
      <teletext>Close</teletext>
    </remote>
  </Teletext>
  <Favourites>
    <remote>
      <back>Close</back>
    </remote>
  </Favourites>
</keymap>

Modify as required.

Its very important you understad the xbmc lirc relationship. It can be VERY confusing.

See this page http://forum.xbmc.org/showthread.php?tid=150228&page=3

After a reboot open a lxterminal and type irw. Start pushing buttons on your remote. It will display the remote name and the name of the buttons you pushed.
Hopefully your remote name is NOT popcornhour Big Grin. No big deal if it is just make sure its the same in Lircmap.xml

I repeated this process with another remote (Go Video DVD Remote) I found in the trash at work.
It also works without issue.
Image

You can have multiple remotes configured to use XBMC. All the remotes in your house can be configured and used at ANY time or at the same time.
Just add them to lircd.conf and Lirc.xml like you did above. No need to modify remote.xml.

Both these remotes now work with this fresh "out of the box" install of xbmc.
Reply
#33
Very nice! Thanks for the comprehensive writeup.
Reply
#34
One other thing I forgot to mention.

Sometimes with multidevice remotes the media keys only work when a media device is selected.

For example
The play and pause and stop buttons will only work if SAT or DVD is selected.
So if your buttons dont send a signal for irrecord, select a media device button (SAT, DVD) on the remote before trying to record the codes.
Reply
#35
Thank you very much FishOil for the comprehensive writeup! I will study this in depth as soon as I can, and then try if I can be successful with my IR remote.

Cheers David.P
Reply
#36
@FishOil -- and/or anyone who has already tried the tutorial:

If I was going to do this in OpenElec: would it be it possible to briefly sketch what steps would be different on OpenElec, as compared to the XBMCbuntu method?

I am prepared to connect to the OpenElec machine using Putty, in order to use the Linux command line. Also, I'm able to remotely edit my OpenElec system configuration files like Lircmap.xml, Keyboard.xml etc.

Thanks so much already Blush

Cheers David.P
Reply
#37
(2013-01-16, 03:50)FishOil Wrote: The media remote works with my Xbox-360 Universal remote files.

A few things I dont like about the media remote.
1. No Stop button (I modded the config to use the record button as stop)
2. No Eject Button
3. No Backlight
4. Feels kinda small

Picture of the Xbox-360 Media Remote

Can I ask how you re-configured the record button to act as stop? I've been fiddling around trying to get this to work with no success so far.

Any help you can offer would be appreciated.
Reply
#38
(2013-10-13, 10:34)Popavich Wrote:
(2013-01-16, 03:50)FishOil Wrote: The media remote works with my Xbox-360 Universal remote files.

A few things I dont like about the media remote.
1. No Stop button (I modded the config to use the record button as stop)
2. No Eject Button
3. No Backlight
4. Feels kinda small

Picture of the Xbox-360 Media Remote

Can I ask how you re-configured the record button to act as stop? I've been fiddling around trying to get this to work with no success so far.

Any help you can offer would be appreciated.

Did you use the script in this post?
Assuming you have a correct Lircd.conf correctly setup in /etc/lirc for this remote and the record button has a code and Lircmap.xml is correct.

Change remote.xml to <record>Stop</record> in the global section
Reply
#39
Hello FishOil and thanks for dropping by again.

Did you see my above message about trying your tutorial in Openelec?

I'd be more than happy about any direction you might be able to give me regarding this. Blush

Best regards
David.P
Reply
#40
Should work over an SSH session no problem, although you will obviously have no GUI editor, so you will have to use nano or the openelec equivalent. To get to a root editor preface the command with sudo eg sudo nano to open the nano text editor with root privileges.
Reply
#41
Thanks - although that sounds somewhat deterring for me, being spoiled by decades of pointing and clicking :o
Reply
#42
Ha, yeah I can see why it might, but honestly it'll be a breeze. Think you will need two ssh sessions if you want to keep the list of button names open while you record your remote. Other than that, at the bit where the guide says to type gksudo pcmanfm, and copy/paste into lircd.conf, replace those instructions with sudo cp <name of the file you recorded> /etc/lirc/lircd.conf. This will copy the file you just recorded into the correct directory with the correct name. sudo stands for SuperUser DO and elevates the command to the root account (think windows administrator). Without it the copy command will fail because the lircd.conf file belongs to the root user and therefore only the root user can overwrite it.

When you elevate to the root account with sudo, it will ask you for a password. This is your current user (xbmc on an XBMCbuntu install) password, which again would be xbmc.

So, if you record a file with the command sudo irrecord -d /dev/lirc0 /home/your-xbmc-user-name/myremote.txt then the command to copy it to the correct place would be sudo cp /home/your-xbmc-user-name/myremote.txt /etc/lirc/lircd.conf

Easy !!

------------------------------------------------------------------------------------

Edited to add !!

I cut my programming teeth on Z80 assembly and DOS. I moved to Windows pretty much as soon as it was usable and stuck with it for far too long really. I forgot about DOS and the power of batch files and really only switched to Linux because of XBMCbuntu and an old HTPC I had that never ran a windows xp based media centre as I wanted it to. Now it runs XBMCbuntu with Frodo 12.2, and my main desktop runs Ubuntu 13.04 on my monitor and XBMC 24/7 in a seperate X window on my plasma in full HD. Linux can be a steep learning curve I grant you but I think the rewards far outweigh the penalties. Plus, my brain has had to start working again (mainly due to breaking Ubuntu on a regular basis). GUI is great but any admin I need to do on the box upstairs is done over SSH.

If I can do it, anyone can !! Nod
Reply
#43
(2013-10-16, 22:22)David.P Wrote: Thanks - although that sounds somewhat deterring for me, being spoiled by decades of pointing and clicking :o

You can run GUI programs over ssh with the -X switch. But you may have to install the gui programs in question (pcmanfm,lxterminal,mousepad) on openelec.

If you are on windows I cant even offer a hint of what to do. I simply dont do windows.

The only way to find out if it works is to try it. Smile
Reply
#44
@black_eagle: GREAT instructions, tips and explanations about those seemingly obvious things (that used to put me off, like "sudo" etc.). Thanks!

Now I think that I should be able to do it.

Thanks very much also to FishOil!

Regards David.P
Reply
#45
@black_eagle: please bear with an additional request, or idea of mine Blush

Do you think it would be possible to take steps 7 through 26 of FishOil's great tutorial, and just add a short note whether the step should be the same, or different, or not needed (etc.) in Openelec?

Like so:

8: skip
9: use SSH (Putty) instead
10: type "sudo fiddle tinker" instead into your SSH box Rolleyes
11: ....

Do you think that would be possible?

Thanks very much already,
Best Regards
David.P
Reply
  • 1
  • 2
  • 3(current)
  • 4
  • 5
  • 8

Logout Mark Read Team Forum Stats Members Help
XBOX 360 Media Remote on XBMCbuntu3