2018-07-10, 19:41
Using madMeasureHDR to Create Dynamic HDR10 Metadata
madMeasureHDR is located in the madVR installation folder. This command-based utility is available to pre-parse HDR videos to create frame-based HDR10 metadata that is stored in a .measurements file. These metadata files are used to replace madVR's live dynamic measurements, and should provide fewer jumps in brightness and a reduced potential for flickering artifacts by providing madVR with all frame measurements ahead of time to predict scene and chapter changes before they happen. The pre-scraped metadata also provides a small uptick in accuracy compared to the brightness histogram used by the live tone mapping algorithm.
The script decodes, measures and records the brightness of each video frame to create metadata that can be read by madVR when tone map HDR using pixel shaders is selected. The real-time histogram is replaced by the frame-by-frame, hard-coded metadata. The use of scene-based metadata is similar in concept to how Dolby Vision and HDR10+ content is mastered with the intent to make tone mapping more precise by flagging the brightness of each scene or even individual frames to allow displays to optimize its tone mapping for each individual scene in the video.
Requirements:
*An external installation of LAV Filters is required. Internal copies of LAV Filters installed with various media players do not count as valid installations.
Note: The GPU that is measuring the video file requires a built-in 10-bit HEVC decoder to measure the file in a reasonable amount of time.
How to Use madMeasureHDR
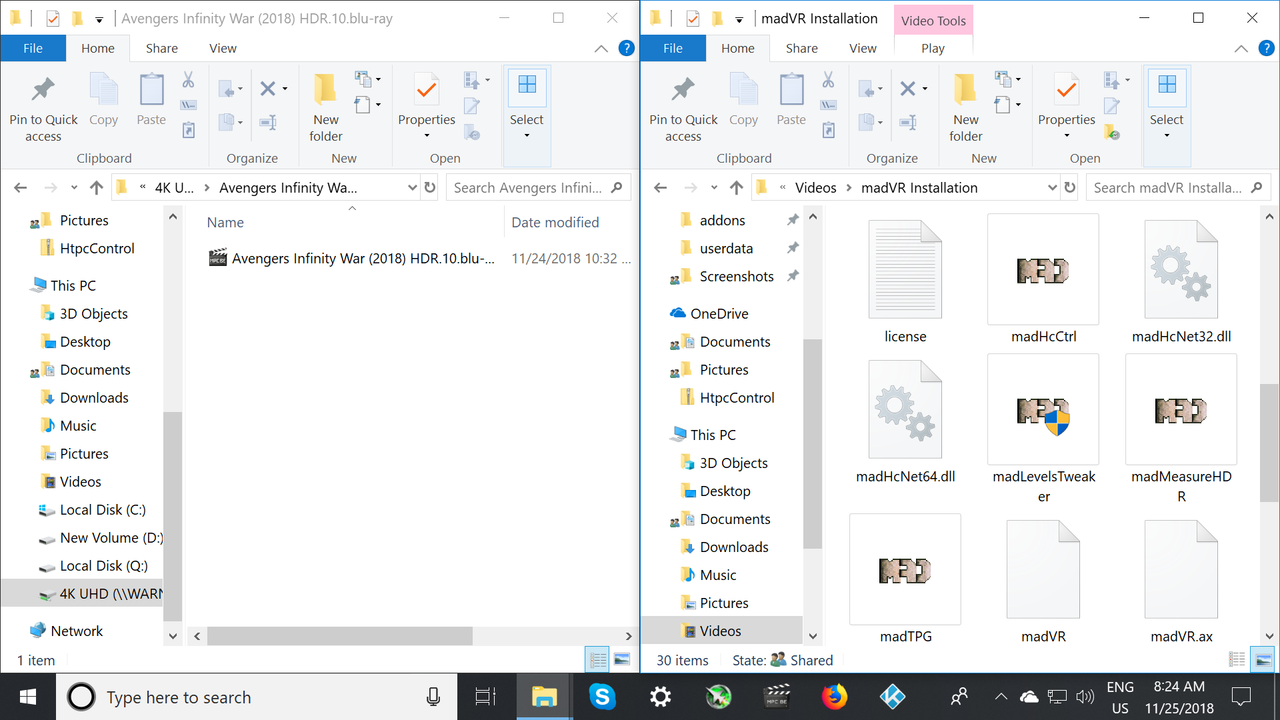
Open the local or network media folder containing your HDR videos in File Explorer and drag it to the left of the screen until it snaps to the edge.
Open the madVR installation folder and drag it to the right of the screen until it snaps to the edge.
Drag and drop an HDR video onto madMeasureHDR to initialize the script.
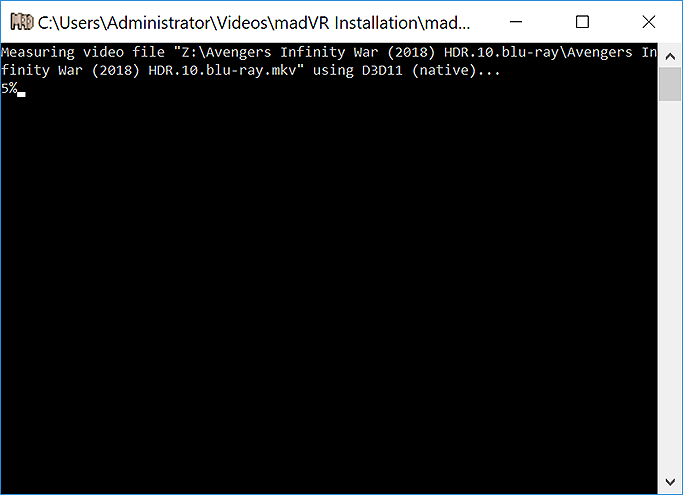
A Command Prompt window should pop-up indicating the file is being measured with its progress displayed as a percentage.
When finished, a file will be created with the extension .mkv.measurements.
The program can sometimes hang on the first attempt. You will know this is the case if the percentage progress fails to appear.
Note: Support for measurement files is currently limited to single digital files. The only way to create measurement files for ISOs or BDMV folders is to first play the file from start to finish.
3ll3d00d's Third-Party Tool for Measuring ISOs and BDMV Folders
configuration -> files & folders -> central measurement file folder
Specifies where the measurements file are stored. Leaving the file location blank will place the files in the media folder next to each video. madVR requires Write access to the folder to create the file.
To confirm the measurements file is valid, play the video with any media player. A valid measurements file will indicate the frame and scene brightness (the target of the tone mapping curve), the measured peak of the video, average of all pixels in the frame and the MaxFALL. The peak measurement replaces MaxCLL for any profile rules referencing hdrVideoPeak.
The source peak measured by madVR may contradict the source MaxCLL. This is not a typo; the MaxCLL of HDR10 movies is not accurate in many cases. I have confirmed this myself by importing HDR10 videos into Davinci Resolve and comparing the metadata generated by madVR with HDR waveforms in Resolve that show the actual mastered peak brightness of each movie frame. Frame target peaks generated by madVR are almost to the pixel of the actual HDR brightness histograms generated by Davinci Resolve. Therefore, the MaxCLL calculated by madMeasureHDR incorporates encoded pixels that may not be included in the source MaxCLL or mastering display peak luminance, but are in fact encoded in the source.
Altered Metadata Shows the Scene and Source Peaks:
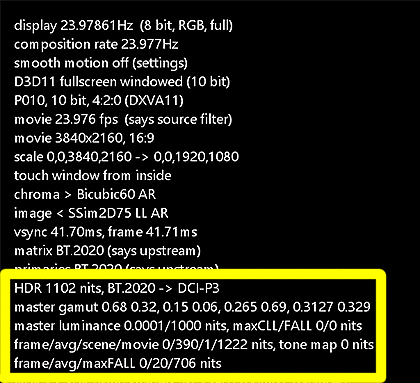
Note: Some of the above metadata is only available if a blank folder named ShowHdrMode is placed in the madVR installation folder.
The tool is considerably faster when LAV Video is set to decode with D3D11 Automatic (Native). The measurement process should take less than half of the movie runtime (sometimes it is considerably faster).
Running from the Command Prompt: If the above method is not working and flashing an error, a proper error message can be displayed by running madMeasureHDR from the Command Prompt.
C:\madVR>madMeasureHDR.exe \\NAS\4K UHD\Video Name (2018)\Video Name (2018).mkv
Format: file path to madMeasureHDR + file path to media file
How to Run a Program on Command Prompt on Windows
Incomplete Files: Files are labelled incomplete if the measurement tool is unable to correctly read the timestamp. The most likely cause for this error is a poor rip. To correct a corrupt rip, try re-ripping the file or using another source of disc ripping software.
Creating Measurement Files with File Playback
Simply playing a video from start to finish will also create a .measurements file. Completed measurement files are not overwritten on subsequent playback.
Using HTPCControl to Measure an Entire Media Folder
It is possible to measure all HDR videos in one folder in succession with batch processing. Obviously, this can take some time depending on the amount of videos in the folder. BerndFfm at AVSForum was kind enough to create a control panel interface to simplify and automate the process.
During the scan, videos with existing measurements files are skipped and the utility can be run any time you update your media folders. Network shares can be scanned if they are first assigned a drive letter in Windows.
Download HTPCControl for madMeasureHDR
Source
Extract the contents of HtpcControl.zip to any folder and run HtpcControl.exe.
Settings:
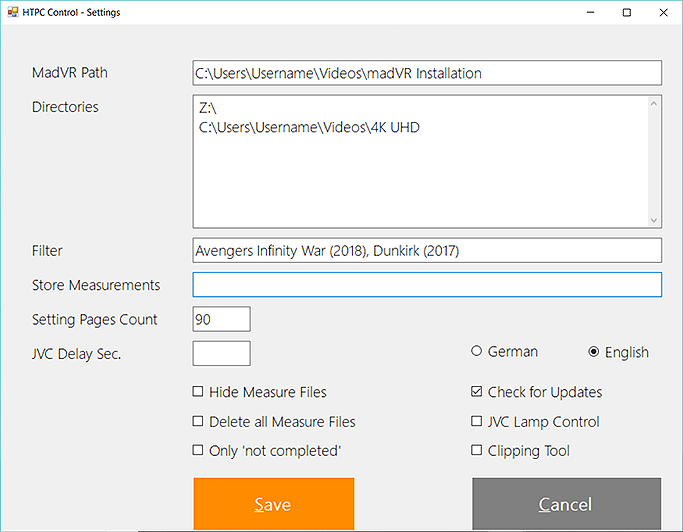
Set the language to English.
MadVR Path: Windows file path to the madVR installation folder containing madMeasureHDR.
Directories: Drive letters and media folders to be scanned including subdirectories. Network sources must first be assigned a drive letter in Windows.
How to Map a Network Drive in Windows 10
*Mapping a network drive will not upset existing SMB sharing with library managers such as JRiver Media Center and Kodi. The mapped drive can be removed at any time with the Disconnect command.
Note: For best results, eliminate any subdirectories by setting the destination network folder as the drive letter (e.g. Set the 4K Movies folder as drive Z:\).
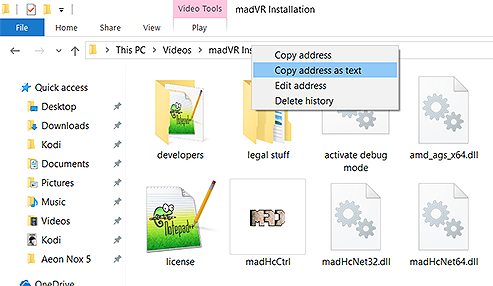
Shortcut in Windows to Copy and Paste File Paths:
Right-click on the file path in File Explorer and select Copy address as text:
Filter: Only measure the videos set by the filter. Titles must match the filename and should be separated by a comma.
Store Measurements: Determines the directory where the measurement files are stored. Must match the same directory in madVR for the tool to find any existing measurement files.
Settings Pages Count: Applicable when Save MadVR Set. is used to take print screens of the madVR control panel as a back-up or to share with others. Set the total number of screenshots captured by the tool. Avoids creating dozens of print screens of the keyboard shortcuts menu. For most users, this should be set anywhere from 80-120.
JVC Delay Sec: This option works in conjunction with the option JVC Control. A network connection to a JVC projector can be used automatically toggle various functions such as activating a lens memory number, selecting picture settings profiles and changing the lamp mode (selecting high or low lamp). Sets the amount of delay in seconds between each sent command.
Hide Measure Files: Windows will tag the .measurements files as hidden with this checked.
Delete all Measure Files: Deletes all existing .measurements files and replaces them with new ones when the script is run.
Only 'not completed': Only replace measurement files labelled as incomplete by madVR.
Check for Updates: When the tool is started, the most recent versions of madVR, HTPC Control, LAV Filters and MakeMKV are downloaded into the HTPC Control and madVR installation folders (or appdata folder when Write access is denied). To complete the update of madVR, manually extract the zip file. Test builds of madVR are included in the search.
JVC Lamp Control: Check to enable automatic lamp control selection (high or low) of a network-connected JVC projector. Works with JVC Control.
Clipping Tool: Automatically calls up Sounight's MadmeasureHDR Dynamic Optimizer tool (as detailed below) after files are measured. The MadmeasureHDR Dynamic Optimizer tool must be located in the madVR or HTPC Control installation folders with all parameters set in the tool before the measurement process begins.
Run: Save your settings and select HDR Measurement to run the script.
If the file paths are configured correctly, the tool will start measuring all HDR videos in succession:
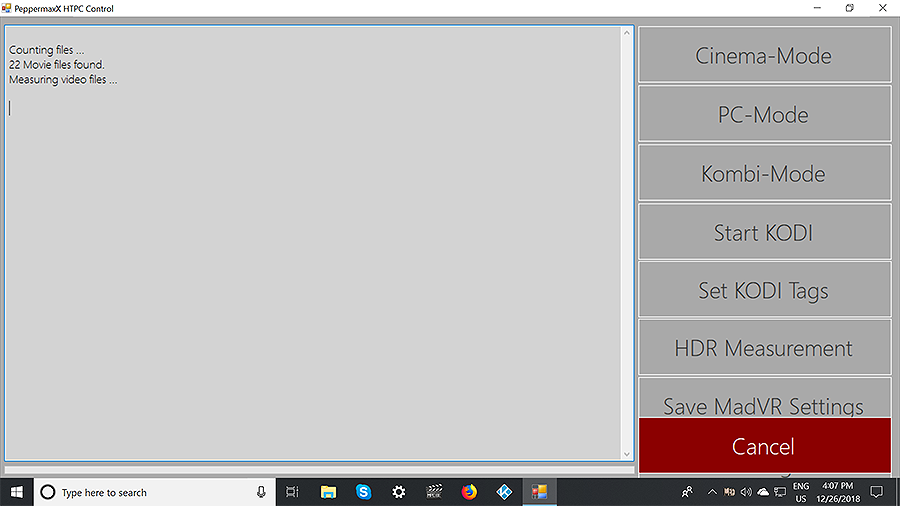
When finished each file, a message with a summary of the measurement statistics is shown.
Cancel: Selecting Cancel stops the process. Running HDR Measurement again resumes where it left off.
Batch File Method
If you don't want to use the above tool, the same automatic processing can be achieved with a batch file. The batch file will also skip any videos with existing measurements files and can be run at any time. Network sources must also first be assigned a drive letter in Windows. The batch file method has the advantage of retaining the percentage progress for the file being measured.
madMeasureHDR Batch File (Thanks to Manni)
Source
Values to Change:
echo off
set pathToMadMeasure="C:\Program Files\madVR\madMeasureHDR.exe"
Windows file path to madMeasureHDR in the madVR installation folder.
Set folder paths for measuring specific file formats:
REM Mkv Test Videos
set pathToVideos="L:\4K Test Files\HDR"
File path to the media folder containing MKV files: "Z:\Media Folder Name\Subdirectory Name"
REM Mp4 Test Videos
set pathToVideos="L:\4K Test Files\HDR"
File path to the media folder containing MP4 files: "Z:\Media Folder Name\Subdirectory Name"
REM Ts Test Videos
set pathToVideos="L:\4K Test Files\HDR"
File path to the media folder containing TS files: "Z:\Media Folder Name\Subdirectory Name"
Set folder path for measuring a priority folder for test purposes:
REM 4K Movies in @MadMeasureHDR folder for priority measurements to be done before the main folder
set pathToVideos="U:\@MadMeasureHDR"
File path to the media folder containing priority files: "Z:\Media Folder Name\Subdirectory Name"
Set folder path for measuring all file types in a single folder:
REM 4K Movies
set pathToVideos="P:\"
File path to the media folder containing all HDR files: "Z:\Media Folder Name\Subdirectory Name"
DELETE the following code from any folder path in the batch file if you choose not to download the assisting program Wintee (the utility mentioned in the batch file):
Remove from Block: | wtee "%%f.txt"
How to Run the Batch File:
The terminal window should open and the batch file will begin its processing. You can stop the process with Ctrl + C. The next time the batch file is run, it will resume where it left off. If this fails, an error message can be shown by running the batch file from Command Prompt.
How to Run a Batch File from the Command Line on Windows
Save MadVR Set.
This feature is handy for those who wish to make a visual back-up of their madVR settings or share them with others.
Instructions:
The tool will take screenshots of every subsection of the control panel:
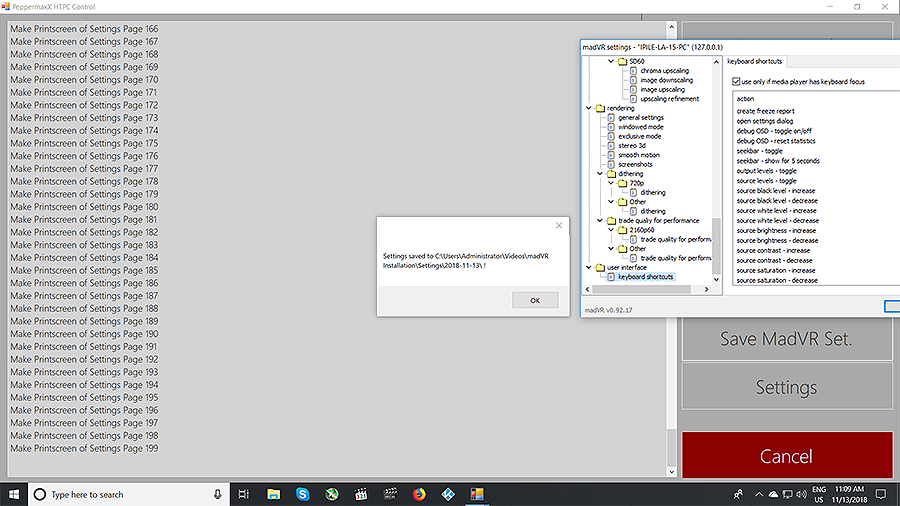
The print screens will be saved in a separate folder in the madVR installation folder. Running the tool additional times creates new folders. You may want to run the tool a second time to enter the exact number of print screens required based on the output from the first run.
Additional Tools
pandm1967's Simple Tool:
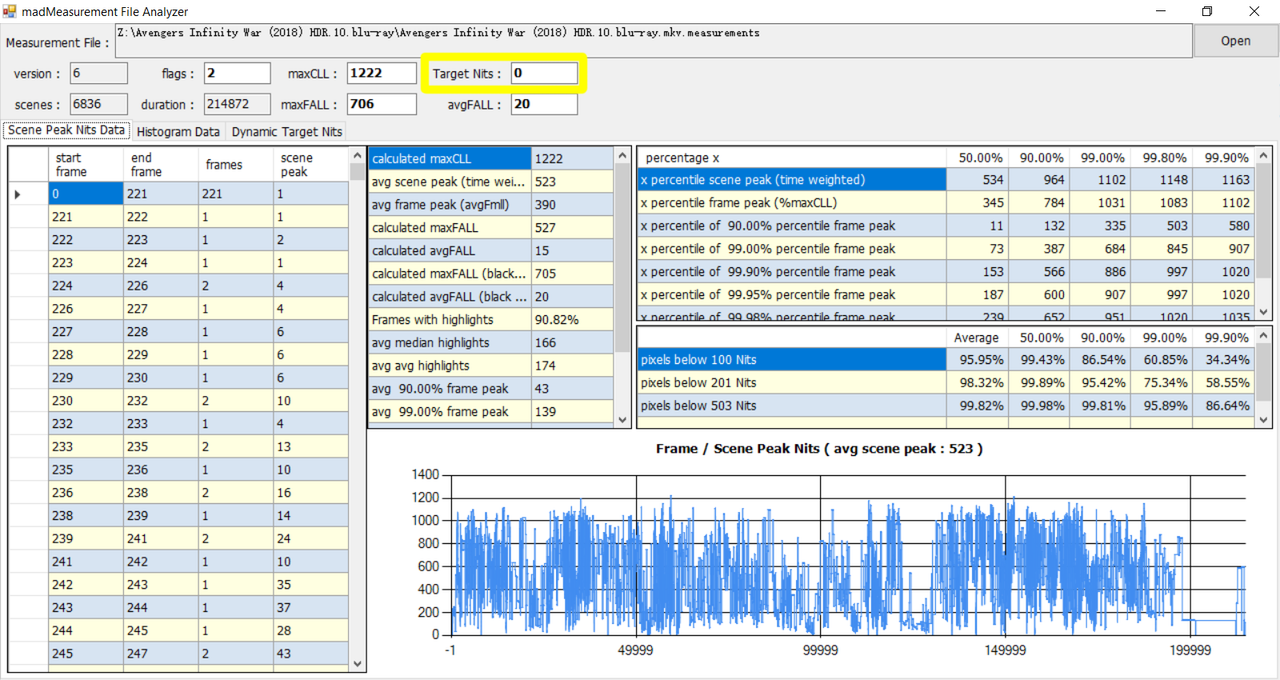
pandm1967’s simple tool organizes the measurement data into a summary and detailed analysis of the peak measurements including the full brightness histogram for each measured frame.
Simple Tool: madMeasurementAnalyzer.zip (Thanks to pandm1967)
Target Nits
Enter a custom display target nits for the movie. When a value is entered, the field will turn yellow and an option to Save will appear. The display target nits value becomes hard-coded into the measurement file and any real display peak nits entered in madVR is ignored. HDR profile rules referencing a specific display target nits are also ignored in favor of the value in the measurement file. Set this value to 0 to return it to its default.
pandm1967 includes a second simple utility to batch measure HDR videos with madMeasureHDR. Enter the madVR path, UHD Driver (the folder to be measured) and Run Measure to start the measurement tool. Make Hard Link is for BDMV folders. This allows Blu-ray folders to be measured by creating a hard-coded file path to the measurement file that can be read by a variety of media players supporting madVR.
Soulnight’s MadmeasureHDR Dynamic Optimizer Tool:
Soulnight’s tool is a little more complex. It can do the following:
Dynamic Clipping and Dynamic Target Nits Tool: MadmeasureHDRDynamicOptimizer.zip (Thanks to Soulnight)
Instructions:
Auto Start: Checking this will automatically apply all previously entered values to the last used file path or file location when the app is started.
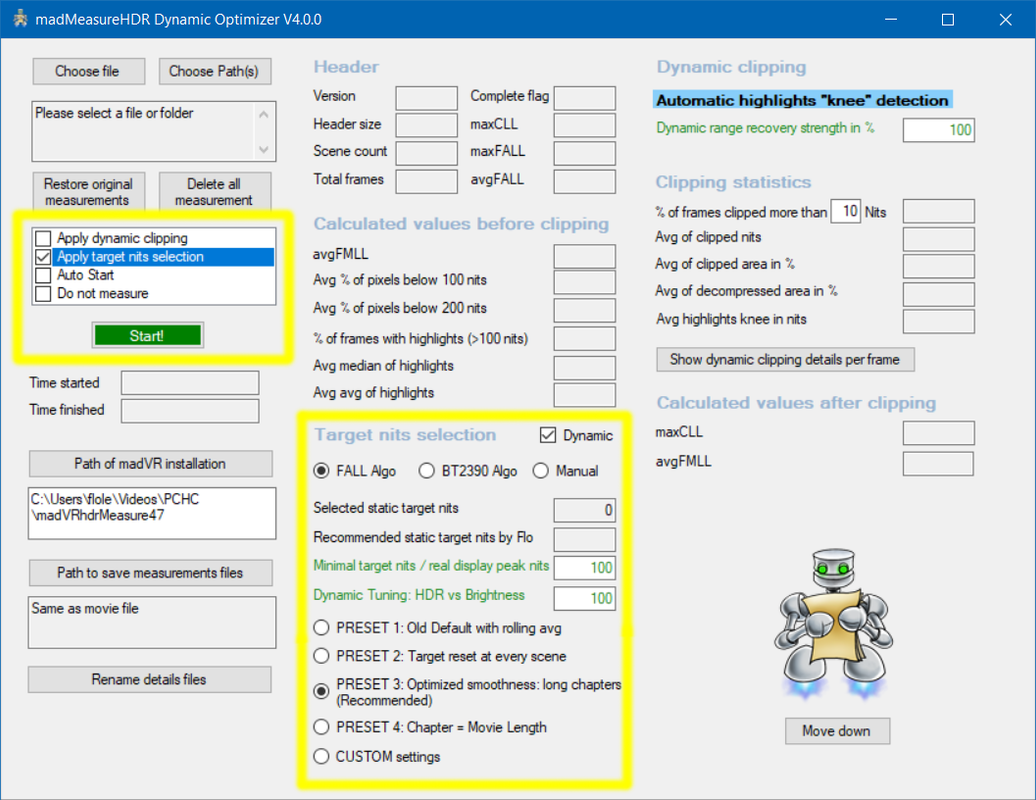
If applying dynamic clipping, you can control the strength of Soulnight’s highlight clipping formula to reduce the amount of highlight clipping permitted: Dynamic range recovery strength in % (from 100% [default] down to 0% [none]). The Clipping statistics will show the impact this has on the measurement data after the clipping formula is applied. Dynamic clipping uses calculations that take black bars encoded in the video into account. Sources re-encoded without black bars should uncheck the dynamic clipping option because it can lead to inaccurate clipping of bright highlights and blown out highlight detail.
Target nits selection:
Instructions for Dynamic target nits:
The Dynamic checkbox results in a display target nits being calculated for every frame in the movie, which calculates an ideal display target nits for each movie scene for dynamic per scene tone mapping:
Dynamic Target nits Presets:
Custom PRESET settings:
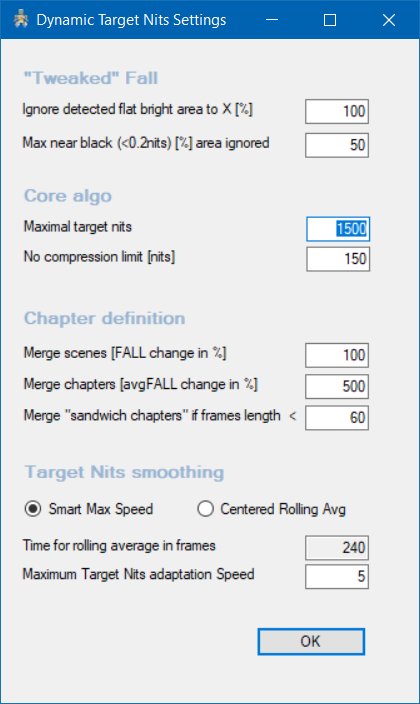
"Tweaked" Fall:
Core algo:
Chapter definition:
Target Nits smoothing:
Note: After each upgrade of this tool, you should first run Restore original measurements before applying any new changes as new tool parameters can interfere with files created with previous versions.
Select Start!. If a measurement file exists, the tool will populate all of the desired fields with the selected options for the active file or the entire file folder path. If a measurement file does not exist, madMeaureHDR is started and each file is measured with selected adjustments applied to the data.
To analyze the results of the Dynamic selection, use pandm1967's tool and select the Dynamic Target Nits tab. The automated dynamic display target nits will be plotted against the movie runtime:
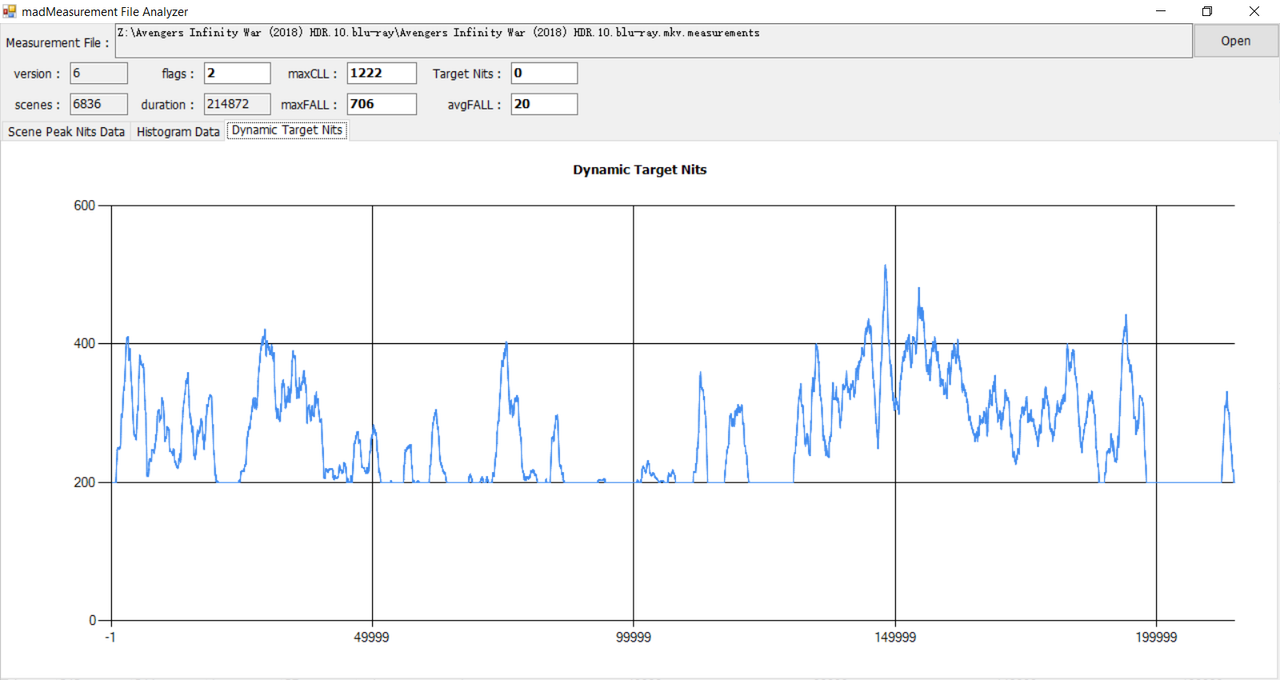
Note: The tool will preserve the original measurement file by placing it in a separate folder named Original. So it is possible to revert to the original measurement file calculated by madVR if you are unhappy with the results provided by Soulnight’s tool.
The same measurement file can be replaced infinite times with new values. The original values are restored and then replaced with the values provided by the tool.
madMeasureHDR is located in the madVR installation folder. This command-based utility is available to pre-parse HDR videos to create frame-based HDR10 metadata that is stored in a .measurements file. These metadata files are used to replace madVR's live dynamic measurements, and should provide fewer jumps in brightness and a reduced potential for flickering artifacts by providing madVR with all frame measurements ahead of time to predict scene and chapter changes before they happen. The pre-scraped metadata also provides a small uptick in accuracy compared to the brightness histogram used by the live tone mapping algorithm.
The script decodes, measures and records the brightness of each video frame to create metadata that can be read by madVR when tone map HDR using pixel shaders is selected. The real-time histogram is replaced by the frame-by-frame, hard-coded metadata. The use of scene-based metadata is similar in concept to how Dolby Vision and HDR10+ content is mastered with the intent to make tone mapping more precise by flagging the brightness of each scene or even individual frames to allow displays to optimize its tone mapping for each individual scene in the video.
Requirements:
- madVR v0.92.18+
- 32-bit LAV Splitter Source + LAV Video Decoder (32-bit/64-bit installer here)
*An external installation of LAV Filters is required. Internal copies of LAV Filters installed with various media players do not count as valid installations.
Note: The GPU that is measuring the video file requires a built-in 10-bit HEVC decoder to measure the file in a reasonable amount of time.
How to Use madMeasureHDR
Open the local or network media folder containing your HDR videos in File Explorer and drag it to the left of the screen until it snaps to the edge.
Open the madVR installation folder and drag it to the right of the screen until it snaps to the edge.
Drag and drop an HDR video onto madMeasureHDR to initialize the script.

A Command Prompt window should pop-up indicating the file is being measured with its progress displayed as a percentage.

When finished, a file will be created with the extension .mkv.measurements.
The program can sometimes hang on the first attempt. You will know this is the case if the percentage progress fails to appear.
Note: Support for measurement files is currently limited to single digital files. The only way to create measurement files for ISOs or BDMV folders is to first play the file from start to finish.
3ll3d00d's Third-Party Tool for Measuring ISOs and BDMV Folders
configuration -> files & folders -> central measurement file folder
Specifies where the measurements file are stored. Leaving the file location blank will place the files in the media folder next to each video. madVR requires Write access to the folder to create the file.
To confirm the measurements file is valid, play the video with any media player. A valid measurements file will indicate the frame and scene brightness (the target of the tone mapping curve), the measured peak of the video, average of all pixels in the frame and the MaxFALL. The peak measurement replaces MaxCLL for any profile rules referencing hdrVideoPeak.
The source peak measured by madVR may contradict the source MaxCLL. This is not a typo; the MaxCLL of HDR10 movies is not accurate in many cases. I have confirmed this myself by importing HDR10 videos into Davinci Resolve and comparing the metadata generated by madVR with HDR waveforms in Resolve that show the actual mastered peak brightness of each movie frame. Frame target peaks generated by madVR are almost to the pixel of the actual HDR brightness histograms generated by Davinci Resolve. Therefore, the MaxCLL calculated by madMeasureHDR incorporates encoded pixels that may not be included in the source MaxCLL or mastering display peak luminance, but are in fact encoded in the source.
Altered Metadata Shows the Scene and Source Peaks:

Note: Some of the above metadata is only available if a blank folder named ShowHdrMode is placed in the madVR installation folder.
The tool is considerably faster when LAV Video is set to decode with D3D11 Automatic (Native). The measurement process should take less than half of the movie runtime (sometimes it is considerably faster).
Running from the Command Prompt: If the above method is not working and flashing an error, a proper error message can be displayed by running madMeasureHDR from the Command Prompt.
C:\madVR>madMeasureHDR.exe \\NAS\4K UHD\Video Name (2018)\Video Name (2018).mkv
Format: file path to madMeasureHDR + file path to media file
How to Run a Program on Command Prompt on Windows
Incomplete Files: Files are labelled incomplete if the measurement tool is unable to correctly read the timestamp. The most likely cause for this error is a poor rip. To correct a corrupt rip, try re-ripping the file or using another source of disc ripping software.
Creating Measurement Files with File Playback
Simply playing a video from start to finish will also create a .measurements file. Completed measurement files are not overwritten on subsequent playback.
Using HTPCControl to Measure an Entire Media Folder
It is possible to measure all HDR videos in one folder in succession with batch processing. Obviously, this can take some time depending on the amount of videos in the folder. BerndFfm at AVSForum was kind enough to create a control panel interface to simplify and automate the process.
During the scan, videos with existing measurements files are skipped and the utility can be run any time you update your media folders. Network shares can be scanned if they are first assigned a drive letter in Windows.
Download HTPCControl for madMeasureHDR
Source
Extract the contents of HtpcControl.zip to any folder and run HtpcControl.exe.
Settings:

Set the language to English.
MadVR Path: Windows file path to the madVR installation folder containing madMeasureHDR.
Directories: Drive letters and media folders to be scanned including subdirectories. Network sources must first be assigned a drive letter in Windows.
How to Map a Network Drive in Windows 10
*Mapping a network drive will not upset existing SMB sharing with library managers such as JRiver Media Center and Kodi. The mapped drive can be removed at any time with the Disconnect command.
Note: For best results, eliminate any subdirectories by setting the destination network folder as the drive letter (e.g. Set the 4K Movies folder as drive Z:\).
Shortcut in Windows to Copy and Paste File Paths:
Right-click on the file path in File Explorer and select Copy address as text:

Filter: Only measure the videos set by the filter. Titles must match the filename and should be separated by a comma.
Store Measurements: Determines the directory where the measurement files are stored. Must match the same directory in madVR for the tool to find any existing measurement files.
Settings Pages Count: Applicable when Save MadVR Set. is used to take print screens of the madVR control panel as a back-up or to share with others. Set the total number of screenshots captured by the tool. Avoids creating dozens of print screens of the keyboard shortcuts menu. For most users, this should be set anywhere from 80-120.
JVC Delay Sec: This option works in conjunction with the option JVC Control. A network connection to a JVC projector can be used automatically toggle various functions such as activating a lens memory number, selecting picture settings profiles and changing the lamp mode (selecting high or low lamp). Sets the amount of delay in seconds between each sent command.
Hide Measure Files: Windows will tag the .measurements files as hidden with this checked.
Delete all Measure Files: Deletes all existing .measurements files and replaces them with new ones when the script is run.
Only 'not completed': Only replace measurement files labelled as incomplete by madVR.
Check for Updates: When the tool is started, the most recent versions of madVR, HTPC Control, LAV Filters and MakeMKV are downloaded into the HTPC Control and madVR installation folders (or appdata folder when Write access is denied). To complete the update of madVR, manually extract the zip file. Test builds of madVR are included in the search.
JVC Lamp Control: Check to enable automatic lamp control selection (high or low) of a network-connected JVC projector. Works with JVC Control.
Clipping Tool: Automatically calls up Sounight's MadmeasureHDR Dynamic Optimizer tool (as detailed below) after files are measured. The MadmeasureHDR Dynamic Optimizer tool must be located in the madVR or HTPC Control installation folders with all parameters set in the tool before the measurement process begins.
Run: Save your settings and select HDR Measurement to run the script.
If the file paths are configured correctly, the tool will start measuring all HDR videos in succession:

When finished each file, a message with a summary of the measurement statistics is shown.
Cancel: Selecting Cancel stops the process. Running HDR Measurement again resumes where it left off.
Batch File Method
If you don't want to use the above tool, the same automatic processing can be achieved with a batch file. The batch file will also skip any videos with existing measurements files and can be run at any time. Network sources must also first be assigned a drive letter in Windows. The batch file method has the advantage of retaining the percentage progress for the file being measured.
madMeasureHDR Batch File (Thanks to Manni)
Source
Values to Change:
echo off
set pathToMadMeasure="C:\Program Files\madVR\madMeasureHDR.exe"
Windows file path to madMeasureHDR in the madVR installation folder.
Set folder paths for measuring specific file formats:
REM Mkv Test Videos
set pathToVideos="L:\4K Test Files\HDR"
File path to the media folder containing MKV files: "Z:\Media Folder Name\Subdirectory Name"
REM Mp4 Test Videos
set pathToVideos="L:\4K Test Files\HDR"
File path to the media folder containing MP4 files: "Z:\Media Folder Name\Subdirectory Name"
REM Ts Test Videos
set pathToVideos="L:\4K Test Files\HDR"
File path to the media folder containing TS files: "Z:\Media Folder Name\Subdirectory Name"
Set folder path for measuring a priority folder for test purposes:
REM 4K Movies in @MadMeasureHDR folder for priority measurements to be done before the main folder
set pathToVideos="U:\@MadMeasureHDR"
File path to the media folder containing priority files: "Z:\Media Folder Name\Subdirectory Name"
Set folder path for measuring all file types in a single folder:
REM 4K Movies
set pathToVideos="P:\"
File path to the media folder containing all HDR files: "Z:\Media Folder Name\Subdirectory Name"
DELETE the following code from any folder path in the batch file if you choose not to download the assisting program Wintee (the utility mentioned in the batch file):
Remove from Block: | wtee "%%f.txt"
How to Run the Batch File:
- Windows Key + R (Run)
- Click Browse...
- Navigate to the folder that contains the batch file
- Select the batch file
- Click Open
- Click OK
The terminal window should open and the batch file will begin its processing. You can stop the process with Ctrl + C. The next time the batch file is run, it will resume where it left off. If this fails, an error message can be shown by running the batch file from Command Prompt.
How to Run a Batch File from the Command Line on Windows
Save MadVR Set.
This feature is handy for those who wish to make a visual back-up of their madVR settings or share them with others.
Instructions:
- Open the madVR control panel;
- Click on the first line of the active device in the control panel: properties;
- Open HTPC Control and select Save MadVR Set.
- Enter the maximum number of print screens to exclude any duplicate screens of the keyboard shortcuts menu (80-120 is recommended);
- Place the madVR control panel against a white background such as Notepad set to a fullscreen;
- Bring up the HTPC Control pop-up and select Start.
The tool will take screenshots of every subsection of the control panel:

The print screens will be saved in a separate folder in the madVR installation folder. Running the tool additional times creates new folders. You may want to run the tool a second time to enter the exact number of print screens required based on the output from the first run.
Additional Tools
pandm1967's Simple Tool:
pandm1967’s simple tool organizes the measurement data into a summary and detailed analysis of the peak measurements including the full brightness histogram for each measured frame.
Simple Tool: madMeasurementAnalyzer.zip (Thanks to pandm1967)
Target Nits
Enter a custom display target nits for the movie. When a value is entered, the field will turn yellow and an option to Save will appear. The display target nits value becomes hard-coded into the measurement file and any real display peak nits entered in madVR is ignored. HDR profile rules referencing a specific display target nits are also ignored in favor of the value in the measurement file. Set this value to 0 to return it to its default.

pandm1967 includes a second simple utility to batch measure HDR videos with madMeasureHDR. Enter the madVR path, UHD Driver (the folder to be measured) and Run Measure to start the measurement tool. Make Hard Link is for BDMV folders. This allows Blu-ray folders to be measured by creating a hard-coded file path to the measurement file that can be read by a variety of media players supporting madVR.
Soulnight’s MadmeasureHDR Dynamic Optimizer Tool:
Soulnight’s tool is a little more complex. It can do the following:
- Override the measurement data with a formula that clips a small percentage of specular highlight detail to make the image a little brighter without completely destroying or clipping the specular highlights;
- Populate all measurement files with custom display target nits values as provided by a user-defined formula with the optional ability to dynamically adjust the display target nits for each detected movie scene as the video plays.
Dynamic Clipping and Dynamic Target Nits Tool: MadmeasureHDRDynamicOptimizer.zip (Thanks to Soulnight)
Instructions:
- Disable any anti-virus scanning that may cause the program to be flagged with a false positive and subsequently crash;
- Install the utility with the included installer for faster performance or use the standalone app;
- Map any network drives in Windows;
- Open the tool and select Choose file or Choose path(s) (for multiple files in a single folder);
- Enter the Path of madVR installation and Path to save measurements files (leave blank to save measurements in same folder as movie file);
- Check or uncheck the options to Apply dynamic clipping and Apply target nits selection.
Auto Start: Checking this will automatically apply all previously entered values to the last used file path or file location when the app is started.

If applying dynamic clipping, you can control the strength of Soulnight’s highlight clipping formula to reduce the amount of highlight clipping permitted: Dynamic range recovery strength in % (from 100% [default] down to 0% [none]). The Clipping statistics will show the impact this has on the measurement data after the clipping formula is applied. Dynamic clipping uses calculations that take black bars encoded in the video into account. Sources re-encoded without black bars should uncheck the dynamic clipping option because it can lead to inaccurate clipping of bright highlights and blown out highlight detail.
Target nits selection:
- FALL Algo: Uses the Frame Average Light Level (FALL) and Dynamic Tuning value to determine the ideal display target nits that is appropriate for the average frame brightness of each scene in the movie.
- BT2390 Algo: Similar to above, but attempts to use the display target nits as the baseline to reproduce the same on-screen brightness for all scenes with any Dynamic Tuning value relative to the brightness of the end display.
- Link: Technical Explanation of FALL Algo & BT2390 Algo.
- Manual (static): Allows the entry of a desired static display target nits for the selected movie or all movies (when a path selected).
- Selected static target nits: When Manual is selected: Enter your desired static display target nits for the selected movie(s); When Dynamic is unchecked with Manual deselected: Populates the static target nits field with a value recommended by Soulnight.
- Minimal target nits / real display peak nits: The lowest allowable display target nits for the dynamic target nits. This should be set to the actual peak nits of the display to present scenes within the display limits 1:1 with the actual display peak brightness. Can also be used as the baseline offset to calculate increases to the display target nits if this value is set higher than the no compression limit [default no compression limit = 150 nits].
- Dynamic Tuning: HDR vs Brightness: (100 [default] 0 to 200%) Sets the range of values used to adjust the display target nits. The image will get progressively darker as the Dynamic Tuning value is increased. Higher Dynamic Tuning values result in higher display target nits — This adds more contrast to the image and limits clipping of specular highlight detail, but produces darker images. Lower Dynamic Tuning values result in lower display target nits — This reduces image contrast and clips more specular highlight detail, but produces brighter images.
Instructions for Dynamic target nits:
The Dynamic checkbox results in a display target nits being calculated for every frame in the movie, which calculates an ideal display target nits for each movie scene for dynamic per scene tone mapping:
- Ensure the Dynamic checkbox is checked;
- Choose FALL Algo or BT2390 Algo as the target nits algorithm;
- Enter the Minimal target nits / real display peak nits (50-150 recommended for most).
Dynamic Target nits Presets:
- PRESET 1: Uses a simple rolling average to measure the brightness of each movie segment and create blended scenes or chapters in the movie. Can lead to some brightness pumping from sudden changes to the display target nits during abrupt camera changes or scene cuts and more dynamic changes to the display target nits;
- PRESET 2: Even more straightforward than the rolling average. The display target nits is adjusted or reset with each detected scene change with no attempt to merge common scenes or chapters with similar measured brightness;
- PRESET 3: Uses the newest "Smart Speed Algo," which attempts to identify unique chapters in the movie and smoothly blends all scenes together within the chapter by limiting display target nits changes between adjacent frames to a very small perecentage. This eliminates any brightness pumping from camera changes or scene cuts caused by sudden resets to the display target nits. The Smart Speed Algo also tries to keep display target nits targets close to the calculated ideal average target nits for each chapter as well as merge adjacent scenes together that have APLs that dip above or below this ideal average. The result is a small number of very long chapters with consistently smooth blending of all scenes and chapters by only allowing for gradual and not abrupt changes to the display target nits;
- PRESET 4: The entire movie is presented as one continuous chapter with no scene or chapter blending;
- Custom settings: Opens a user-editable custom settings dialog. The default settings are pre-populated based on the last selected preset above.
Custom PRESET settings:

"Tweaked" Fall:
- Ignore detected flat bright area to X [%]: (100% [default] down to 0% [none]) Eliminates a % of small, flat and bright spots in the image that would otherwise cause large increases to the frame FALL and large increases to the dynamic display target nits. This limits the use of very high display target nits values to scenes where most of the image is near the peak white of the display and not to some scenes where only small parts of the image are very bright and the rest of the image is near black or not especially bright.
- Max near black (<0.2 nits) [%] area ignored: (50% [default] down to 0% [none]) Removes mostly black pixels from the frame FALL calculation that would lower the frame FALL to a value that is not reflective of the true average frame light level of a scene. This could lead to a washed out image if the display target nits is set too low when the rest of the image is placed well above black.
Core algo:
- Maximal target nits: (Recommended: 480 to 1500 [default]) The upper limit for the display target nits during playback. If you find the target nits values are sometimes too high, set this to a value lower than 1500 nits to limit any increases to the display target nits to this value.
- No compression limit [nits]: (Recommended: 0 to 150 [default]) Any scene within this value is not compressed by tone mapping: display target nits = scene peak nits. If this value is higher than the specified Minimal target nits / real display peak nits, the no compression limit is also used as the offset for calculating a new display target nits. So increases to the display target nits are added on top of the no compression limit for all scenes with a scene peak nits higher than the no compression limit, which has a default value of 150 scene nits.
Chapter definition:
- Merge scenes [FALL change in %]: (100% [default] up to 1,000%) Sets the strength of the scene FALL calculation used to merge two scenes with similar brightness.
- Merge chapters [avgFALL change in %]: (500% [default] up to 1,000%) Sets the strength of the avgFALL calculation used to merge two distinct chapters with similar brightness.
- Merge "sandwich chapters" if frames length <: (60 [default]) Merges scenes with few frames that fall between two larger scenes. This specifies the minimum number of frames for a scene to be considered a "sandwich chapter" that can be merged with the scenes before and after it.
Target Nits smoothing:
- Smart Max Speed: Uses the new "Smart Speed Algo." The core of the Smart Speed Algo calculates an "ideal average target nits" for each chapter in the movie (a combination of scenes that should be viewed smoothly together). When the target nits crosses this ideal average, the algo matches these crossing points frames to the ideal average target nits to smoothly merge APL changes from one scene to the next. The algo looks ahead and behind at one minute intervals within each chapter to detect scene changes and blends the previous scene crossing point with the next scene crossing point to create one long chapter. A typical chapter may be 10 minutes in length. Any change to the display target nits is controlled by the Maximum Target Nits adaptation Speed, which limits changes to the display target nits between consecutive frames to a small percentage. The consistently gradual changes to the display target nits and consistent merging of scene APL changes creates very long chapters with maximum smoothness and no awkward target nits resets at camera changes.
- Centered Rolling Average: Uses the simpler rolling average method of detecting scene changes without limiting changes to the display target nits. Allows for more dynamic adjustments to the display target nits to respond to large brightness changes, but can create brightness pumping when sudden camera or scene cuts are encountered by resetting the display target nits too quickly.
- Time for rolling average in frames: (Recommended: 240 [default] to 1440) Sets the minimum duration of frames used to detect scene changes and resets to the display target nits when using a Centered Rolling Average.
- Maximum Target Nits adaptation Speed: (5/1000 (0.5%) [default]) Sets the minimum percentage change permitted between two adjacent frames when using the Smart Max Speed Algo to reset the display target nits. The default value of 5 allows for a 0.5% maximum change to the display target nits between two consecutive frames to ensure changes in brightness are gradual. This value should be set so changes to the display target nits are invisible to the eye.
Note: After each upgrade of this tool, you should first run Restore original measurements before applying any new changes as new tool parameters can interfere with files created with previous versions.
Select Start!. If a measurement file exists, the tool will populate all of the desired fields with the selected options for the active file or the entire file folder path. If a measurement file does not exist, madMeaureHDR is started and each file is measured with selected adjustments applied to the data.
To analyze the results of the Dynamic selection, use pandm1967's tool and select the Dynamic Target Nits tab. The automated dynamic display target nits will be plotted against the movie runtime:

Note: The tool will preserve the original measurement file by placing it in a separate folder named Original. So it is possible to revert to the original measurement file calculated by madVR if you are unhappy with the results provided by Soulnight’s tool.
The same measurement file can be replaced infinite times with new values. The original values are restored and then replaced with the values provided by the tool.
