2015-05-04, 19:17
Dynamic Target Nits Explained
The dynamic target nits changes the display target nits when there is a detected scene change. This allows for very dynamic changes in contrast that are not possible when using a static display target nits. Increases to the display target nits are applied to create contrast that is necessary to preserve bright specular highlight detail in scenes with brightness peaks greater than the real display peak nits entered in madVR. When a new display target nits is applied, the new target nits aims for an on-screen brightness (Average Picture Level) that presents similar perceived brightness to the previous scene to keep average brightness consistent across all scenes.
A scene change is described on the basis of having a visible change in APL and not a distinct beginning and end. By this definition, scene changes can be frequent. For instance, a muzzle flash from a gun would not be considered a scene change, but a conversation between two people that starts in front of a bright window and moves continuously into another room would be considered a visible change in APL that could benefit from a change in display target nits. Changes to the display target nits occur often enough to keep scene and corresponding APL changes smooth and largely invisible to the viewer.
The display target nits is altered based on two variables:
Scene Peak Brightness: The brightest pixels found in each scene.
Frame FALL (Frame Average Light Level): The average frame brightness of all pixels in the first frame of the scene.
Scene Peak <= real display peak nits:
No tone mapping is required and the scene is represented 1:1 with the real display peak nits.
Scene Peak > real display peak nits
Low Frame FALL:
The moderate increase in scene contrast causes a relatively low increase to the display target nits.
Scene Peak > real display peak nits
High Frame FALL:
The large increase in scene contrast causes a relatively high increase to the display target nits.
The frame FALL describes the total average distribution of all pixels in a frame. A scene with a low frame FALL has many pixels near black and a scene with a high frame FALL has a greater distribution of pixels near white. By knowing where the brightness curve is distributed within a given scene, madVR can apply a tone curve that keeps consistent midrange brightness to prevent the gamma from ever appearing too high (a dim image with crushed shadow detail) or too low (a washed out or milky image with clipped highlight detail).
The frame FALL is a more useful value than the scene peak brightness in the predicting the average brightness of the image after tone mapping is applied, and not just the amount of specular highlight detail expected to be retained. Many of the mastered peaks in HDR content are well beyond the light output that can be reproduced by a display such as a projector, so having a consistently bright APL is often more critical for these displays than preserving every bit of specular highlight detail present in the source.
HDR to SDR Waveforms
One way to illustrate the impact lowering the average brightness of an HDR scene through tone mapping is to use a waveform graph. A waveform graph shows the distribution of luminance of all pixels in a frame by plotting the peaks and valleys in brightness present in the video.
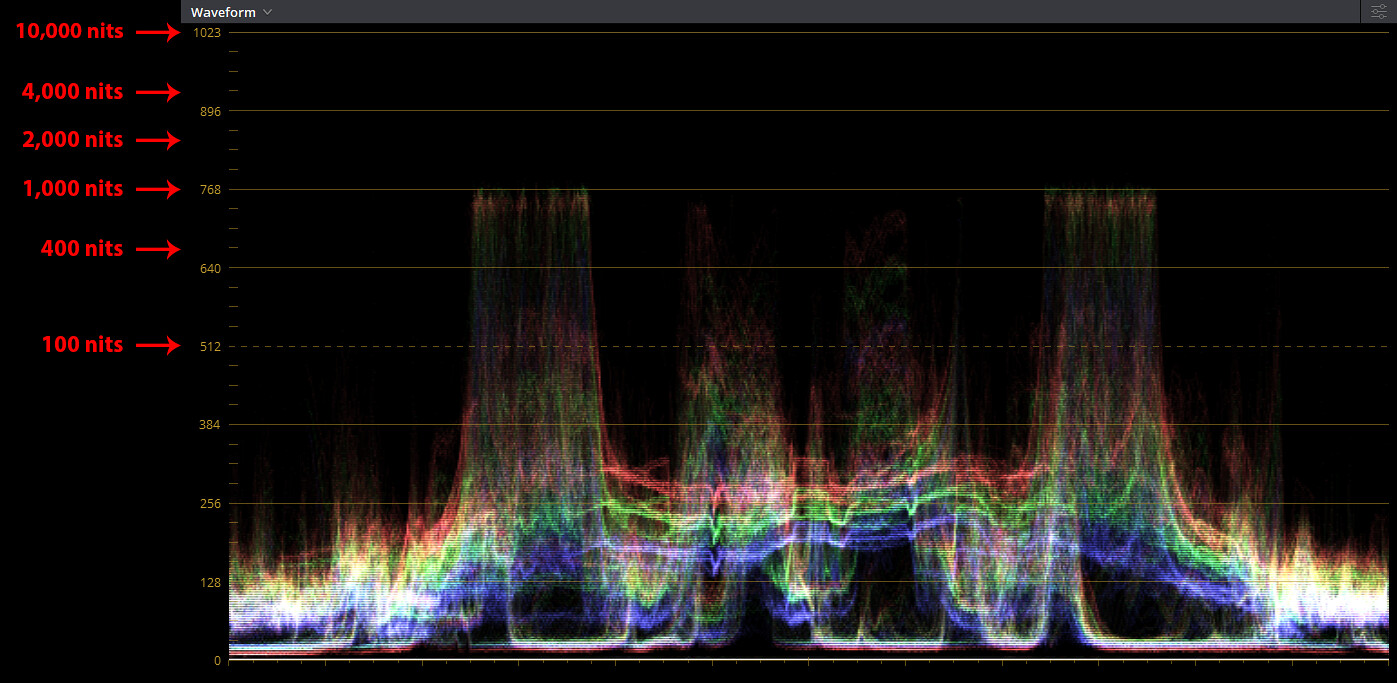
Color grading software DaVinci Resolve offers detailed waveforms through its scopes panel that show the position of each pixel in the frame in a 2D graph. These graphs separate all pixels into its individual red, green and blue color channels along with its corresponding PQ (luminance) value. A sample waveform from DaVinci Resolve is shown below with labels showing the corresponding luminance of notable 10-bit PQ values on the graph.
DaVinci Resolve Waveform Legend (10-bit PQ Values):

So what does an HDR waveform look like when applied to scenes that match the criteria already established:
Scene peaks within the real display peak nits;
Scene peaks higher the real display peak nits with a low frame FALL;
Scene peaks higher the real display peak nits with a high frame FALL.
The display used in this example has a real display peak nits of 100 nits (typical calibrated HDR projector brightness).
The first test scene is from the Avengers: Infinity War UHD Blu-ray. A waveform of the scene was produced by importing an SDR BT.709 PNG screenshot from MPC-BE into the DaVinci Resolve Timeline. Because an SDR screenshot is used in this case, some precision is lost in the conversion back to ST.2084 PQ HDR values. For example, if the two waveforms are layered on top of each other, it is possible to see very slight differences in the distribution of the frame's pixels. However, the minor differences between the two waveforms are slight enough to consider the sample waveforms to be accurate representations of the roll-off applied by madVR.
min target / real display peak nits: 100 nits (dynamic tuning: 100)
Screenshot #1
madVR OSD:
measured frame 100 nits, tone map 111 nits
frame FALL 1.759 nits
HDR -> SDR using shaders, BT.2390 (100nits), no hue shift
Note: To see the frame FALL and selected min target / real display peak nits in the madVR OSD, a blank folder named ShowHdrMode must be created and placed in the madVR installation folder.
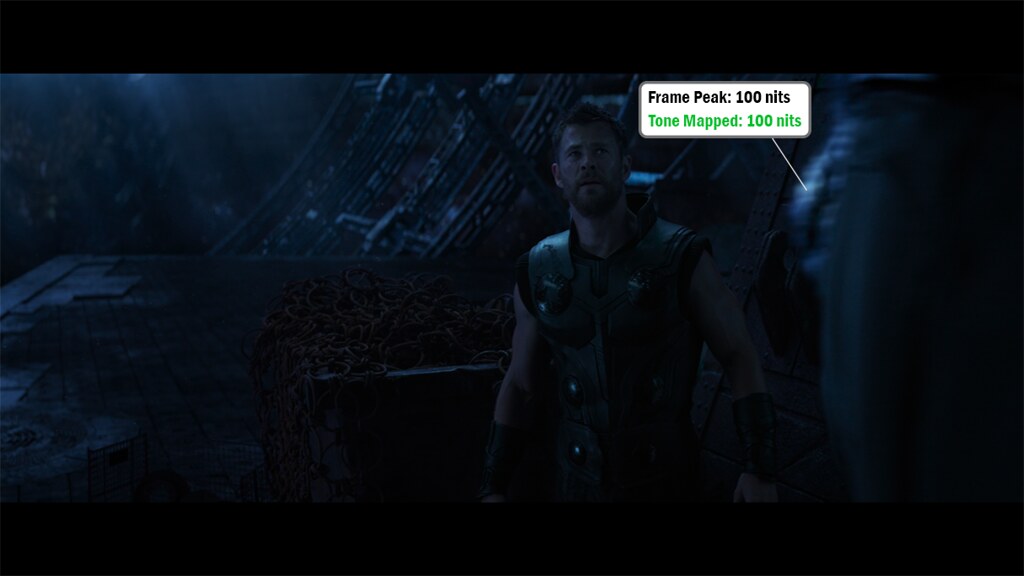
Frame Peak 100 nits:

Tone Mapping — Before & After:

Frame Peak and Reference White — Before & After:

The first frame peaks at 100 nits with a low frame FALL of 1.759 nits. As the real display peak nits used in this example is also 100 nits, no tone mapping is required in this scene and both the input and output PQ values match.
The dynamic display target nits is set to match the real display peak nits (100 nits). The scene luminance is presented 1:1 and both the frame peak and frame FALL remain unchanged after tone mapping is applied.
In the next two examples, the frame peak rises high above the real display peak nits to 1,000 nits. For these scenes, keeping the display target nits at 100 nits would lead to significant clipping of any specular highlights above 100 nits due to the limited space available at the top of the display range.
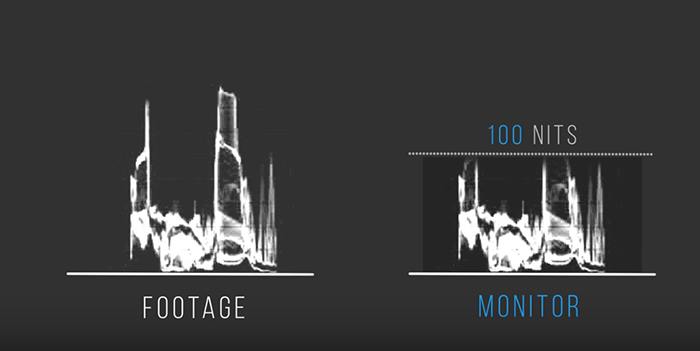
Source Footage vs. 100 nits Target Display Brightness:

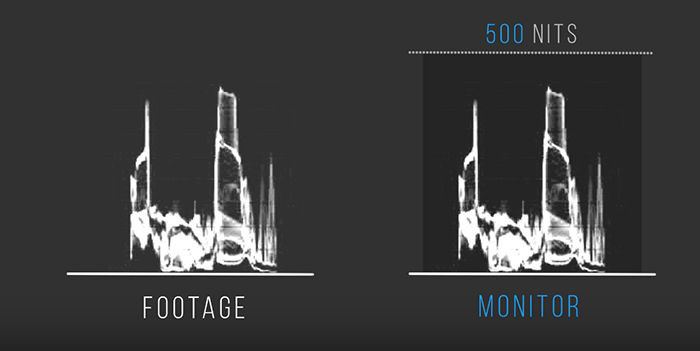
By raising the display target nits above the actual display peak nits, more of the highlights in the video can be captured by creating additional space at the upper end of the display range for a more gradual roll-off of the specular highlights. The source values in the 0-100 nits SDR range (reference white) are slightly rolled-off towards black, which produces higher contrast necessary to represent the higher peak brightness of the reference scene.
Source Footage vs. 500 nits Target Display Brightness:

Screenshot #2
madVR OSD:
measured frame 1000 nits, tone map 1018 nits
frame FALL 18.342 nits
HDR -> SDR using shaders, BT.2390 (227nits), no hue shift
Frame Peak 1,000 nits:

Tone Mapping — Before & After:

Frame Peak and Reference White — Before & After:

The second frame has a frame peak of 1,000 nits with a moderate frame FALL of 18.342 nits. With the frame peak now well above the real display peak nits, the dynamic display target nits is increased from 100 nits to 227 nits. This increase in display target nits preserves more specular highlight detail while moderately lowering the scene APL.
The display target nits used in this scene is 2.27x higher than the first scene (227 nits/100 nits = 2.27). This means the image should be 2.27x darker after gamma conversion by the display, yet the frame FALL after tone mapping, Frame FALL = 8.080 nits, is still marginally higher than the frame FALL after tone mapping of the first scene: Frame FALL = 1.759 nits. The higher initial frame average light level of the second frame keeps the image brighter after tone mapping is applied: Original FALL Screenshot #2: 18.342 nits vs. Original FALL Screenshot #1: 1.759 nits.
So despite the moderate increase to the display target nits, the average brightness after tone mapping of the second scene remains higher than the first scene and both end up with similar perceived brightness and contrast.
Screenshot #3
madVR OSD:
measured frame 1000 nits, tone map 1027 nits
frame FALL 35.069 nits
HDR -> SDR using shaders, BT.2390 (302nits), no hue shift
Frame Peak 1,000 nits:

Tone Mapping — Before & After:

Frame Peak and Reference White — Before & After:

The last frame also has a frame peak of 1,000 nits, but the frame FALL rises even higher to 35.069 nits. This means much of the image is well above black and the display target nits can be raised even higher to compress the large number of pixels near white and prevent the brightest parts of the image from clipping and washing out the result. The dynamic target is increased to 302 nits, and rather than create a darker image than the previous two frames, the high initial frame FALL keeps the frame FALL after tone mapping above the previous two frames.
The display target nits used in this example is 3.02x higher than the first example (302 nits/100 nits = 3.02). It is also 1.33x higher than the second example. This means the APL of this scene will be compressed 3.02x more than the first scene and 1.33x more than the second scene.
Despite the difference in compression ratios, the frame FALL after tone mapping, Frame FALL = 11.612 nits, is the highest of the three scenes: Tone Mapped FALL Screenshot #3: 11.612 nits vs. Tone Mapped FALL Screenshot #2: 8.080 nits vs. Tone Mapped FALL Screenshot #1: 1.759 nits.
The larger distribution of pixels near the display peak in this scene keeps the average brightness after tone mapping a little higher than the previous scenes by largely limiting compression to brighter pixels.
Summary of the Results of Tone Mapping
Screenshot #1:
Frame Peak: 100 nits
Min Target: 100 nits
Reference White: 100 nits
FALL Before: 1.759 nits
FALL After: 1.759 nits
Screenshot #2:
Frame Peak: 1,000 nits
Min Target: 227 nits
Reference White: 44.05 nits
FALL Before: 18.342 nits
FALL After: 8.080 nits
Screenshot #3:
Frame Peak: 1,000 nits
Min Target: 302 nits
Reference White: 33.11 nits
FALL Before: 35.069 nits
FALL After: 11.612 nits
As you can see, the dynamic display target nits provides more control over the application of contrast to ensure every scene in a movie has similar perceived on-screen brightness and contrast that is appropriate for the scene's brightness and contrast. If the real display peak nits entered in madVR is an accurate estimate of the actual display peak nits, no scene should ever end up too bright or too dark relative to the end display's brightness.
The dynamic target nits changes the display target nits when there is a detected scene change. This allows for very dynamic changes in contrast that are not possible when using a static display target nits. Increases to the display target nits are applied to create contrast that is necessary to preserve bright specular highlight detail in scenes with brightness peaks greater than the real display peak nits entered in madVR. When a new display target nits is applied, the new target nits aims for an on-screen brightness (Average Picture Level) that presents similar perceived brightness to the previous scene to keep average brightness consistent across all scenes.
A scene change is described on the basis of having a visible change in APL and not a distinct beginning and end. By this definition, scene changes can be frequent. For instance, a muzzle flash from a gun would not be considered a scene change, but a conversation between two people that starts in front of a bright window and moves continuously into another room would be considered a visible change in APL that could benefit from a change in display target nits. Changes to the display target nits occur often enough to keep scene and corresponding APL changes smooth and largely invisible to the viewer.
The display target nits is altered based on two variables:
Scene Peak Brightness: The brightest pixels found in each scene.
Frame FALL (Frame Average Light Level): The average frame brightness of all pixels in the first frame of the scene.
Scene Peak <= real display peak nits:
No tone mapping is required and the scene is represented 1:1 with the real display peak nits.
Scene Peak > real display peak nits
Low Frame FALL:
The moderate increase in scene contrast causes a relatively low increase to the display target nits.
Scene Peak > real display peak nits
High Frame FALL:
The large increase in scene contrast causes a relatively high increase to the display target nits.
The frame FALL describes the total average distribution of all pixels in a frame. A scene with a low frame FALL has many pixels near black and a scene with a high frame FALL has a greater distribution of pixels near white. By knowing where the brightness curve is distributed within a given scene, madVR can apply a tone curve that keeps consistent midrange brightness to prevent the gamma from ever appearing too high (a dim image with crushed shadow detail) or too low (a washed out or milky image with clipped highlight detail).
The frame FALL is a more useful value than the scene peak brightness in the predicting the average brightness of the image after tone mapping is applied, and not just the amount of specular highlight detail expected to be retained. Many of the mastered peaks in HDR content are well beyond the light output that can be reproduced by a display such as a projector, so having a consistently bright APL is often more critical for these displays than preserving every bit of specular highlight detail present in the source.
HDR to SDR Waveforms
One way to illustrate the impact lowering the average brightness of an HDR scene through tone mapping is to use a waveform graph. A waveform graph shows the distribution of luminance of all pixels in a frame by plotting the peaks and valleys in brightness present in the video.
Color grading software DaVinci Resolve offers detailed waveforms through its scopes panel that show the position of each pixel in the frame in a 2D graph. These graphs separate all pixels into its individual red, green and blue color channels along with its corresponding PQ (luminance) value. A sample waveform from DaVinci Resolve is shown below with labels showing the corresponding luminance of notable 10-bit PQ values on the graph.
DaVinci Resolve Waveform Legend (10-bit PQ Values):

So what does an HDR waveform look like when applied to scenes that match the criteria already established:
Scene peaks within the real display peak nits;
Scene peaks higher the real display peak nits with a low frame FALL;
Scene peaks higher the real display peak nits with a high frame FALL.
The display used in this example has a real display peak nits of 100 nits (typical calibrated HDR projector brightness).
The first test scene is from the Avengers: Infinity War UHD Blu-ray. A waveform of the scene was produced by importing an SDR BT.709 PNG screenshot from MPC-BE into the DaVinci Resolve Timeline. Because an SDR screenshot is used in this case, some precision is lost in the conversion back to ST.2084 PQ HDR values. For example, if the two waveforms are layered on top of each other, it is possible to see very slight differences in the distribution of the frame's pixels. However, the minor differences between the two waveforms are slight enough to consider the sample waveforms to be accurate representations of the roll-off applied by madVR.
min target / real display peak nits: 100 nits (dynamic tuning: 100)
Screenshot #1
madVR OSD:
measured frame 100 nits, tone map 111 nits
frame FALL 1.759 nits
HDR -> SDR using shaders, BT.2390 (100nits), no hue shift
Note: To see the frame FALL and selected min target / real display peak nits in the madVR OSD, a blank folder named ShowHdrMode must be created and placed in the madVR installation folder.
Frame Peak 100 nits:

Tone Mapping — Before & After:

Frame Peak and Reference White — Before & After:

The first frame peaks at 100 nits with a low frame FALL of 1.759 nits. As the real display peak nits used in this example is also 100 nits, no tone mapping is required in this scene and both the input and output PQ values match.
The dynamic display target nits is set to match the real display peak nits (100 nits). The scene luminance is presented 1:1 and both the frame peak and frame FALL remain unchanged after tone mapping is applied.
In the next two examples, the frame peak rises high above the real display peak nits to 1,000 nits. For these scenes, keeping the display target nits at 100 nits would lead to significant clipping of any specular highlights above 100 nits due to the limited space available at the top of the display range.
Source Footage vs. 100 nits Target Display Brightness:

By raising the display target nits above the actual display peak nits, more of the highlights in the video can be captured by creating additional space at the upper end of the display range for a more gradual roll-off of the specular highlights. The source values in the 0-100 nits SDR range (reference white) are slightly rolled-off towards black, which produces higher contrast necessary to represent the higher peak brightness of the reference scene.
Source Footage vs. 500 nits Target Display Brightness:

Screenshot #2
madVR OSD:
measured frame 1000 nits, tone map 1018 nits
frame FALL 18.342 nits
HDR -> SDR using shaders, BT.2390 (227nits), no hue shift
Frame Peak 1,000 nits:

Tone Mapping — Before & After:

Frame Peak and Reference White — Before & After:

The second frame has a frame peak of 1,000 nits with a moderate frame FALL of 18.342 nits. With the frame peak now well above the real display peak nits, the dynamic display target nits is increased from 100 nits to 227 nits. This increase in display target nits preserves more specular highlight detail while moderately lowering the scene APL.
The display target nits used in this scene is 2.27x higher than the first scene (227 nits/100 nits = 2.27). This means the image should be 2.27x darker after gamma conversion by the display, yet the frame FALL after tone mapping, Frame FALL = 8.080 nits, is still marginally higher than the frame FALL after tone mapping of the first scene: Frame FALL = 1.759 nits. The higher initial frame average light level of the second frame keeps the image brighter after tone mapping is applied: Original FALL Screenshot #2: 18.342 nits vs. Original FALL Screenshot #1: 1.759 nits.
So despite the moderate increase to the display target nits, the average brightness after tone mapping of the second scene remains higher than the first scene and both end up with similar perceived brightness and contrast.
Screenshot #3
madVR OSD:
measured frame 1000 nits, tone map 1027 nits
frame FALL 35.069 nits
HDR -> SDR using shaders, BT.2390 (302nits), no hue shift
Frame Peak 1,000 nits:

Tone Mapping — Before & After:

Frame Peak and Reference White — Before & After:

The last frame also has a frame peak of 1,000 nits, but the frame FALL rises even higher to 35.069 nits. This means much of the image is well above black and the display target nits can be raised even higher to compress the large number of pixels near white and prevent the brightest parts of the image from clipping and washing out the result. The dynamic target is increased to 302 nits, and rather than create a darker image than the previous two frames, the high initial frame FALL keeps the frame FALL after tone mapping above the previous two frames.
The display target nits used in this example is 3.02x higher than the first example (302 nits/100 nits = 3.02). It is also 1.33x higher than the second example. This means the APL of this scene will be compressed 3.02x more than the first scene and 1.33x more than the second scene.
Despite the difference in compression ratios, the frame FALL after tone mapping, Frame FALL = 11.612 nits, is the highest of the three scenes: Tone Mapped FALL Screenshot #3: 11.612 nits vs. Tone Mapped FALL Screenshot #2: 8.080 nits vs. Tone Mapped FALL Screenshot #1: 1.759 nits.
The larger distribution of pixels near the display peak in this scene keeps the average brightness after tone mapping a little higher than the previous scenes by largely limiting compression to brighter pixels.
Summary of the Results of Tone Mapping
Screenshot #1:
Frame Peak: 100 nits
Min Target: 100 nits
Reference White: 100 nits
FALL Before: 1.759 nits
FALL After: 1.759 nits
Screenshot #2:
Frame Peak: 1,000 nits
Min Target: 227 nits
Reference White: 44.05 nits
FALL Before: 18.342 nits
FALL After: 8.080 nits
Screenshot #3:
Frame Peak: 1,000 nits
Min Target: 302 nits
Reference White: 33.11 nits
FALL Before: 35.069 nits
FALL After: 11.612 nits
As you can see, the dynamic display target nits provides more control over the application of contrast to ensure every scene in a movie has similar perceived on-screen brightness and contrast that is appropriate for the scene's brightness and contrast. If the real display peak nits entered in madVR is an accurate estimate of the actual display peak nits, no scene should ever end up too bright or too dark relative to the end display's brightness.

