2019-04-24, 17:32
Dynamic Clipping Explained
The aim of dynamic clipping is to decompress areas of the image that have very few bright pixels concentrated in a very small area. These small patches of bright pixels cause the tone mapping curve to aggressively compress the image to preserve the contrast between the brightest and darkest portions of the image. Frequent compression of small specular highlights can be less optimal for displays with a low peak brightness, as this compression creates lower APLs (Average Picture Levels) that favor the preservation of contrast over brightness.
By clipping a very small percentage of these image areas, the target scene peak for tone mapping can be lowered enough to reduce tone mapping compression and restore a visible amount of brightness to previously compressed portions of the image without completely destroying the specular highlights.
*Dynamic clipping was originally developed by Soulnight at AVS Forum in conjunction with the release of the MadmeasureHDR Dynamic Optimizer tool designed to work with madMeasureHDR measurements files.
Summary of Dynamic Clipping:
Scene-based dynamic clipping:
dynamic clipping targets are calculated for each detected scene change. All frames within a scene are given a compressed target scene peak where clipping of the specular highlights is deemed most beneficial and the frame in the scene with the highest calculated target peak becomes the new scene peak for tone mapping. This typically results in a small of percentage of all frames being clipped to this target peak for any frame peaks that are above the calculated clipped scene peak. Partial clipping of the highlights begins at a highlights knee, which is a point on the PQ curve where big increases in brightness are detected with little pixels added.
Example:
Scene Peak Before Clipping: 999 nits
Frame Peak Before Clipping: 664 nits
Scene Peak After Dynamic Clipping: 468 nits (new clipped target scene peak)
Frame Peak After Dynamic Clipping: 634 nits (after a small % of the brightest pixels are clipped to the scene peak)
When combined with the dynamic target nits, lowering the target scene peak with dynamic clipping can in some cases also cause changes to the display target nits. If the new calculated scene peak is reduced to a value below the min target / real display peak nits, the display becomes capable of representing the scene 1:1 and the target nits is lowered to match the real display peak nits.
Pros & Cons of Dynamic Clipping:
Pros:
Cons:
The shape of the tone mapping curve changes based on the tone mapping target scene peak. A more aggressive roll-off is applied to the original scene peak to represent the full dynamic range of the scene.
Original Scene Peak & Tone Curve Shape:

When the tone mapping target is lowered by dynamic clipping, the tone mapping curve straightens due to having less dynamic range to compress. This clips more specular highlight detail, but also reduces overall image compression, thereby creating a slight boost in brightness in the previously compressed portions of the curve.
Clipped Scene Peak & Resulting Tone Curve Shape:

Examples of Dynamic Clipping
*All images courtesy of Soulnight at AVS Forum.
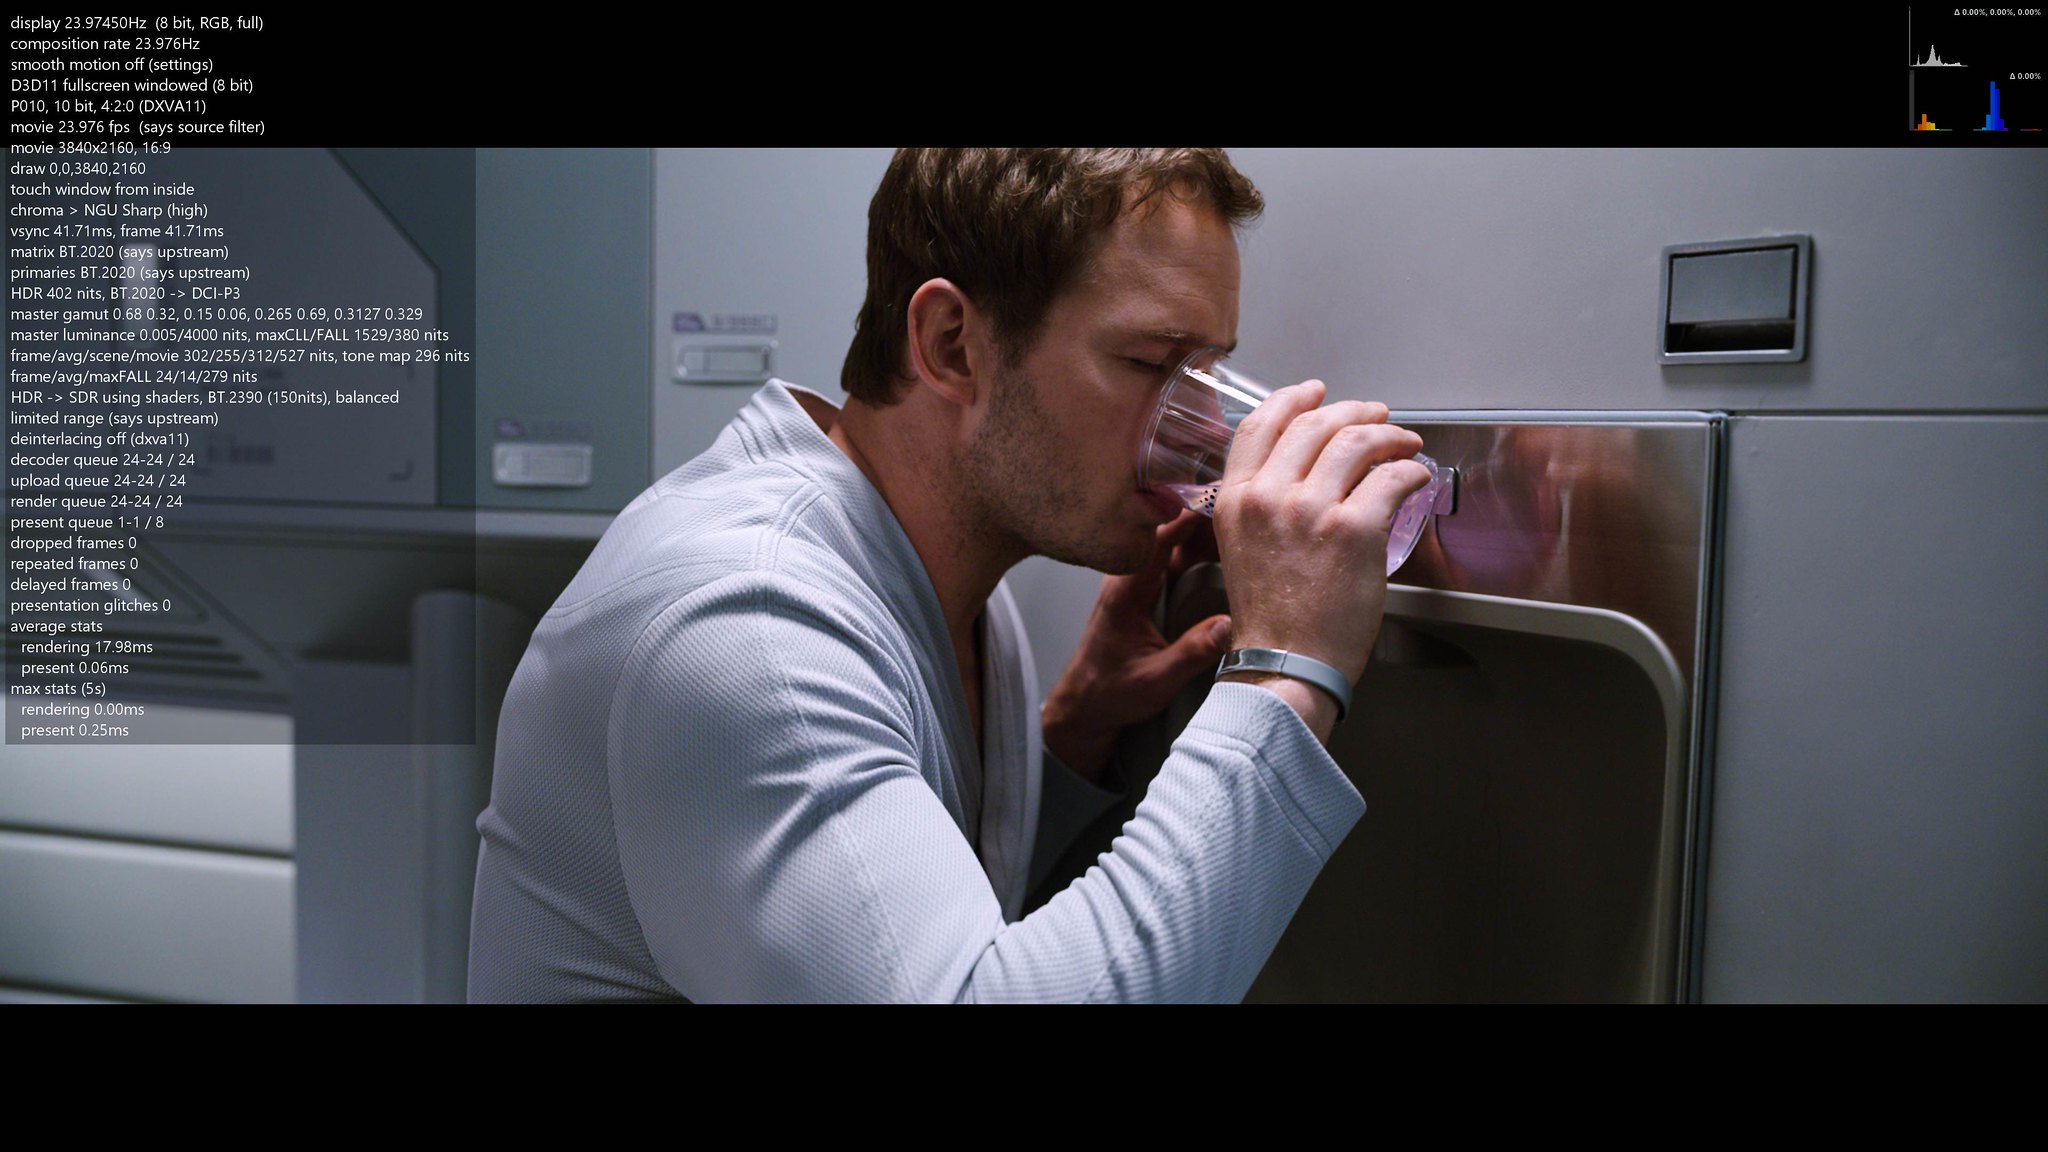
Passengers 4K UHD Blu-ray
Before dynamic clipping:
frame/avg/scene/movie 302/255/312/527, tone map 296 nits

After dynamic clipping:
frame/avg/scene/movie 290/231/233/527, tone map 214 nits

No tone mapping — simple clipping:
min target / real display peak nits: 150 nits

Passengers 4K UHD Blu-ray
Before dynamic clipping:
frame/avg/scene/movie 254/255/254/527, tone map 254 nits

After dynamic clipping:
frame/avg/scene/movie 247/231/178/527, tone map 178 nits

No tone mapping — simple clipping:
min target / real display peak nits: 150 nits

Passengers 4K UHD Blu-ray
Before dynamic clipping:
frame/avg/scene/movie 263/255/263/527, tone map 263 nits

After dynamic clipping:
frame/avg/scene/movie 243/231/135/527, tone map 135 nits

No tone mapping — simple clipping:
min target / real display peak nits: 150 nits

The aim of dynamic clipping is to decompress areas of the image that have very few bright pixels concentrated in a very small area. These small patches of bright pixels cause the tone mapping curve to aggressively compress the image to preserve the contrast between the brightest and darkest portions of the image. Frequent compression of small specular highlights can be less optimal for displays with a low peak brightness, as this compression creates lower APLs (Average Picture Levels) that favor the preservation of contrast over brightness.
By clipping a very small percentage of these image areas, the target scene peak for tone mapping can be lowered enough to reduce tone mapping compression and restore a visible amount of brightness to previously compressed portions of the image without completely destroying the specular highlights.
*Dynamic clipping was originally developed by Soulnight at AVS Forum in conjunction with the release of the MadmeasureHDR Dynamic Optimizer tool designed to work with madMeasureHDR measurements files.
Summary of Dynamic Clipping:
- Never clips more than 0-4% of the total pixels in a frame;
- Never clips more than 50% of the pixels above 100 nits;
- Never clips more than 50% of the pixels corresponding to the 10% brightest pixels in the frame;
- The point where highlight clipping is started is never lower than the average nits of all highlights in the frame;
- No clipping is performed if there are no areas in the image where the clipped tone mapping target peak would be low enough to produce a visible benefit.
Scene-based dynamic clipping:
dynamic clipping targets are calculated for each detected scene change. All frames within a scene are given a compressed target scene peak where clipping of the specular highlights is deemed most beneficial and the frame in the scene with the highest calculated target peak becomes the new scene peak for tone mapping. This typically results in a small of percentage of all frames being clipped to this target peak for any frame peaks that are above the calculated clipped scene peak. Partial clipping of the highlights begins at a highlights knee, which is a point on the PQ curve where big increases in brightness are detected with little pixels added.
Example:
Scene Peak Before Clipping: 999 nits
Frame Peak Before Clipping: 664 nits
Scene Peak After Dynamic Clipping: 468 nits (new clipped target scene peak)
Frame Peak After Dynamic Clipping: 634 nits (after a small % of the brightest pixels are clipped to the scene peak)
When combined with the dynamic target nits, lowering the target scene peak with dynamic clipping can in some cases also cause changes to the display target nits. If the new calculated scene peak is reduced to a value below the min target / real display peak nits, the display becomes capable of representing the scene 1:1 and the target nits is lowered to match the real display peak nits.
Pros & Cons of Dynamic Clipping:
Pros:
- Slight overall increase to average brightness or APL;
- More dynamic image with greater color saturation in some scenes.
Cons:
- Small loss of specular highlight detail;
- Visible reduction in HDR contrast in some scenes;
- Possible uncontrolled clipping and blown out highlight detail in some cases.
The shape of the tone mapping curve changes based on the tone mapping target scene peak. A more aggressive roll-off is applied to the original scene peak to represent the full dynamic range of the scene.
Original Scene Peak & Tone Curve Shape:

When the tone mapping target is lowered by dynamic clipping, the tone mapping curve straightens due to having less dynamic range to compress. This clips more specular highlight detail, but also reduces overall image compression, thereby creating a slight boost in brightness in the previously compressed portions of the curve.
Clipped Scene Peak & Resulting Tone Curve Shape:

Examples of Dynamic Clipping
*All images courtesy of Soulnight at AVS Forum.
Passengers 4K UHD Blu-ray
Before dynamic clipping:
frame/avg/scene/movie 302/255/312/527, tone map 296 nits

After dynamic clipping:
frame/avg/scene/movie 290/231/233/527, tone map 214 nits

No tone mapping — simple clipping:
min target / real display peak nits: 150 nits

Passengers 4K UHD Blu-ray
Before dynamic clipping:
frame/avg/scene/movie 254/255/254/527, tone map 254 nits

After dynamic clipping:
frame/avg/scene/movie 247/231/178/527, tone map 178 nits

No tone mapping — simple clipping:
min target / real display peak nits: 150 nits

Passengers 4K UHD Blu-ray
Before dynamic clipping:
frame/avg/scene/movie 263/255/263/527, tone map 263 nits

After dynamic clipping:
frame/avg/scene/movie 243/231/135/527, tone map 135 nits

No tone mapping — simple clipping:
min target / real display peak nits: 150 nits

