• 1(current)
  • 2
  • 3
  • 4
  • 5
  • 47
Win HOW TO - Configure Kodi DSPlayer with LAV Filters, XySubFilter & madVR
#1
DSPlayer with LAV Filters, XySubFilter and madVR Set up Guide
Last Updated: 2018-04-21

Krypton 17.6
LAV Filters 0.71

Important Notice: The developer of DSPlayer has decided to step away from this project due to personal reasons. As long as the download links remain active, this set up guide will be here.

Krypton 17.6 is available on the first page of the DSPlayer forum.

Jarvis 16.1 should be stable for most users and will work with recent versions of madVR.

Isengard 15.2 is compatible with madVR v0.89.13.


Visit Troubleshooting Tips for an in-progress list of known fixes for current DSPlayer issues.

Image gallery of madVR image processing settings

New to Kodi? Try this Quick Start Guide.

Guide: Building a 4K madVR HTPC

..............

This tutorial is dedicated to the set up of DSPlayer as a primary video player using madVR as the video renderer. This is Windows-only software.

The DirectShow Player (DSPlayer) branch of Kodi has been active for several years. Using popular DirectShow filters such as LAV Filters, XySubFilter and Sanear, DSPlayer has traditionally provided an alternative to Kodi’s VideoPlayer. However, with the addition of madVR video rendering, this branch has the potential to be the premier way to enjoy high-quality audio & video playback with Kodi.

What is madVR? madVR is a GPU-assisted video renderer known for its quality-at-all-cost approach to video presentation. madVR integrates into the Kodi interface by combining it with DSPlayer and a DirectShow filter pack such as LAV Filters. This eliminates the drawbacks associated with external players as the Kodi GUI remains accessible during playback and start and resume points work as they do with the default player.

The quality of madVR with LAV Filters is capable of matching and often besting high-end Blu-ray players such as the Oppo UDP-203 with a capable graphics card and some knowledge of correct set up. Advantages include 32-bit floating point processing, high-quality image scaling, error diffusion dithering, artifact removal, image sharpening, 3D LUT gamut and transfer function correction, HDR10 tone mapping and HDR10 passthrough and, of course, color accuracy. 

Other benefits of DSPlayer come from access to features in the DirectShow library. This could include selectable hardware decoding with LAV Filters; the use of ReClock or FFDShow to perform audio post-processing and channel mixing; the use of specialized video decoders such as the Strongene Lentoid HEVC/H.265 decoder; or the addition of frame interpolation provided by the Smooth Video Project (SVP). DSPlayer offers access to the full suite of DirectShow filters.

Screenshot comparison of DSPlayer and MPC-HC with LAV Filters & madVR.

List of scaling algorithms used by Kodi VideoPlayer.

This DSPlayer Configuration Guide Includes:
  1. Introduction to DSPlayer & List of Required Software;
  2. DSPlayer Set up;
  3. LAV Filters & XySubFilter Set up;
  4. madVR Set up;
  5. Other Resources;
  6. Troubleshooting Tips.
1. INTRODUCTION TO DSPLAYER & LIST OF REQUIRED SOFTWARE

A complete media player is comprised of many parts. Understanding these components is useful in understanding DSPlayer set up.

The process of decoding and rendering a media file can be split into three components:
  • Audio & Video Filters
  • Video Renderer
  • Audio Renderer

Audio & Video Filters – Component 1

Source Filter: Reads source files and generates the appropriate output pins for the file type to be read by the splitter.
  • e.g. LAV Source

Splitter Filter: Used to demux media files into their separate elementary audio and video streams for decoding.
  • e.g. LAV Splitter

Video Decoder: Decodes the video stream based on its video codec to be processed by the video renderer.
  • e.g. LAV Video

Audio Decoder: Decodes the audio stream by either unpacking the stream into multi-channel PCM or by passing bitstreams intact to the audio renderer.
  • e.g. LAV Audio

Subtitle Filter: Decodes the subtitle stream and renders the subtitle on the screen.
  • e.g. XySubFilter

Video Renderer – Component 2

The video renderer receives the output from the video decoder and deinterlaces, converts to RGB, upscales, resizes and applies any post-processing before rendering an image to the GPU.
  • e.g. madVR

Audio Renderer – Component 3

The audio renderer receives the output from the audio decoder and communicates with the audio device. This can lead to further post-processing or bit-exact delivery of the audio streams.
  • e.g. Sanear or ReClock

Introduction to Kodi DirectShow (DS)Player

Kodi DSPlayer is a media player with an integrated OSD and player controls designed to take the place of the default Kodi player codenamed VideoPlayer. The player distinguishes itself from VideoPlayer by using its own set of DirectShow filters as defined in mediasonfig.xml and filtersconfig.xml along with custom video renderers.

Set up in this guide focuses on using LAV Filters as the filter set, XySubFilter as the subtitle filter, madVR as the video renderer and Sanear as the audio renderer. Completing set up requires access to the following:

Required Software:
  • DSPlayer Installer
    includes LAV Filters, XySubFilter and Sanear;
  • madVR (external installation).

Options for A/V filter selection:
  1. Internal filters: Use the filters installed with DSPlayer.
  2. Media rules and Filters configuration: Use mix of internal/external filters with manual configuration.
  3. System filters (DirectShow merits): Use existing system filters, ignoring the filters installed with DSPlayer.
Before continuing, you must first obtain a DSPlayer Kodi installer. The installer is necessary to integrate DSPlayer, LAV Filters, XySubFilter and Sanear into the Kodi GUI. For configuration purposes, we will rely on these Internal Filters.

Instructions:
  1. Run the Kodi installer (Krypton 17.6) to overwrite existing copies of Kodi on your system and replace with the integrated DSPlayer.
  2. Install madVR: http://forum.doom9.org/showthread.php?t=146228 (v0.88.21 & later)
    To install madVR, extract the zip file to any directory, right-click "install.bat" and select "Run as Administrator."
  3. Open Kodi and navigate to DSPlayer settings (Player settings -> DSPlayer).
  4. Select madVR as the Video Renderer.
  5. Set Audio Renderer to Internal Audio Renderer (Sanear).
  6. Set Filters management to Internal filters.
  7. Configure each internal filter to your hardware: - Splitter, - Video decoder, - Audio decoder, - Subtitle filter.
  8. Play a test video to configure madVR (Ctrl + S). Test the performance of your settings using Ctrl+J.
DSPlayer Installer

DSPlayer installers are released in concert with official releases of Kodi. This installer is identical in appearance to the default Kodi installer and will remove old versions of Kodi and integrate DSPlayer and its setup menus into Kodi.

Installers are released by the branch’s maintainer aracnoz. The most recent link is always available in the first post of the DSPlayer official forum.

Setup.exe:
Image

Links to DSPlayer Installers: 1972183 (post)

Note: There is a newer build of DSPlayer Krypton 17.7 available released by axbmcuser that contains a few additional tweaks and fixes to the x64 build originally released by aracnoz. You can find a link to axbmcuser's Windows thread below:

Kodi 17.7 DSPlayer x64 BETTERGUI (2020 build)

MediaPortal and Argus TV – Live TV Users

Built-in support is available for live TV streams using the rtsp protocol. This service has been tested with MediaPortal and Argus TV PVR backends. Instructions and required add-on settings are found here: MediaPortal and ArgusTV PVR.

NextPVR – Live TV Users

Support for NextPVR using the http protocol is also possible. Instructions for NextPVR are found here: NextPVR Directshow Filter for DSPlayer.

Video Add-ons – Streaming Content

Playback of most http/https streams from video add-ons is possible with DSPlayer using LAV Splitter Source. The use of DSPlayer for streaming sources does come with limitations. Currently, buffering issues and slow navigation may be experienced with some add-ons. If you find playback or navigation is suffering, it is possible to substitute VideoPlayer as the streaming video player.

The playercorefactory.xml linked below contains instructions pre-configured to reroute all Internet protocols (all streaming content) to be played with VideoPlayer.

VideoPlayer merits: https://drive.google.com/open?id=1KrS8Yt...ejebD-tiMd

Move the included playercorefactory.xml to the following directory:

C:\Users\Username\AppData\Roaming\Kodi\userdata

Emby for Kodi Users

Emby for Kodi users must configure Emby Server for compatibility with DSPlayer. Compatibility requires path substitution is used for folders on the server. This entails converting the path of each Emby folder into the folder's actual path on the computer. A direct Windows path is needed for DSPlayer to correctly read and play each file.

An example of path substitution is shown below:

Emby Server -> Library -> Path Substitution

Image

Each media source listed in the Folders tab requires its original path.

Plex Add-ons and DSPlayer

PlexKodiConnect and Plex for Kodi both work natively with DSPlayer without any need for path substitution. Simply install the add-on and configure DSPlayer for normal video playback.

DSPlayer Backup

If you are using external filters and customized configuration files, it may be desirable to back-up your DSPlayer settings. When using the Backup add-on for system backups, you must select the dsplayer folder in the userdata directory as a custom directory. This folder is not backed-up by default by the add-on.

Kodi Backup add-on:
To back-up the DSPlayer configuration files, select the dsplayer folder as a custom directory.
Image

Summary of Required Software

With all software installed, you should be set up with the following components:
  • Frontend – Kodi DSPlayer Edition
  • Audio & Video Filters – LAV Filters and XySubFilter
  • Video Renderer – madVR
  • Audio Renderer – Sanear
Reply
#2
2. DSPLAYER SET UP

DSPlayer is configured from the Kodi GUI (Player settings -> DSPlayer). Ensure Internal filters is selected from this menu to leverage the installed LAV Filters and XySubFilter. To confirm the correct filters are being loaded during playback, press O while playing any video.

Image

Image

Summary of DSPlayer Settings

DSPlayer

Use as the default video player


Checking this box replaces VideoPlayer when the Play command is issued for all media. If this box is not checked, DSPlayer can only be accessed from the Context Menu, C, by selecting Play using... -> DSPlayer. Similarly, the stock Kodi player can be accessed by Play using... -> VideoPlayer.

- VideoPlayer merits

This setting allows rules to be created governing what media should be played by VideoPlayer. DSPlayer may not be a perfect replacement for VideoPlayer in all circumstances. For example, video add-ons containing Internet streams may be more stable when played with VideoPlayer. For TV streams and Internet-related content, rules set for Protocols and the checkbox Internet streams will reroute this content to VideoPlayer.

Rules created in VideoPlayer merits are saved in userdata\playercorefactory.xml. Kodi must be restated for changes to take effect.

Renderers

Video Renderer

DSPlayer offers a choice of two video renderers: madshi Video Renderer (madVR) and Enhanced Video Renderer (EVR).

Enhanced Video Renderer (EVR) is a very basic renderer with no additional set up requirements beyond configuring DSPlayer's internal filters. When EVR is selected, XyVSFilter is substituted for XySubFilter as the subtitle renderer.

madshi Video Renderer (madVR) is a more robust, fully-customizable video renderer offering scalable performance. madVR must be installed manually before playback. Configuration is possible during playback by choosing the madVR tray icon from the Windows Taskbar or by pressing Ctrl + S on your keyboard.

- Manage settings with Kodi

These settings determine the way madVR settings are managed:

Image

Never: The Kodi madVR GUI is disabled and all madVR settings are loaded exclusively from the madVR control panel.

Load and Save with DSPlayer database (default): Enabling this option allows basic configuration of madVR from within Kodi. These settings are accessed during video playback by selecting Video Settings. Video settings are set on a per video basis but can be saved as a global profile for all videos. DSPlayer will create its own DSPlayer Profile Group in the madVR control panel when this setting is enabled. This is a dummy profile intended to separate DSPlayer settings from existing madVR profiles. This dummy profile is not meant for external configuration. Internal settings tables are saved by Kodi — no settings are saved in the madVR control panel.

Load from madVR active profile: Upon playback, the appropriate profile is loaded from madVR for the selected video. Changes made from within Kodi will change the same value in the madVR control panel. No dummy profile is created. These changes only impact the active madVR profile and profile rules cannot be created or saved. This is the best choice for those who have set up profiles in madVR. Any changes made to the active profile are saved externally by madVR. External settings are always loaded in place of internal Kodi tables.

Load from madVR active profile is the preferred method of handling madVR's settings. This allows control from both the control panel and DSPlayer GUI without having to save any data in the Kodi DSPlayer database.

- Delay madVR playback until render queue is full

Delays the start of video playback until the amount frames set in the pre-buffer are rendered. This can help with crashes caused by the Kodi refresh rate change mechanism interacting with madVR.

- Fullscreen exclusive mode

Checking this box makes use of madVR’s fullscreen exclusive mode, which takes full control of the display during playback making it impossible to take screen captures or steal focus away from the player. This may improve player stability slightly but can cause compatibility issues with many graphics cards. If checked, the Kodi GUI is forced into windowed mode at all times to accommodate the player during playback. If you encounter a black screen after playing a video or random presentation glitches, your graphics card likely isn't compatible with fullscreen exclusive mode. Known to cause some issues and be unreliable with Windows 10.

- Force madVR to exit fullscreen before stop

This setting should only be used if experiencing problems when stopping playback. Black screens and failure to return to the Kodi menu can often be countered by forcing madVR to exit fullscreen before stopping. If problems during playback stop remain persistent, it is advised to follow the instructions in Troubleshooting Tips.

- Direct3D presentation

This determines how madVR presents an image, not how it is rendered. madVR is currently a Direct3D 9 application. Prevents the use of windowed overlay in general settings. Choosing a Direct3D 11 presentation path may allow for faster entering and exiting of fullscreen exclusive mode. Direct3D 11 presentation is required for 10-bit output (all GPUs) and for HDR passthrough with AMD GPUs.

Choosing Direct3D 11 (no vsync) may improve performance but can cause presentation glitches. However, Direct3D 11 with VSync can cause presentation glitches on other systems. With (no vsync) selected, madVR presents new frames when needed, relying on Direct3D 11 to repeat frames as necessary to maintain VSync.

- Pre-Rendered frames in windowed mode

Only active when present several frames in advance is checked for windowed mode in the madVR control panel.

This can be thought of as a buffer to prevent presentation glitches. When the present queue (shown in the madVR OSD) reaches zero, presentation glitches will occur. Sending frames in advance provides protection against these glitches. Increasing the number of pre-buffered frames will increase the amount of video memory used by madVR. Overrides the same setting in the madVR control panel.

A present queue stuck at zero means your GPU has run out of resources and madVR processing settings will have to be reduced until it fills.

- Pre-Rendered frames in exclusive mode

Only active when present several frames in advance is checked for exclusive mode in the madVR control panel.

Same as windowed mode above.

Audio Renderer

The choice of audio renderer in this menu impacts DSPlayer alone. System -> Audio is used to configure audio output for VideoPlayer. Keep in mind, any DirectShow audio renderer such as ReClock or FFDShow can be used with DSPlayer.

Set this to Internal Audio Renderer (Sanear).

Sanear is the MPC-HC audio renderer. The benefits of Sanear include:
  • WASAPI output in shared or exclusive mode;
  • automatic channel downmixing in shared mode;
  • stereo crossfeed for headphones;
  • bit-exact bitstreaming support.

- Device

Choose the audio output device. System Default will use the default audio device set in Windows.

- Exclusive mode

Exclusive mode refers to WASAPI exclusive. WASAPI exclusive mode gives applications exclusive access to the audio driver, so audio streams are passed directly to the audio output device without any interference from intermediate buffers or the Windows Mixer. Unchecking the Exclusive mode checkbox enables shared mode, where a third-party application (the Windows Mixer) is added to the playback chain forcing post-processing such as resampling and channel downmixing before reaching the output device. Under shared mode, Windows will resample PCM audio (primarily AAC, multichannel PCM and stereo sources) to the speaker layout, sample rate and bit depth set in "Sound" settings. Codecs not decoded by the media player cannot be resampled by Windows, so bitstreaming should be unaffected. Exclusive mode polls the capabilities of the audio device in terms of codec support, sample rate, bit depth and maximum channels. If the audio stream doesn't match the capabilities of the hardware, no resampling is done and audio is output as silence. Recent versions of LAV Audio include a fallback to audio decoding to PCM if the hardware device does not support the bitstream.

It is recommended to toggle Exclusive mode to ensure the audio output is untouched by Windows when it reaches the audio output device (e.g. AV receiver).

- Allow bitstreaming

Bitstreaming is the untouched passthrough of codecs such as Dolby Digital and DTS to the audio device. Unchecking this will unpack every audio codec as multichannel PCM. PCM output is passed through without resampling unless Exclusive mode is disabled. Unchecking all formats in LAV Audio will also output multichannel PCM even if bitstreaming is selected.

To bitstream, check this option and all supported formats in LAV Audio.

Note: Dolby Atmos (via Dolby TrueHD) and DTS:X (via DTS-HD) must be bitstreamed. There is no decoding to PCM on PC.

- Ignore System Channel Mixer

Only applicable if Exclusive mode is disabled where output then defaults to WASAPI shared. Ignoring the system channel mixer disables the Windows Mixer and prevents it from resampling PCM audio.

- Stereo Crossfeed (headphones)

Stereo crossfeed blends the left and right channels of a stereo audio output to make the stereo separation less obvious and more natural as if you were listening in front of a pair of speakers. This may improve listening with headphones.

Filters

Filters management


Defines the source of audio & video filters:

Image

Internal filters

Internal filters refer to the copies of LAV Filters and XySubFilter installed with DSPlayer. When selected, the creation of media rules is not required as compatible media is pre-configured to use these filters.

It may also be desirable to add an external filter to take advantage of features not provided by DSPlayer's internal filters. Three external filter slots are available. A common example of this is FFDShow, which can be added as an extra filter to use features such as the SmoothVideo Project (SVP).

- Splitter: Configure (i) LAV Splitter.

- Video decoder: Configure (i) LAV Video.

- Audio decoder: Configure (i) LAV Audio.

- Subtitle filter: Configure (i) XySubFilter.

- Extra external filter: Add an external filter to be used by all media.

Media rules and Filters configuration

This overrides DSPlayer's internal filters to use external filters installed in Windows. External filter rules are defined in mediasconfig.xml and filtersconfig.xml. It is not enough to install the external filter and play a video — DSPlayer must be manually configured to use it. Mixing-and-matching internal and external filters is possible.

- Media rules

Media rules provide instruction on what combination of filters and shaders are used when a media file is played. The player is pre-configured to use its internal filters. Using any combination of custom filters requires the creation of player rules.

Created Media rules are saved in userdata\dsplayer\mediasconfig.xml. Once saved, rules will appear in a list that can be revised and added to in the future.

- Filters configuration

Filters configuration provides a master list of all filters available to DSPlayer. Like Media rules, Filters configuration relies on system filters by default. Custom filters must be added manually.

Filters declared in Filters configuration are saved in userdata\dsplayer\filtersconfig.xml. Once saved, filters will appear in a list that can be revised and added to in the future.

System filters (DirectShow merits)

Enabling this option uses the merits hierarchy of existing DirectShow filters installed in Windows. Unchecking this is necessary to use DSPlayer's internal filters or the filter rules set in mediasconfig.xml. The vast majority of users will want to leave this unchecked.

Extra Options

Preferred audio codec name

This only applies to videos with multiple audio tracks. It is possible to specify a default audio track that will always be selected at playback start. Codec names follow those in LAV Audio: Dolby Digital (AC-3), Dolby Digital Plus (E-AC3), Dolby TrueHD, DTS and DTS-HD.

Note: Dolby Atmos is bitstreamed as part of Dolby TrueHD. DTS:X is bitstreamed as part of DTS-HD.

Preferred external subtitle language

Select a default language for external subtitles (e.g. .srt) in the event multiple external subtitle tracks are available.

Use menu audio selector

Adds an option in the Audio Settings menu that can be accessed during playback to select an audio stream.

Use menu subtitle selector

Adds an option in the Audio Settings menu that can be accessed during playback to select a subtitle stream.

Show stream details from selected splitter

Stream details from LAV Splitter provides more accurate and detailed information about the audio stream including the codec, channel layout and bit rate. This information is provided by DSPlayer by default. By comparison, DSPlayer is localized for the selected language, but may lack information such as the codec and bit rate. This setting also impacts the information displayed when pressing O (codec info).

Show Blu-ray titles and Matroska Editions choice dialog

Shows a selection of available video streams within Blu-ray folder structures (BDMV). Also, some MKV files contain multi-chapter list support. The Matroska Edition choice dialog allows a choice between the various chapter lists. LAV Filters supports multiple chapter files through Matroska Editions.

Min. Blu-ray title length (min.)

Sets the minimum title length for a video stream to appear in the list of selectable titles when playing Blu-ray folder structures (BDMV).

Zoom

Move OSD into active video area

This setting may be useful for users of projectors with a Constant Image Height (CIH) setup. Constant Image Height projection attempts to show all content on a 2.35:1 ratio (extra-wide) screen. Content with a 16:9 (1.78:1) ratio fills the height of the screen but not its sides. While movies with an aspect ratio of 2.35:1 are zoomed to fill both the height and width of the screen. Thereby, all content fills the height of the screen but not its width.

madVR offers zoom control and black bar detection to work with CIH setups. However, the Kodi OSD will remain outside the active screen area during playback. Enabling this setting moves the OSD into the active video area. This only impacts GUI elements during fullscreen playback and does not change the default 16:9 aspect ratio of Kodi.

madVR zoom control settings can be adjusted during playback from the DSPlayer madVR GUI found under Video Settings.

Define visible screen area

This setting is best used alongside Move OSD into active video area for users of Constant Image Height (CIH) setups. The defined screen size permanently changes the position of Kodi and the active skin for menu navigation, which can be used to position the skin inside the 2.35:1 rectangle used by scope screens.

Adjust display refresh rate

This setting is located under Player settings -> Videos. When using DSPlayer, display refresh rate selection can be applied to both players or to each player independently. This way, one player can be set to auto-change while the other is disabled. 

Image

VideoPlayer merits – Assigning Content to VideoPlayer

VideoPlayer merits are used to assign certain content to VideoPlayer. VideoPlayer offers greater format support than DSPlayer and may be more reliable when playing certain sources such as live TV or Internet streaming video.

DSPlayer is capable of playing http/https content with LAV Splitter Source, but can suffer from a lack of buffering or unstable playback. For this reason, some may want to reroute all known network protocols to VideoPlayer by adding a rule to VideoPlayer merits.

Note: This rule is pre-configured in the supplied playercorefactory.xml in section #1. This example should only be followed to assign additional content to VideoPlayer.

1. Select VideoPlayer merits from the DSPlayer menu. Choose Add new merits rule...

2. Delete any existing fields. Only one line is to be added to the Protocols field.

3. Insert the text below as written:
daap|rtv|rtmp|http|https|rtmpe|mms|rtp|rtsp

Image

4. Select Save rule changes.

5. Kodi must be restated for changes to take effect. All Internet sources should now be played by VideoPlayer.

Adding Custom Filters – Filters configuration

Note: Filters management must be set to Media rules and Filters configuration for the following to apply.

Use of external filters with DSPlayer is a manual process. Custom filters are added in Filters configuration and then assigned to content through media rules. This process can be automated by first installing the filter in Windows.

1. Install the filter.

2. Under Filters management, toggle Media rules and Filters configuration:

Image

3. Choose - Filters configuration.

4. Select Add filter.

5. Choose System filters list, and select the desired filter from the drop-down.

Image

6. All fields should populate except Filter type.

Image

7. Choose the filter type from the drop-down, and click Add filter.

Image

Filters declared in Filters configuration are saved in userdata\dsplayer\filtersconfig.xml. Once saved, a filter will appear in a list that can be revised and added to in the future.

Adding Playback Rules – Media rules

External filters are assigned to content by the creation of media rules. Media rules specify the circumstances when a specific filter should be used. It is possible to incorporate internal versions of LAV Filters and XySubFilter with external filters.

1. Under Filters management, toggle Media rules and Filters configuration:

Image

2. Choose - Media rules.

3. Select Add new rule…

4. Complete the desired fields:

Image

Rule name

Name as it appears in the list of Media rules.

Priority order

Order in which rules with overlapping criteria are applied to media from 0 to 9. The first rule in a list will take precedence over the last.
  • e.g. 0

- File types

Specify the file types (containers) compatible with the rule.
  • e.g. mkv|avi|divx|ogm|mp4|mov|m4v|flv|m2v|mpeg|mpg|mts|m2ts|vob|bdmv

- File name

Play items containing this string found in the filename.
  • e.g. blu-ray

- Video codec

Play items compressed with the following codec.
  • e.g. hevc

- Protocols

Play items with the following network protocols. This can be used with or without the Url checkbox to route live TV and video add-ons containing Internet streams.
  • e.g. daap|rtv|rtsp|rtmp|http|https|rtmpe|rtsp|mms|rtp|pvr

- Url

Play items that are Internet streams.

Source filter

Select the source filter.
  • e.g. LAV Source (lavsource)

Splitter filter

Select the splitter filter.
  • e.g. LAV Splitter (lavsplitter)

Video filter

Select the video decoder.
  • e.g. LAV Video (lavvideo)

Audio filter

Select the audio decoder.
  • e.g. LAV Audio (lavaudio)

Subs filter

Select the subtitle filter.
  • e.g. XySubFilter (xysubfilter)

Extra filter

Select an extra filter. The filter’s role is determined by its type. Adding more than one extra filter is possible.
  • e.g. FFDShow RAW (ffdraw)

Shader Id

Apply post-processing. Shaders do things such as add sharpening, remove grain or apply color correction. Using shaders will impact madVR performance, so only use if your GPU has the processing power to accommodate it. Shaders can be applied to the pre-resized or post-resized image. Although, adding shaders to the post-resized image is recommended. It is possible to use custom shader files, which is explained here.
  • e.g. Sharpen complex 2 (18)

5. Save rule changes.

Created Media rules are saved in userdata\dsplayer\mediasconfig.xml. Once saved, rules will appear in a list that can be revised and added to in the future.

A sample of rules created in mediasconfig.xml is shown below:

<rules>
<rule priority="0" videocodec="hevc">
<source filter="lavsource" />
<splitter filter="lavsplitter" />
<video filter="lentoid_hevc_decoder" />
<audio filter="lavaudio" />
<subs filter="xysubfilter" />
</rule>

<rule filetypes="mkv">
<source filter="lavsource" />
<splitter filter="lavsplitter" />
<video filter="lavvideo" />
<audio filter="lavaudio" />
<subs filter="xysubfilter" />
</rule>
</rules>

DSPlayer Starter Kit

If you would prefer to use external filters with DSPlayer, the following files are pre-configured for most media types to use external copies of LAV Filters and XySubFilter already installed in Windows:

DSPlayer External Filter Configuration Files

Move the included filtersconfig.xml and mediasconfig.xml to: 

C:\Users\Username\AppData\Roaming\Kodi\userdata\dsplayer\

Overwrite any existing files if they exist.

Set Filters management to Media rules and Filters configuration.

Note: Ensure you install the correct external 32-bit or 64-bit versions of LAV Filters and XySubFilter with the corresponding 32-bit or 64-bit Kodi DSPlayer build.
Reply
#3
3. LAV FILTERS & XYSUBFILTER SET UP

We will now configure LAV Filters & XySubFilter. Internal copies of these filters are installed with DSPlayer. Set up assumes internal filters are used.

Pressing O during playback brings up a list of filters loaded with each video. This can be useful to ensure the correct filters are being used. Titles of internal filters start with an i (e.g. (i) LAV Splitter Source).

Configure LAV Filters: Player settings -> DSPlayer -> Filters management -> Internal filters

Image

The recommendation is to configure each filter with its standard configuration panel as opposed to the Kodi GUI.

Select Open property page to access the configuration panel:
Image

LAV Splitter (- Splitter)

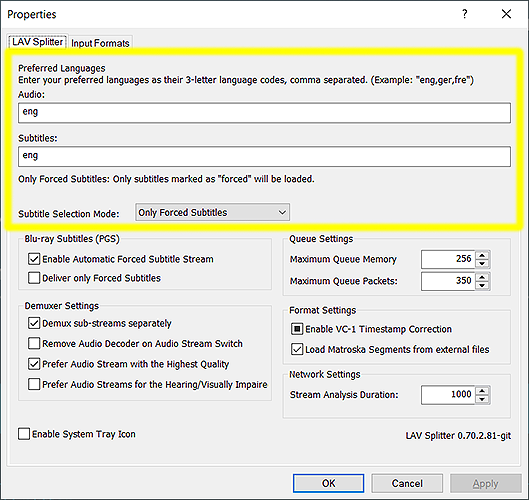
In LAV Splitter, we are primarily concerned with delivering the correct audio and subtitle streams with each video. Specify a default audio and subtitle language. Then choose a default subtitle selection mode (e.g. Forced for English speakers).

The first Blu-ray Subtitles (PGS) box can safely be left checked. PGS subtitles are graphic subtitles embedded in Blu-ray rips (mkvs). Checking Deliver only Forced Subtitles can sometimes result in PGS subtitles not displaying at all with some files.

Image

LAV Video (- Video decoder)

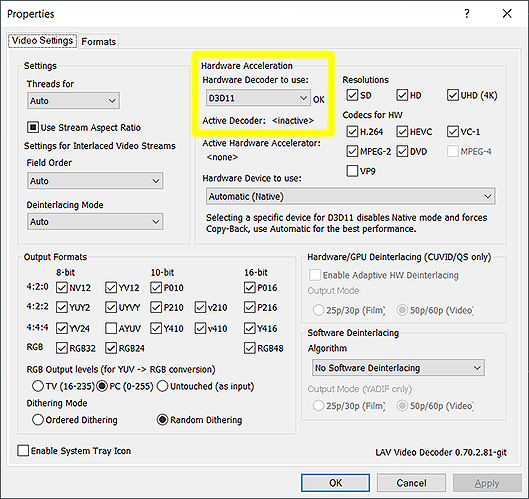
The main setting to be concerned with in LAV Video is the type of hardware acceleration to be used. Hardware acceleration reduces the load on the CPU by offloading video decoding to the GPU. Use of a fixed-function hardware decoder should have minimal impact on madVR. However, it can significantly reduce the load placed on the CPU, as well as reduce noise and heat. Setting hardware acceleration to None means all video will be decoded using software decoding. The effectiveness of software decoding will depend on the speed of your CPU.

The recommendation for hardware acceleration remains the same across hardware manufacturers:
  • Intel: D3D11 (Win 8+) or DXVA2 (copy-back)
  • AMD: D3D11 (Win 8+) or DXVA2 (copy-back) 
  • Nvidia: D3D11 (Win 8+) or DXVA2 (copy-back) 

*NVIDIA CUVID is less efficient with regards to performance and power consumption. The justification for this claim comes from this post.

*DXVA2 (copy-back) can be used by any hardware that supports DXVA2. The copy-back in name means that every video texture is copied back from GPU memory to CPU memory after decoding, so some additional system RAM is consumed. DXVA2 (native) is known to have issues with chroma quality on some systems and is not recommended for use with madVR.

*D3D11 must have the Hardware Device to use set to Automatic (Native). Otherwise, a version of copy-back is used that is slightly slower than DXVA2 (copy-back) with no additional quality benefits. madVR doesn't care if DXVA2 (copy-back) or D3D11 Native are selected. Both are appropriate choices.


madVR features currently unsupported by D3D11 Native:
  • IVTC and GPU hardware deinterlacing;
  • black bar detection.

madVR features noticeably faster with D3D11 Native:
  • HDR tone mapping highlight recovery strength;
  • 4K HEVC on older systems with weak CPU/RAM architecture.

Be sure to check all supported Resolutions and Codecs for HW for the GPU. Documentation for the GPU should indicate video codecs and resolutions supported with hardware acceleration.

Leave the software deinterlacing options alone, as deinterlacing will be handled by madVR. Software deinterlacing does not work with any of the native variants of hardware decoding.

Image

Users struggling with x86 software decoding of HEVC content with LAV Video may want to substitute the Strongene Lentoid HEVC/H.265 Decoder, which offers a significant performance boost. This would require the use of an Extra external filter or Media rules and Filters configuration. LAV Video is the fastest software decoder for x64 (64-bit) DSPlayer.

LAV Audio (- Audio decoder)

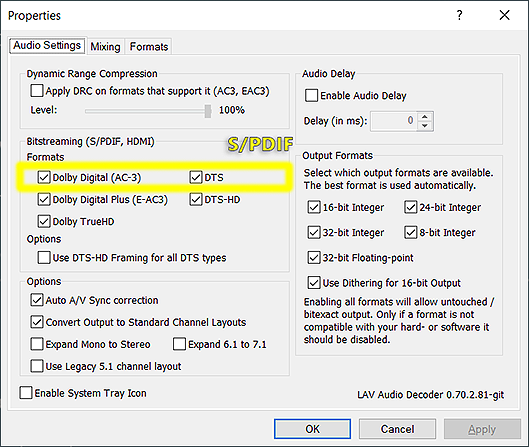
Audio codecs are the focus of configuring LAV Audio. The items that are checked will be bitstreamed. Those left unchecked will be unpackaged and sent as multichannel PCM. What can be bitstreamed depends on the audio equipment used (e.g. AV receiver or television) and the type of output (HDMI or S/PDIF). Users of S/PDIF are limited to Dolby Digital (AC3) and DTS and should leave all other boxes unchecked.

Note: Dolby Atmos (via Dolby TrueHD) and DTS:X (via DTS-HD) must be bitstreamed. There is no decoding to PCM on PC.

Note: If using ReClock for media speed correction, it advised all audio be output as PCM (uncheck all boxes, with the above limitation in mind).

Convert Output to Standard Channel Layouts
Adds silent channels to PCM audio streams to match the layout selected in Windows Sounds settings. This prevents some audio devices from misinterpreting the layout of some mulitichannel PCM tracks resulting in some channels being sent to the wrong speakers.

Use Legacy 5.1 channel layout
Check this box if your surround speakers are in the back as opposed to the sides. The default configuration is to have the surround speakers at the sides. This only impacts audio decoded by LAV Audio. Bitstreams are passed through.

Mixing
When bitstreaming is disabled, LAV Audio does the decoding. The Windows Mixer is not useable in WASAPI exclusive mode. So using the Mixing tab opens the possibility to add mixing: converting the output to different channel layouts, altering the volume of specific channels and matrix encoding to Dolby Pro Logic II. These options should be left alone for most users unless you know what you are doing.

Image

Note: It is possible to manually update LAV Filters to the latest version if you are impatient about waiting for a new DSPlayer release. Take the 32-bit or 64-bit LAV Filters installation files and copy them to the following directory (overwriting the old files):

Program Files (x86)\Kodi\system\players\dsplayer\LAVFilters

You may want to backup the existing files in that directory in case something goes wrong.

XySubFilter (- Subtitle filter)

XySubFilter is the subtitle renderer. The benefit of XySubFilter is that it does not render subtitles directly over the video, and instead communicates with the video renderer allowing it to do what it wants with the subtitle and move it as necessary. All subtitles are rendered in high definition with special care given to language formatting. 

Subtitles are enabled in Kodi from the Audio Settings menu, which is accessible during playback.

Configure XySubFilter: Player settings -> DSPlayer -> Filters management -> Internal filters -> - Subtitle filter

Loading:

Load when needed: Load only when specified by the subtitle selection mode in LAV Splitter.
Always load: Load any subtitle track matching the default language.

VobSub Settings:

VobSub/PGS subtitles are embedded in mkvs from DVD and Blu-ray rips. The lone setting to be concerned with is Only show forced subtitles. Only subtitles marked as forced will be displayed when checked. A forced PGS subtitle stream must be enabled in LAV Splitter for this setting to be functional, and because these are graphic (bitmap) subtitles, it is not possible to change the color or size.

Tip: From experience, use of XySubFilter will slightly reduce the performance of madVR and use quite a bit of VRAM. This is likely due to the fact subtitles are added to the pre-resized image making madVR work harder. To reduce this impact, check the box optimize subtitle quality for performance instead of quality in the trade quality for performance section of madVR's settings. Those having trouble with XySubFilter should consider substituting it with another subtitle filter and adding that subtitle filter as an Extra external filter.

Image

- Extra external filter

Additional filters can be added to the filters covered above. It is possible to include up to three external filters that will be applied to all media. The role of the extra filter is determined by its type (e.g. audio decoder, video decoder, etc.). The purpose of adding an extra external filter is to use features not offered by LAV Filters or XySubFilter.

The most common extra filter used with DSPlayer is FFDShow. Adding FFDShow RAW (ffdraw), for example, makes it possible to use FFDShow-compatible applications such as the SmoothVideo Project (SVP).

The filters below are popular additions to DSPlayer:
That concludes filters set up. So, on to madVR...
Reply
#4
4. MADVR SET UP

Installation Link: http://forum.doom9.org/showthread.php?t=146228

*To install madVR, extract the zip file to any directory, right-click "install.bat" and select "Run as Administrator."

madVR can be configured in two ways:

Detailed Configuration – madVR control panel

madVR is designed to be configured during playback through its own set of configuration menus. It is recommended to complete initial set up via these default panels. This should be done before adjusting any settings in Kodi, due to the fact several menus are located here, which remain inaccessible from Kodi.

The default control panels are available during playback by minimizing Kodi and selecting the tray icon from the Windows Taskbar.

Minimize Kodi, and select Edit madVR Settings… from the madVR tray icon.
Image

Or, press Ctrl + S on your keyboard.

The madVR control panel should appear:

Image

madVR Set up Guide

Completing initial madVR set up will be left to an external guide. This will take you through each menu in the madVR control panel to get madVR up and running.

madVR Set up & Configuration Guide

*It is recommended to use the guide above for detailed set up of madVR on all systems.

Basic Configuration – Kodi GUI

After completing initial set up, it is possible to finetune madVR processing features directly from DSPlayer.

The DSPlayer madVR GUI is especially useful when used alongside rendering stats (Ctrl + J) to dial-in settings and experiment with the various processing features. Opening this menu forces madVR into low latency mode, which temporarily reduces the present queue from 7-8/8 to 1-2/2 to reduce the impact of madVR's pre-rendered frames on GUI performance.

Load and Save with DSPlayer database or Load from madVR active profile must be checked in DSPlayer settings for the menu below to be accessible.

To adjust these settings, access the player controls during playback and select Video Settings.

madVR Video Settings window:
Image

The madVR GUI is divided into three categories:
  1. Processing...
    Image enhancements...
    Zoom Control...
    Deinterlacing
    Reduce banding artifacts
    Reduce ringing artifacts
    Reduce compression artifacts
    Reduce random noise

  2. Scaling Algorithms...
    Upscaling refinement...
    Chroma upscaling

    Image upscaling
    Image downscaling
  3. Rendering...
    Trade quality for performance...
    Brightness
    Dithering
    Smooth motion

Manage settings with Kodi

Player settings -> DSPlayer -> - Manage settings with Kodi

DSPlayer offers three options to manage madVR settings:

Image

Never: The Kodi madVR GUI is disabled and all madVR settings are loaded exclusively from the madVR control panel.

Load and Save with DSPlayer database (default): Enabling this option allows basic configuration of madVR from within Kodi. These settings are accessed during video playback by selecting Video Settings. Video settings are set on a per video basis but can be saved as a global profile for all videos. DSPlayer will create its own DSPlayer Profile Group in the madVR control panel when this setting is enabled. This is a dummy profile intended to separate DSPlayer settings from existing madVR profiles. This dummy profile is not meant for external configuration. Internal settings tables are saved by Kodi — no settings are saved in the madVR control panel.

Load from madVR active profile: Upon playback, the appropriate profile is loaded from madVR for the selected video. Changes made from within Kodi will change the same value in the madVR control panel. No dummy profile is created. These changes only impact the active madVR profile and profile rules cannot be created or saved. This is the best choice for those who have set up profiles in madVR. Any changes made to the active profile are saved externally by madVR. External settings are always loaded in place of internal Kodi tables.

madVR Content Profiles

With Load and Save with DSPlayer database selected, it is possible to save groups of settings based on the content resolution. Settings profiles created in Kodi function independently of any profiles created in madVR.

The resolution of a video influences the usefulness of madVR settings such image enhancements, upscaling refinement and image doubling, which is why profiles are commonly set in this manner. It is also possible to set profiles for specific TV Shows to reflect the large variability in the quality of TV broadcasts.

To create a profile, adjust the settings to your liking, select Save settings... and choose the appropriate category.

The hierarchy of settings created by the Kodi GUI can be confusing. When a video is loaded, the table of settings goes through a progression as follows (Load and Save with DSPlayer database must be enabled for this rules hierarchy to apply):
  • Load settings for the current video;
  • If no settings are found, load the resolution profile;
  • If no resolution profile is found, load global settings.

madVR internal profiles dialog:
Image

Summary of Rules governing the madVR Kodi GUI:
  • Settings made from the Kodi GUI override those made in madVR. Keep in mind, these settings are saved and madVR will revert to the Kodi GUI when started.
  • Settings apply on a per video basis but can be saved as a default for all videos.
  • External madVR profile rules only apply when the GUI is disabled or Load from madVR active profile is selected.

Load from madVR active profile is the preferred method of handling madVR's settings. This allows control from both the control panel and DSPlayer GUI without having to save any data in the Kodi DSPlayer database.

Note: The Kodi GUI is starting to become outdated with madVR development. As as result, some settings found in the madVR control panel are missing from the DSPlayer GUI. Those settings that remain can be adjusted without issue and use of the GUI is still recommended.


Those wanting to add current madVR features to the DSPlayer GUI are advised to follow the instructions in this post.

Set up Tip: Installing a desktop media player such as MPC-HC can make madVR set up an easier task. MPC-HC set up is covered here.

Image
Reply
#5
5. OTHER RESOURCES

Keyboard Shortcuts – Player Controls

Hotkeys are a handy way of accessing the player control menus (e.g. video settings). A combination of native keyboard commands and Kodi actions defined in a keyboard.xml are all that is required to access almost any menu by remote keypress. Creating direct shortcuts to these menus can make menu navigation less tedious. Examples of common actions are shown below:

Keyboard Controls:

Subtitle Selection -> L (NextSubtitle)
Toggle Subtitles On/Off -> T (ShowSubtitles)
Audio Delay -> A (audiodelay)

Action IDs:

Video Settings -> ActivateWindow(123)
Audio Settings -> ActivateWindow(124)
Audio Selection -> AudioNextLanguage
Subtitle Offset -> subtitledelay
Video Bookmarks -> ActivateWindow(125)
Subtitle Search -> ActivateWindow(153)

Example keyboard.xml:

<keymap>
<FullScreenVideo>
<keyboard>
<home>ActivateWindow(123)</home>
<end>ActivateWindow(124)</end>
<s>AudioNextLanguage</s>
<c>subtitledelay</c>
<w>ActivateWindow(125)</w>
<u>ActivateWindow(153)</u>
</keyboard>
</FullScreenVideo>
</keymap>

Configuring a Remote Control

HOW TO - Configure a Logitech Harmony Remote for Kodi

Kodi Beginner's Guide

Kodi Quick Start Guide

HTPC Updater

This is not a DSPlayer tool. But, rather, it is an automated means of downloading and installing the latest version of madVR. This tool is designed to download and install updated copies of MPC-HC, LAV Filters and madVR.

For this tool to work, a 32-bit version of MPC-HC must installed on your system along with LAV Filters and madVR. Running the program will update copies of each program. The benefit for DSPlayer users is this avoids the process of manually extracting and re-registering madVR with each update.

Note: On the first run, madVR components are dropped one level above the existing installation folder. If your installation was C:\Program Files\madVR, madVR installation files would be placed in the C:\Program Files directory. This is the default behavior of the program. Subsequent runs will overwrite the existing installation. If one component fails, try updating it manually before running the program again.

HTPC Updater

MakeMKV

MakeMKV is pain-free software for ripping Blu-rays and DVDs into an MKV container, which can be read by Kodi. By selecting the main title and an audio stream, it is possible to create bit-for-bit copies of Blu-rays with the accompanying lossless audio track in one hour or less. No encoding is required — the video is placed in a new container and packaged with the audio and subtitle track(s). From here, the file can be added directly to your Kodi library or compressed for storage using software such as Handbrake. This is the fastest way to import your Blu-ray collection into Kodi.

Tip: Set the minimum title length to 3600 seconds (60 minutes) and a default language preference in Preferences to ease the task of identifying the correct video, audio and subtitle tracks.

MakeMKV Homepage (Beta Registration Key)

Launcher4Kodi

Launcher4Kodi is a HTPC helper utility that can assist in creating appliance-like behavior of a Windows-based HTPC running Kodi. This utility auto-starts Kodi on power on/sleep resume and auto-closes Kodi on power off. It can also be used to ensure Kodi remains focused when loaded fullscreen and set either Windows or Kodi to run as a shell.
Reply
#6
6. TROUBLESHOOTING TIPS
  1. If you encounter any problem files that result in a black screen while seeking (this should be rare), it is advised to remux these files to a new container or assign them to another player. For mp4 files, MP42MKVac3 offers quick and painless conversion of mp4s into an mkv format with no alteration to the audio or video streams.
  2. Occasional black screens on load or stop can be caused by a failure of the player to switch to the correct refresh rate. Try swapping madVR's refresh rate switching for Kodi, or Kodi for madVR. To use Kodi, leave the display modes field blank in madVR and set Kodi to Adjust display refresh rate under Video settings. To use madVR, disable refresh rate switching in Kodi and configure the textbox in display modes to include all compatible display modes.
  3. If the player fails to load or crashes on stop:
    - Ensure Use system filters (DirectShow merits) is unchecked in DSPlayer settings
    - Ensure the content path is a SMB (Windows) share
    - Disable any custom resolutions
    - Disable fullscreen exclusive mode from Kodi
    - Do not disable present several frames in advance in madVR windowed or exclusive settings
    - Check to determine if the madVR folder was deleted at some point
    - Update madVR to the latest release
    - Turn off Hardware Acceleration in LAV Video (particularly if using Direct3D 11 for presentation in madVR general settings)
    - If the player is crashing on stop, enable - Force madVR to exit from fullscreen before stop in DSPlayer settings

Known Issues/Bugs:

- Adding ReloadSkin() to a keyboard.xml causes DSPlayer to crash on stop dropping from playback back to the home screen.

 - PGS subtitles sometimes will not show if Deliver only Forced Subtitles is checked under Blu-ray Subtitles (PGS) in LAV Splitter. This seems to impact a small number of users and may be related to the software used to rip the source.

- The setting Use limited color range in Kodi is ignored by the DSPlayer OSD that appears during video playback. This should only be an issue when the following output chain is used: 16-235 (madVR) -> 0-255 (GPU) -> 16-235 (Display).

- Enabling subtitles can cause HDR playback to corrupt the image. The source of these subtitles is unknown and this issue seems to be isolated to a couple of known users.

If you are experiencing problems, it is advised to capture a debug log of the issue in Kodi and post it to the official forum.

How to Capture a Debug Log in Kodi:

Turn on dubugging in System -> Debugging. Restart Kodi and recreate the circumstances leading to the error. Close Kodi. Navigate to kodi.log in the AppData\Roaming\Kodi folder. Copy and paste this log to Pastebin and provide a link in the DSPlayer forum.

It is possible to enable silent debugging by creating an advancedsettings.xml and placing it in the userdata folder. This bypasses debugging settings in Kodi. Add the following to advancedsettings.xml:
Code:
<advancedsettings>
<loglevel>1</loglevel> <!-- Setting this to "1" hides the on-screen debug log text -->
</advancedsettings>

How to Capture a Crash Report for madVR:

Crashes likely caused by madVR should be logged via a madVR crash report. Crash reports are produced by pressing CTRL+ALT+SHIFT+BREAK when madVR becomes unresponsive. This report will appear on the desktop. Again, copy and paste this log to Pastebin and provide a link in the DSPlayer forum.

Not all keyboards contain a Break/Pause key. On my wireless Logitech keyboard, Break/Pause is accessed by FN+P. So a madVR crash report is produced by pressing CTRL+ALT+SHIFT+FN+P.

Kodi.pdb:

When debugging, it is recommended to download the PDB file on the DSPlayer download page, rename it as Kodi.pdb and place it in the same folder as Kodi.exe (the Kodi executable). The PDB assists in tracking debug logs and madVR crash reports. Each PDB is directly associated with the accompanying DSPlayer installer.

Please describe your personal settings and the circumstances leading to the problem:

Windows 10
madVR v0.88.21
Direct3D 11 for presentation
fullscreen exclusive mode
Kodi set to Adjust display refresh rate
madVR display modes: 1080p23, 1080p60
Kodi madVR GUI enabled

Playback is started and the video fails to select the correct refresh rate. Playback remains stuck at 60 Hz.

Questions and concerns should be forwarded to the Official DSPlayer Forum!
Reply
#7
I did a test using my laptop with an HD 3000 as the renderer comparing the image output by DSPlayer and MPC-HC with madVR. As you can see, the images are identical.

These are JPEGs not uncompressed PNGs, so this comparison is not of rendering quality. Also, the images were saved for web performance, so minute differences may exist between the two due to the use of dithering. But the takeaway is there appears to be no limitations or unwanted modification of the image by DSPlayer when rendering an image versus the reference player, Media Player Classic. Both rendering performance and image quality remain intact.

Intel HD 3000 madVR settings:
  • Chroma: Bicubic100 + AR
  • Image: Lanczos3 + AR
  • Artifact Removal: Off
  • Dithering: Ordered

DSPlayer & madVR
Image

MPC-HC + LAV Filters & madVR
Image

DSPlayer & madVR
Image

MPC-HC + LAV Filters & madVR
Image
Reply
#8
Kodi VideoPlayer Video Rendering

This is a compilation of VideoPlayer rendering settings to assist in understanding the difference between Kodi VideoPlayer and other renderers:

Image

Note: Only Intel DXVA rendering appears to use an anti-ringing filter. 

Enable HQ scalers allows the use of Pixel Shaders when DXVA is selected. This may be desirable when using DXVA scaling with AMD and Nvidia graphics cards, which use lesser scaling algorithms under this setting.
Reply
#9
Nice guide - may have missed it, but might be worthwhile adding that both mediasconfig and filtersconfig, once configured to your satisfaction can be saved to a DSPlayer folder in C:\User\Username\AppData\Roaming\Kodi\userdata thereby negating the need to change/re-add them each time a new version is installed.

EDIT

Sorry had missed that part entirely. Has something changed with the introduction of menu based alteration, that saves the changes to the userdata installation.
Reply
#10
(2015-03-28, 01:38)steelman1991 Wrote: Nice guide - may have missed it, but might be worthwhile adding that both mediasconfig and filtersconfig, once configured to your satisfaction can be saved to a DSPlayer folder in C:\User\Username\AppData\Roaming\Kodi\userdata thereby negating the need to change/re-add them each time a new version is installed.

EDIT

Sorry had missed that part entirely. Has something changed with the introduction of menu based alteration, that saves the changes to the userdata installation.

Yes, the new menu-based rules system saves changes to the userdata folder.
Reply
#11
Amazing! Thank you for this fantastic Howto Wink
Reply
#12
Warner306, amazing guide. Such a comprehensive work must be commended. Hats off!
For troubleshooting and bug reporting please make sure you read this first (usually it's enough to follow instructions in the second post).
Reply
#13
(2015-04-04, 13:05)ashlar Wrote: Warner306, amazing guide. Such a comprehensive work must be commended. Hats off!

Thanks, there is a lot to cover and many topics that have not been covered in this guide. My concern now is about bugs with the player. I have experienced some instability during playback that I'm hoping will be addressed. There is also a new profiles feature that has been added.
Reply
#14
(2015-03-27, 09:33)Warner306 Wrote: 7. TROUBLESHOOTING TIPS
[*]Users of SVP (SmoothVideo Project) should substitute lavfsplitter as the Source Filter in place of lavsource when using FFDShow for the filter to work as designed.
[/list]

This is totally wrong. You can use any combination of source / video decoding filter with SVP. SVP injects avisynth script into FFDShow to do the job. All you have to do is add FFDShow RAW as extra filter. And SVP would inject code on the fly.

The information you recieved, it's just that example filterconfig / mediaconfig xml SVP team provided is different in filter naming. It's kinda outdated anyway.
Reply
#15
Hello,
I tried to follow your guide to make it happen, unfortunately video playback does not start with dsplayer.Sad
log file
Thank you
Reply
  • 1(current)
  • 2
  • 3
  • 4
  • 5
  • 47

Logout Mark Read Team Forum Stats Members Help
HOW TO - Configure Kodi DSPlayer with LAV Filters, XySubFilter & madVR7