2015-05-10, 09:07
HDR to SDR: Resources Toolkit
Choosing a Display Color Gamut | Choosing a Gamma Curve
Topics Covered:
Choosing a Static Target Nits with Profile Rules
hdrVideoPeak, AvgFMLL and AvgFALL
Profile rules are available for HDR sources that can assign a desired display target nits to each video before playback based on the source's peak brightness. This is a way to optimize the presentation of HDR sources by choosing ranges of display target nits that are ideal for each source. The use of profile rules may not be necessary now that madVR can dynamically adjust the display target nits as the video plays.
HDR profile rules are most effective when matched to the dynamic range of the video. Sources with a higher dynamic range tend to work best with higher target nits that preserve more contrast and sources with a lower dynamic range tend to work best with lower target nits that preserve more brightness.
Advantages of Using Static Target Nits Profiles:
If you wish to use HDR profile rules to pre-select a static display target nits for each movie, it is advised to first prepare a measurement file for each video using madMeasureHDR. These measurement files allow madVR to know the average peak brightness of the source before playback and select the profile rule that best matches the known source peak brightness.
Available HDR Profile Rules:
hdrVideoPeak
hdrVideoPeak is the maximum peak brightness of any pixel in the source. hdrVideoPeak uses the MaxCLL (Maximum Content Light Level). If MaxCLL is 0, or if both MaxCLL and MaxFALL are rounded to an even multiple of 50 (e.g. 500/500 or 10000/450), then the MaxCLL is considered invalid and the mastering display maximum luminance is used instead. Sources measured with madMeasureHDR will set hdrVideoPeak to the measured peak of 99.9% of all frames to exclude any outlying pixels, or a valid MaxCLL, whichever value is lower.
AvgFMLL
AvgFMLL stands for Average Frame Maximum Light Level: The average peak brightness of all measured frames in the video. The average peak of all frames is probably the best representation of the overall brightness of a movie to avoid clipping the majority of the specular highlights.
AvgFALL
AvgFALL stands for Average Frame Average Light Level: The average distributed peak brightness of all pixels in a frame for all measured frames in the video. This value is less useful than AvgFMLL for judging highlight clipping, but can be valuable in setting the desired brightness and contrast for the presentation. Videos with a high AvgFALL will appear subjectively brighter than videos with a low AvgFALL, even if the peak brightness of the source fails to reach a high maximum frame peak.
Note: AvgFMLL and AvgFALL are only valid if a measurement file exists for the selected video.
HDR profile groups are created under devices -> hdr
Sample of HDR Profile Rules (Thanks to Manni at Doom9)
Tip: To get the most out of HDR profiles in madVR, it is advised to create a blank folder named "ShowHdrMode" and place it in the madVR installation folder. This will show the active display target nits selected for the video in the madVR OSD.
Custom or Dynamic Display Target Nits with madMeasureHDR Measurement Files
If you browse through the madVR installation folder, you will find a special utility there named madMeasureHDR. This tool is designed to populate a file with frame-by-frame HDR10 metadata from any HDR10 video read and decoded by madMeasureHDR. The metadata created by madMeasureHDR can be used by madVR when that same file is played with tone map HDR using pixel shaders selected.
The Command Prompt utility decodes the full video prior to playback using a LAV Video decoder and analyzes the brightness of each frame in the video and stores all measured frame peaks in a single digital .measurements file. This includes the full brightness histogram for every frame in the video that describes the measured frame average light level and frame peak brightness of each video frame. When the video file is played, madVR reads the completed .measurements file and uses the stored frame measurements to improve the accuracy of its dynamic tone mapping.
The.measurements files include an embedded field for entering a hard-coded display target nits for each video frame. Two user-created tools have been developed to edit this field automatically or manually with user-controlled values.
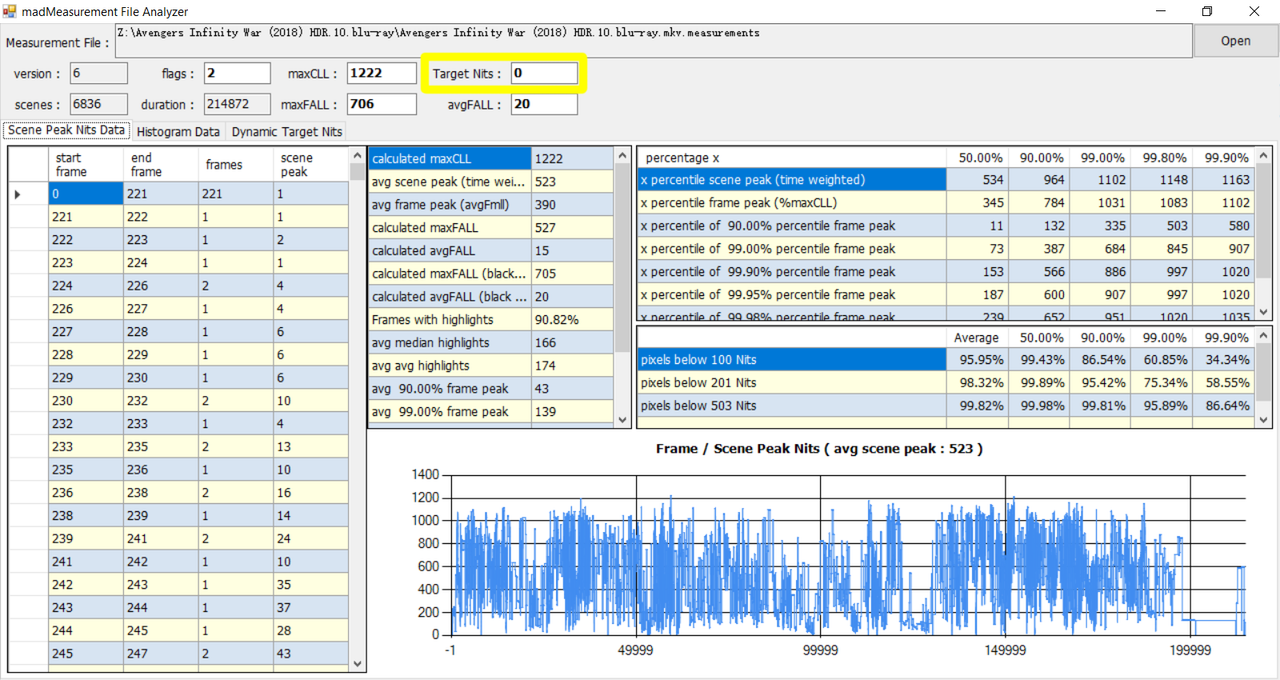
pandm1967's simple tool allows for the entry of a static display target nits for each movie into the target nits field of each measurement file. Values entered in the measurement files permanently override any values entered in the madVR control panel.
pandm1967's simple measurement tool:

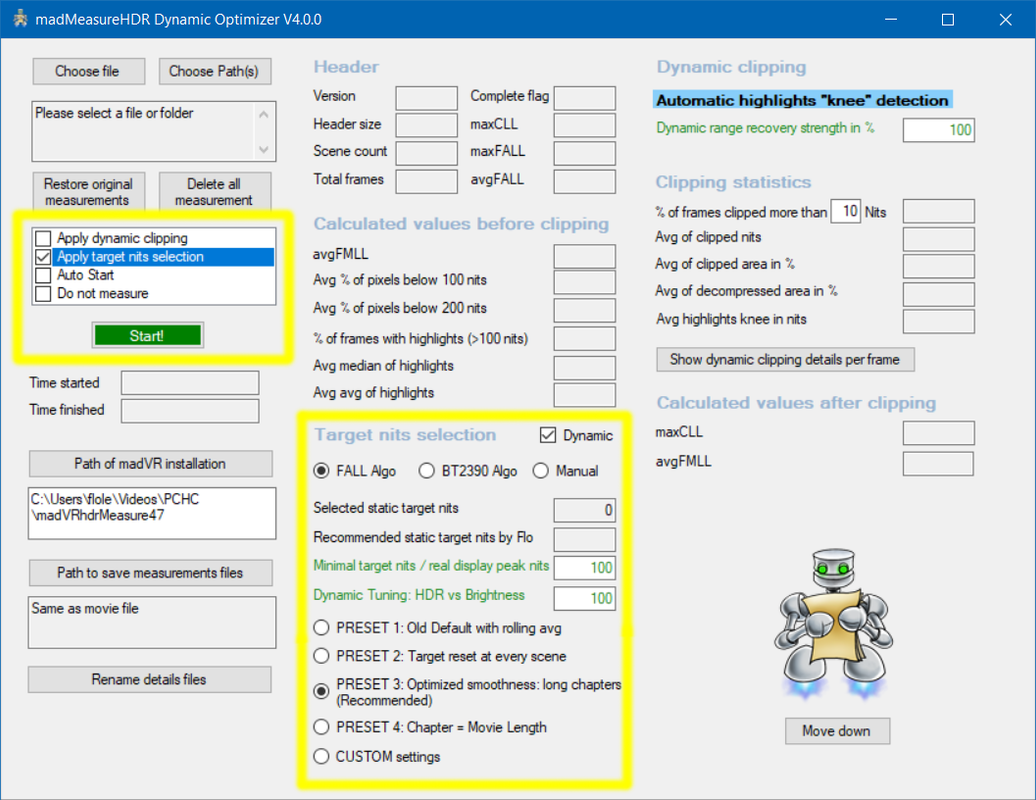
Soulnight's MadmeasureHDR Dynamic Optimizer tool takes this a step further by embedding a display target nits for every frame in the video. This continuously adjusts the display target nits as the video plays to dynamically optimize the brightness and contrast of each scene in the video.
Advantages of Using a Dynamic Target Nits:
Soulnight's tool provides the same functionality as checking apply target nits option (Coming Soon!) in the madVR control panel when no measurement file is available. The formulas used to select the display target nits are identical. Soulnight's tool has the advantage of using the pre-measured frames to know the scene and chapter cuts ahead of time to reduce false detections of individual scenes and chapters and present smoother transitions in brightness caused by resets to the display target nits at each scene change.
Soulnight's MadmeasureHDR Dynamic Optimizer tool:

How to Use madMeasureHDR to Create Dynamic HDR10 Metadata Files
Instructions on how to use these tools along with madMeasureHDR to create .measurements files for HDR10 videos embedded with a hard-coded static or dynamic display target nits are provided below:
Instructions: Using madMeasureHDR to Create Dynamic HDR10 Metadata
Choosing a Display Color Gamut | Choosing a Gamma Curve
Topics Covered:
- Static HDR Profile Rules;
- User-Created Tools for Populating madMeasureHDR Measurement Files.
Choosing a Static Target Nits with Profile Rules
hdrVideoPeak, AvgFMLL and AvgFALL
Profile rules are available for HDR sources that can assign a desired display target nits to each video before playback based on the source's peak brightness. This is a way to optimize the presentation of HDR sources by choosing ranges of display target nits that are ideal for each source. The use of profile rules may not be necessary now that madVR can dynamically adjust the display target nits as the video plays.
HDR profile rules are most effective when matched to the dynamic range of the video. Sources with a higher dynamic range tend to work best with higher target nits that preserve more contrast and sources with a lower dynamic range tend to work best with lower target nits that preserve more brightness.
Advantages of Using Static Target Nits Profiles:
- More consistent brightness throughout the presentation;
- Less potential to clip detail during frame peaks.
If you wish to use HDR profile rules to pre-select a static display target nits for each movie, it is advised to first prepare a measurement file for each video using madMeasureHDR. These measurement files allow madVR to know the average peak brightness of the source before playback and select the profile rule that best matches the known source peak brightness.
Available HDR Profile Rules:
hdrVideoPeak
hdrVideoPeak is the maximum peak brightness of any pixel in the source. hdrVideoPeak uses the MaxCLL (Maximum Content Light Level). If MaxCLL is 0, or if both MaxCLL and MaxFALL are rounded to an even multiple of 50 (e.g. 500/500 or 10000/450), then the MaxCLL is considered invalid and the mastering display maximum luminance is used instead. Sources measured with madMeasureHDR will set hdrVideoPeak to the measured peak of 99.9% of all frames to exclude any outlying pixels, or a valid MaxCLL, whichever value is lower.
AvgFMLL
AvgFMLL stands for Average Frame Maximum Light Level: The average peak brightness of all measured frames in the video. The average peak of all frames is probably the best representation of the overall brightness of a movie to avoid clipping the majority of the specular highlights.
AvgFALL
AvgFALL stands for Average Frame Average Light Level: The average distributed peak brightness of all pixels in a frame for all measured frames in the video. This value is less useful than AvgFMLL for judging highlight clipping, but can be valuable in setting the desired brightness and contrast for the presentation. Videos with a high AvgFALL will appear subjectively brighter than videos with a low AvgFALL, even if the peak brightness of the source fails to reach a high maximum frame peak.
Note: AvgFMLL and AvgFALL are only valid if a measurement file exists for the selected video.
HDR profile groups are created under devices -> hdr
Sample of HDR Profile Rules (Thanks to Manni at Doom9)
Tip: To get the most out of HDR profiles in madVR, it is advised to create a blank folder named "ShowHdrMode" and place it in the madVR installation folder. This will show the active display target nits selected for the video in the madVR OSD.
Custom or Dynamic Display Target Nits with madMeasureHDR Measurement Files
If you browse through the madVR installation folder, you will find a special utility there named madMeasureHDR. This tool is designed to populate a file with frame-by-frame HDR10 metadata from any HDR10 video read and decoded by madMeasureHDR. The metadata created by madMeasureHDR can be used by madVR when that same file is played with tone map HDR using pixel shaders selected.
The Command Prompt utility decodes the full video prior to playback using a LAV Video decoder and analyzes the brightness of each frame in the video and stores all measured frame peaks in a single digital .measurements file. This includes the full brightness histogram for every frame in the video that describes the measured frame average light level and frame peak brightness of each video frame. When the video file is played, madVR reads the completed .measurements file and uses the stored frame measurements to improve the accuracy of its dynamic tone mapping.
The.measurements files include an embedded field for entering a hard-coded display target nits for each video frame. Two user-created tools have been developed to edit this field automatically or manually with user-controlled values.
pandm1967's simple tool allows for the entry of a static display target nits for each movie into the target nits field of each measurement file. Values entered in the measurement files permanently override any values entered in the madVR control panel.
pandm1967's simple measurement tool:

Soulnight's MadmeasureHDR Dynamic Optimizer tool takes this a step further by embedding a display target nits for every frame in the video. This continuously adjusts the display target nits as the video plays to dynamically optimize the brightness and contrast of each scene in the video.
Advantages of Using a Dynamic Target Nits:
- Less wasted brightness and a potentially brighter overall image;
- The ideal amount of brightness and contrast can be applied to each scene.
Soulnight's tool provides the same functionality as checking apply target nits option (Coming Soon!) in the madVR control panel when no measurement file is available. The formulas used to select the display target nits are identical. Soulnight's tool has the advantage of using the pre-measured frames to know the scene and chapter cuts ahead of time to reduce false detections of individual scenes and chapters and present smoother transitions in brightness caused by resets to the display target nits at each scene change.
Soulnight's MadmeasureHDR Dynamic Optimizer tool:

How to Use madMeasureHDR to Create Dynamic HDR10 Metadata Files
Instructions on how to use these tools along with madMeasureHDR to create .measurements files for HDR10 videos embedded with a hard-coded static or dynamic display target nits are provided below:
Instructions: Using madMeasureHDR to Create Dynamic HDR10 Metadata


