2016-02-08, 07:05
4. RENDERING
General Settings

General settings ensure hardware and operating system compatibility for smooth playback. Minor performance improvements may be experienced, but they aren't likely to be noticeable. The goal is to achieve correct open and close behavior of the media player with smooth and stable playback without any dropped frames or presentation glitches.
Expert Guide:
delay playback start until render queue is full
Pauses the video playback until a number of frames have been rendered in advance of playback. This potentially avoids some stuttering right at the start of video playback, or after seeking through a video — but it will add a slight delay to both. It is disabled by default, but I prefer to have it enabled. If you are having problems where a video fails to start playing, this is the first option I would disable when troubleshooting.
enable windowed overlay (Windows 7 and newer)
Windows 7/8/10
Changes the way that windowed mode is rendered, and will generally give you better performance. The downside to windowed overlay is that you cannot take screenshots of it with the Print Screen key on your keyboard. Other than that, it's mostly a “free” performance increase.
It does not work with AMD graphics cards or fullscreen exclusive mode. D3D9 Only.
enable automatic fullscreen exclusive mode
Windows 7/8/10*
Allows madVR to use fullscreen exclusive mode for video rendering. This allows for several frames to be sent to the video card in advance, which can help eliminate random stuttering during playback. It will also prevent things like notifications from other applications being displayed on the screen at the same time, and similar to the Windowed Overlay mode, it stops Print Screen from working. The main downside to fullscreen exclusive mode is that when switching in/out of FSE mode, the screen will flash black for a second (similar to changing refresh rates). A mouse-based interface is rendered in such a way that it would not be visible in FSE mode, so madVR gets kicked out of FSE mode any time you use it, and you get that black flash on the screen. I personally find this distracting, and as such, have disabled FSE mode. The "10ft interface" is unaffected and renders correctly inside FSE mode.
Required for 10-bit output with Windows 7 or 8. fullscreen exclusive mode is not recommended with Windows 10 due to the way Windows 10 handles this mode. In reality, fullscreen exclusive mode is no longer exclusive in Windows 10 and in fact fake, not to mention unreliable with many drivers and media players. Consider it unsupported. It is only useful in Windows 10 if you are unable to get smooth playback with the default windowed mode.
disable desktop composition (Vista and newer)
Windows Vista/7
This option will disable Aero during video playback. Back in the early days of madVR this may have been necessary on some systems, but I don't recommend enabling this option now. Typically, the main thing that happens is that it breaks VSync and you get screen tearing (horizontal lines over the video). Not available for Windows 8 and Windows 10.
use Direct3D 11 for presentation (Windows 7 and newer)
Windows 7/8/10
Uses a Direct3D 11 presentation path in place of Direct3D 9. This may allow for faster entering and exiting of fullscreen exclusive mode. Overrides windowed overlay.
Required for 10-bit output (all video drivers) and HDR passthrough (AMD).
present a frame for every VSync
Windows 7/8/10
Disabling this setting may improve performance but can cause presentation glitches. However, enabling it will cause presentation glitches on other systems. When disabled, madVR presents new frames when needed, relying on Direct3D 11 to repeat frames as necessary to maintain VSync. Unless you are experiencing dropped frames, it is best to leave it enabled.
use a separate device for presentation (Vista and newer)
Windows Vista/7/8/10
By default, this option is now disabled. It could provide a small performance improvement or performance hit depending on the system. You will have to experiment with this one.
use a separate device for DXVA processing (Vista and newer)
Windows Vista/7/8/10
Also disabled by default. Similar to the option above, this may improve or impair performance slightly.
CPU/GPU queue size
This sets the size of the decoder/subtitle queues (CPU) (video & subtitle) and upload/render queues (GPU) (madVR). Unless you are experiencing problems, I would leave it at the default settings of 16/8. The higher these queue sizes are, the more memory madVR requires. With larger queues, you could potentially have smoother playback on some systems, but increased queue sizes also mean increased delays when seeking if the delay playback… options are enabled.
The default queue sizes should be more than enough for most systems. Some weaker PCs may benefit from lowering the CPU queue and possibility the GPU queue.
Windowed Mode Settings
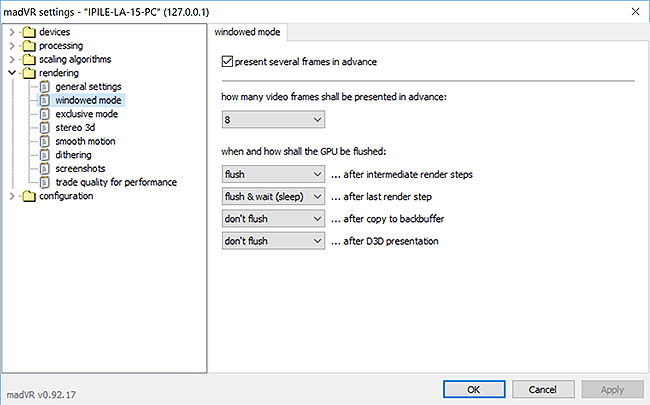
present several frames in advance
Provides a buffer to protect against dropped frames and presentation glitches by sending a predetermined number of frames in advance of playback to the GPU driver. This presentation buffer comes at the expense of some delay during seeking. Dropped frames will occur when the present queue shown in the madVR OSD reaches zero.
It is best to leave this setting enabled. Smaller present queues are recommended (typically, 4-8 frames) for the most responsive playback. If the number of frames presented in advance is increased, the size of the CPU and GPU queues may also need to be larger to fill the present queue.
If the present queue is stuck at zero, your GPU has likely run out of resources and madVR processing settings will have to be reduced until it fills.
Leave the flush settings alone unless you know what you are doing.
Exclusive Mode Settings
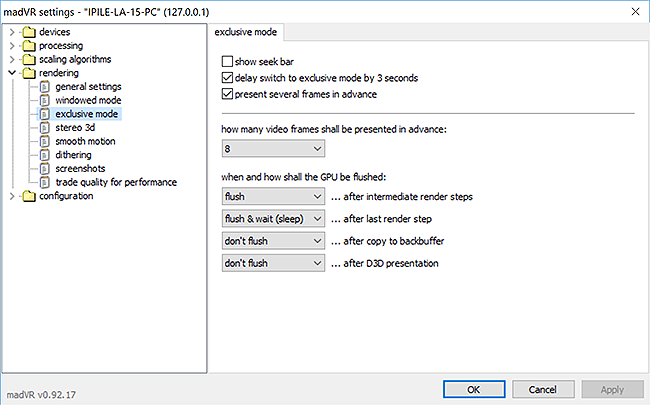
show seek bar
This should be unchecked if using fullscreen exclusive mode and a desktop media player such as MPC. Otherwise, a seek bar will appear at the bottom of every video that cannot be removed during playback.
delay switch to exclusive mode by 3 seconds
Switching to FSE can sometimes be slow. Checking this options gives madVR time to fill its buffers and complete the switch to FSE, limiting the chance of dropped frames or presentation glitches.
present several frames in advance
Like the identical setting in windowed mode, present several frames in advance is protection against dropped frames and presentation glitches and is best left enabled. Smaller present queues are recommended (typically, 4-8 frames) for the most responsive playback. If the number of frames presented in advance is increased, the size of the CPU and GPU queues may also need to be larger to fill the present queue.
If the present queue is stuck at zero, your GPU has likely run out of resources and madVR processing settings will have to be reduced until it fills.
Again, flush settings should be left alone unless you know what you are doing.
Stereo 3D
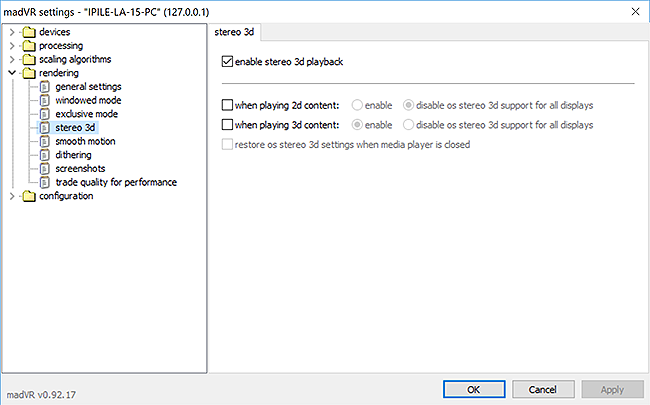
enable stereo 3d playback
Enables stereoscopic 3D playback for supported media, which is currently limited to frame packed MPEG4-MVC 3D Blu-ray.
What Is Stereo 3D?
Nvidia's official support for MVC 3D playback ended with driver 425.31 (April 11, 2019). Newer drivers will not install the 3D Vision driver or offer the ability to enable Stereoscopic 3D in the GPU control panel. Options for 3D playback with Nvidia include converting MVC 3D to any format that places frame packed frames on the same 2D frame: devices -> properties -> 3D format, or using the last stable driver with frame packed 3D support (recommended: 385.28 or 418.91).
Manual Workaround to Install 3D Vision with Recent Nvidia Drivers
when playing 2d content
Nvidia GPUs are known to crash on occasion when 3D mode is active in the operating system and 2D content is played. This most often occurs when use Direct3D 11 for presentation (Windows 7 and newer) is used by madVR. Disable OS stereo 3d support for all displays should be checked if using this combination.
when playing 3d content
Not all GPUs need to have 3D enabled in the operating system. If 3D mode is enabled in the operating system, some GPUs will change the display calibration to optimize playback for frame-packed 3D. This can interfere with the performance of madVR's 3D playback. Possible side effects include altered gamma curves (designed for frame-packed 3D) and screen flickering caused by the use of an active shutter. Disable OS stereo 3d support for all displays is a failsafe to prevent GPU 3D settings from altering the image in unwanted ways.
restore OS stereo 3D settings when media player is closed
Returns the GPU back to the same state as before playback. So this is an override for any of the GPU control panel adjustments made by the two settings above. Overrides made by madVR will be enabled again when the media player is started.
Recommended Use (stereo 3D):
It is recommended to leave all secondary 3D settings at the default values and only change them if 3D playback is causing problems or 2D videos are not playing correctly.
madVR's approach to 3D is not failsafe and can be at the mercy of GPU drivers. If 3D mode is not engaged at playback start, try checking enable automatic fullscreen exclusive mode. If this does not work, a batch file may be needed to toggle 3D mode in the GPU control panel.
The use of batch files with madVR is beyond the scope of this guide, but a batch file that can enable stereoscopic 3D in the Nvidia control panel can be found here. Batch files can be called from madVR by associating them with folders created under profile groups.
Smooth Motion
Expert Guide: smooth motion is a frame blending system for madVR. What smooth motion is not, is a frame interpolation system — it will not introduce the “soap opera effect” like you see on 120 Hz+ TVs, or reduce 24p judder.
smooth motion is designed to display content where the source frame rate does not match up to any of the refresh rates that your display supports. For example, that would be 25/50fps content on a 60 Hz-only display, or 24p content on a 60 Hz-only display.
It does not replace ReClock or JRiver VideoClock, and if your display supports 1080p24, 1080p50, and 1080p60 then you should not need to use smooth motion at all.
Because smooth motion works by using frame blending you may see slight ghost images at the edge of moving objects — but this seems to be rare and dependent on the display you are using, and is definitely preferable to the usual judder from mismatched frame rates/refresh rates.
What Is Motion Interpolation?
Medium Processing
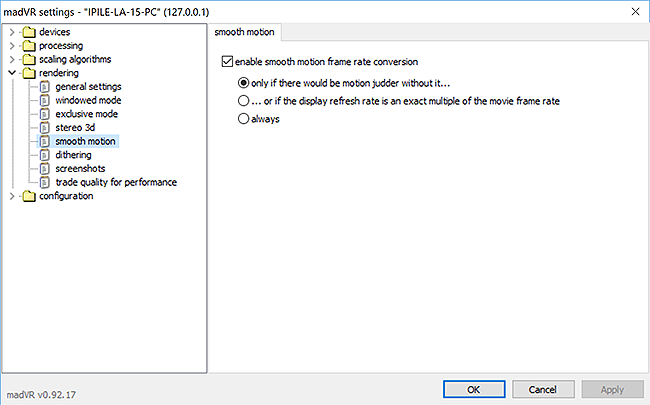
enable smooth motion frame rate conversion
Eliminates motion judder caused by mismatched frame rates by converting any source frame rate to the output refresh rate by using frame blending.
only if there would be motion judder without it...
Enables smooth motion when 3/2 pulldown is needed or any other irregular frame pattern is detected.
...or if the display refresh rate is an exact multiple of the movie frame rate
Enables smooth motion when the output refresh rate of the GPU is an exact duplicate of the content refresh rate.
always
Enables smooth motion for all playback.
Recommended Use (smooth motion):
If your display lacks the ability to match refresh rates, like most native 60 Hz panels, smooth motion may be a prefered alternative to 3/2 pulldown. Use of smooth motion largely comes down your taste for this form of frame smoothing. Those with projectors with equipment that takes ages to change refresh rates could be tempted to lock the desktop to 60 Hz and use smooth motion to eliminate any motion judder. smooth motion can introduce some blur artifacts, so its judder-free performance upgrade is not free and comes with its own trade-offs.
Dithering
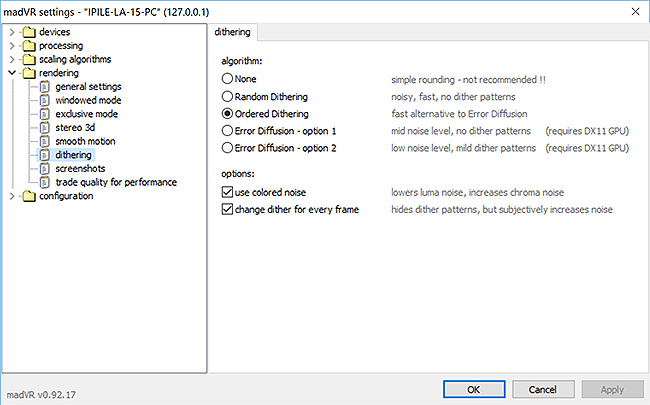
madVR Explained: Dithering is performed as the last step in madVR to convert its internal 16-bit data to the bit depth set for the display. Any time madVR does anything to the video (e.g., upsample or convert to another color space), high bit-depth information is created. Dithering allows much of this information to be preserved when displayed at lower bit depths. For example, the conversion of Y'CbCr to RGB generates >10-bits of RGB data.
What Is Dithering?
Dithering to 2-bits:
2 bit Ordered Dithering
2 bit No Dithering
Low Processing
Random Dithering
Very fast dithering. High-noise, no dither pattern.
Ordered Dithering
Very fast dithering. Low-noise, high dither pattern. This offers high-quality dithering basically for free.
use colored noise
Uses an inverted dither pattern for green ("opposite color"), which reduces luma noise but adds chroma noise.
change dither for every frame
Uses a new dither seed for every frame. Or, for Ordered Dithering, add random offsets and rotate the dither texture 90° between every frame. Hides dither patterns but adds some subjective noise.
Medium Processing
Error Diffusion - option 1
DirectCompute is used to perform very high-quality error diffusion dithering. Mid-noise, no dither pattern. Requires a DX 11-compatible graphics card.
Error Diffusion - option 2
DirectCompute is used to perform very high-quality error diffusion dithering. Low-noise, mid dither pattern. Requires a DX 11-compatible graphics card.
Recommended Use (dithering):
There really is no good reason to disable dithering. Even when the input and output bit depths match, slight color banding will be introduced into the image just through digital quantization (or rounding) errors. When the source bit depth is higher than the output bit depth set in madVR, severe banding can be introduced if dithering is not used.
Error Diffusion offers a gradual improvement over Ordered Dithering with marginally higher resource use and is by no means necessary. Two variants of Error Diffusion are offered in madVR because no clear preference exists amongst users for one over the other. Either choice will provide similar quality with slightly different trade-offs.
Trade Quality for Performance
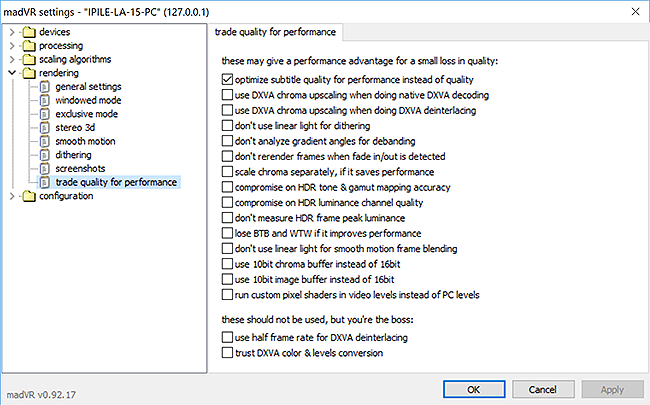
The last set of settings reduce GPU usage at the expense of image quality. Most, if not all, options will provide very small degradations to image quality.
Recommended Use (trade quality for performance):
I would start by disabling all options in this section to retain the highest-quality output and only check them if you truly need the extra performance. Those trying to squeeze the last bit of power from their GPU will want to start at the top and work their way to the bottom. It usually takes more than one checkbox to put rendering times under the frame interval or cause the present queue to fill.
- General Settings
- Windowed Mode Settings
- Exclusive Mode Settings
- Stereo 3D
- Smooth Motion
- Dithering
- Trade Quality for Performance
General Settings

General settings ensure hardware and operating system compatibility for smooth playback. Minor performance improvements may be experienced, but they aren't likely to be noticeable. The goal is to achieve correct open and close behavior of the media player with smooth and stable playback without any dropped frames or presentation glitches.
Expert Guide:
delay playback start until render queue is full
Pauses the video playback until a number of frames have been rendered in advance of playback. This potentially avoids some stuttering right at the start of video playback, or after seeking through a video — but it will add a slight delay to both. It is disabled by default, but I prefer to have it enabled. If you are having problems where a video fails to start playing, this is the first option I would disable when troubleshooting.
enable windowed overlay (Windows 7 and newer)
Windows 7/8/10
Changes the way that windowed mode is rendered, and will generally give you better performance. The downside to windowed overlay is that you cannot take screenshots of it with the Print Screen key on your keyboard. Other than that, it's mostly a “free” performance increase.
It does not work with AMD graphics cards or fullscreen exclusive mode. D3D9 Only.
enable automatic fullscreen exclusive mode
Windows 7/8/10*
Allows madVR to use fullscreen exclusive mode for video rendering. This allows for several frames to be sent to the video card in advance, which can help eliminate random stuttering during playback. It will also prevent things like notifications from other applications being displayed on the screen at the same time, and similar to the Windowed Overlay mode, it stops Print Screen from working. The main downside to fullscreen exclusive mode is that when switching in/out of FSE mode, the screen will flash black for a second (similar to changing refresh rates). A mouse-based interface is rendered in such a way that it would not be visible in FSE mode, so madVR gets kicked out of FSE mode any time you use it, and you get that black flash on the screen. I personally find this distracting, and as such, have disabled FSE mode. The "10ft interface" is unaffected and renders correctly inside FSE mode.
Required for 10-bit output with Windows 7 or 8. fullscreen exclusive mode is not recommended with Windows 10 due to the way Windows 10 handles this mode. In reality, fullscreen exclusive mode is no longer exclusive in Windows 10 and in fact fake, not to mention unreliable with many drivers and media players. Consider it unsupported. It is only useful in Windows 10 if you are unable to get smooth playback with the default windowed mode.
disable desktop composition (Vista and newer)
Windows Vista/7
This option will disable Aero during video playback. Back in the early days of madVR this may have been necessary on some systems, but I don't recommend enabling this option now. Typically, the main thing that happens is that it breaks VSync and you get screen tearing (horizontal lines over the video). Not available for Windows 8 and Windows 10.
use Direct3D 11 for presentation (Windows 7 and newer)
Windows 7/8/10
Uses a Direct3D 11 presentation path in place of Direct3D 9. This may allow for faster entering and exiting of fullscreen exclusive mode. Overrides windowed overlay.
Required for 10-bit output (all video drivers) and HDR passthrough (AMD).
present a frame for every VSync
Windows 7/8/10
Disabling this setting may improve performance but can cause presentation glitches. However, enabling it will cause presentation glitches on other systems. When disabled, madVR presents new frames when needed, relying on Direct3D 11 to repeat frames as necessary to maintain VSync. Unless you are experiencing dropped frames, it is best to leave it enabled.
use a separate device for presentation (Vista and newer)
Windows Vista/7/8/10
By default, this option is now disabled. It could provide a small performance improvement or performance hit depending on the system. You will have to experiment with this one.
use a separate device for DXVA processing (Vista and newer)
Windows Vista/7/8/10
Also disabled by default. Similar to the option above, this may improve or impair performance slightly.
CPU/GPU queue size
This sets the size of the decoder/subtitle queues (CPU) (video & subtitle) and upload/render queues (GPU) (madVR). Unless you are experiencing problems, I would leave it at the default settings of 16/8. The higher these queue sizes are, the more memory madVR requires. With larger queues, you could potentially have smoother playback on some systems, but increased queue sizes also mean increased delays when seeking if the delay playback… options are enabled.
The default queue sizes should be more than enough for most systems. Some weaker PCs may benefit from lowering the CPU queue and possibility the GPU queue.
Windowed Mode Settings

present several frames in advance
Provides a buffer to protect against dropped frames and presentation glitches by sending a predetermined number of frames in advance of playback to the GPU driver. This presentation buffer comes at the expense of some delay during seeking. Dropped frames will occur when the present queue shown in the madVR OSD reaches zero.
It is best to leave this setting enabled. Smaller present queues are recommended (typically, 4-8 frames) for the most responsive playback. If the number of frames presented in advance is increased, the size of the CPU and GPU queues may also need to be larger to fill the present queue.
If the present queue is stuck at zero, your GPU has likely run out of resources and madVR processing settings will have to be reduced until it fills.
Leave the flush settings alone unless you know what you are doing.
Exclusive Mode Settings

show seek bar
This should be unchecked if using fullscreen exclusive mode and a desktop media player such as MPC. Otherwise, a seek bar will appear at the bottom of every video that cannot be removed during playback.
delay switch to exclusive mode by 3 seconds
Switching to FSE can sometimes be slow. Checking this options gives madVR time to fill its buffers and complete the switch to FSE, limiting the chance of dropped frames or presentation glitches.
present several frames in advance
Like the identical setting in windowed mode, present several frames in advance is protection against dropped frames and presentation glitches and is best left enabled. Smaller present queues are recommended (typically, 4-8 frames) for the most responsive playback. If the number of frames presented in advance is increased, the size of the CPU and GPU queues may also need to be larger to fill the present queue.
If the present queue is stuck at zero, your GPU has likely run out of resources and madVR processing settings will have to be reduced until it fills.
Again, flush settings should be left alone unless you know what you are doing.
Stereo 3D

enable stereo 3d playback
Enables stereoscopic 3D playback for supported media, which is currently limited to frame packed MPEG4-MVC 3D Blu-ray.
What Is Stereo 3D?
Nvidia's official support for MVC 3D playback ended with driver 425.31 (April 11, 2019). Newer drivers will not install the 3D Vision driver or offer the ability to enable Stereoscopic 3D in the GPU control panel. Options for 3D playback with Nvidia include converting MVC 3D to any format that places frame packed frames on the same 2D frame: devices -> properties -> 3D format, or using the last stable driver with frame packed 3D support (recommended: 385.28 or 418.91).
Manual Workaround to Install 3D Vision with Recent Nvidia Drivers
when playing 2d content
Nvidia GPUs are known to crash on occasion when 3D mode is active in the operating system and 2D content is played. This most often occurs when use Direct3D 11 for presentation (Windows 7 and newer) is used by madVR. Disable OS stereo 3d support for all displays should be checked if using this combination.
when playing 3d content
Not all GPUs need to have 3D enabled in the operating system. If 3D mode is enabled in the operating system, some GPUs will change the display calibration to optimize playback for frame-packed 3D. This can interfere with the performance of madVR's 3D playback. Possible side effects include altered gamma curves (designed for frame-packed 3D) and screen flickering caused by the use of an active shutter. Disable OS stereo 3d support for all displays is a failsafe to prevent GPU 3D settings from altering the image in unwanted ways.
restore OS stereo 3D settings when media player is closed
Returns the GPU back to the same state as before playback. So this is an override for any of the GPU control panel adjustments made by the two settings above. Overrides made by madVR will be enabled again when the media player is started.
Recommended Use (stereo 3D):
It is recommended to leave all secondary 3D settings at the default values and only change them if 3D playback is causing problems or 2D videos are not playing correctly.
madVR's approach to 3D is not failsafe and can be at the mercy of GPU drivers. If 3D mode is not engaged at playback start, try checking enable automatic fullscreen exclusive mode. If this does not work, a batch file may be needed to toggle 3D mode in the GPU control panel.
The use of batch files with madVR is beyond the scope of this guide, but a batch file that can enable stereoscopic 3D in the Nvidia control panel can be found here. Batch files can be called from madVR by associating them with folders created under profile groups.
Smooth Motion

Expert Guide: smooth motion is a frame blending system for madVR. What smooth motion is not, is a frame interpolation system — it will not introduce the “soap opera effect” like you see on 120 Hz+ TVs, or reduce 24p judder.
smooth motion is designed to display content where the source frame rate does not match up to any of the refresh rates that your display supports. For example, that would be 25/50fps content on a 60 Hz-only display, or 24p content on a 60 Hz-only display.
It does not replace ReClock or JRiver VideoClock, and if your display supports 1080p24, 1080p50, and 1080p60 then you should not need to use smooth motion at all.
Because smooth motion works by using frame blending you may see slight ghost images at the edge of moving objects — but this seems to be rare and dependent on the display you are using, and is definitely preferable to the usual judder from mismatched frame rates/refresh rates.
What Is Motion Interpolation?
Medium Processing
enable smooth motion frame rate conversion
Eliminates motion judder caused by mismatched frame rates by converting any source frame rate to the output refresh rate by using frame blending.
only if there would be motion judder without it...
Enables smooth motion when 3/2 pulldown is needed or any other irregular frame pattern is detected.
...or if the display refresh rate is an exact multiple of the movie frame rate
Enables smooth motion when the output refresh rate of the GPU is an exact duplicate of the content refresh rate.
always
Enables smooth motion for all playback.
Recommended Use (smooth motion):
If your display lacks the ability to match refresh rates, like most native 60 Hz panels, smooth motion may be a prefered alternative to 3/2 pulldown. Use of smooth motion largely comes down your taste for this form of frame smoothing. Those with projectors with equipment that takes ages to change refresh rates could be tempted to lock the desktop to 60 Hz and use smooth motion to eliminate any motion judder. smooth motion can introduce some blur artifacts, so its judder-free performance upgrade is not free and comes with its own trade-offs.
Dithering

madVR Explained: Dithering is performed as the last step in madVR to convert its internal 16-bit data to the bit depth set for the display. Any time madVR does anything to the video (e.g., upsample or convert to another color space), high bit-depth information is created. Dithering allows much of this information to be preserved when displayed at lower bit depths. For example, the conversion of Y'CbCr to RGB generates >10-bits of RGB data.
What Is Dithering?
Dithering to 2-bits:
2 bit Ordered Dithering
2 bit No Dithering
Low Processing
Random Dithering
Very fast dithering. High-noise, no dither pattern.
Ordered Dithering
Very fast dithering. Low-noise, high dither pattern. This offers high-quality dithering basically for free.
use colored noise
Uses an inverted dither pattern for green ("opposite color"), which reduces luma noise but adds chroma noise.
change dither for every frame
Uses a new dither seed for every frame. Or, for Ordered Dithering, add random offsets and rotate the dither texture 90° between every frame. Hides dither patterns but adds some subjective noise.
Medium Processing
Error Diffusion - option 1
DirectCompute is used to perform very high-quality error diffusion dithering. Mid-noise, no dither pattern. Requires a DX 11-compatible graphics card.
Error Diffusion - option 2
DirectCompute is used to perform very high-quality error diffusion dithering. Low-noise, mid dither pattern. Requires a DX 11-compatible graphics card.
Recommended Use (dithering):
There really is no good reason to disable dithering. Even when the input and output bit depths match, slight color banding will be introduced into the image just through digital quantization (or rounding) errors. When the source bit depth is higher than the output bit depth set in madVR, severe banding can be introduced if dithering is not used.
Error Diffusion offers a gradual improvement over Ordered Dithering with marginally higher resource use and is by no means necessary. Two variants of Error Diffusion are offered in madVR because no clear preference exists amongst users for one over the other. Either choice will provide similar quality with slightly different trade-offs.
Trade Quality for Performance

The last set of settings reduce GPU usage at the expense of image quality. Most, if not all, options will provide very small degradations to image quality.
Recommended Use (trade quality for performance):
I would start by disabling all options in this section to retain the highest-quality output and only check them if you truly need the extra performance. Those trying to squeeze the last bit of power from their GPU will want to start at the top and work their way to the bottom. It usually takes more than one checkbox to put rendering times under the frame interval or cause the present queue to fill.
