2012-07-21, 15:27
This will be nothing fancy or spectacular so if you are looking for that I am sorry to disappoint you.
you can also see this on my blog
This post will cover the process in which I used to create my HTPC running XBMC running on a windows platform. This is a simple build which does exactly what I require.
http://xbmc.org/
This all came about as my previous system was rather large, loud and well pretty dam ugly.
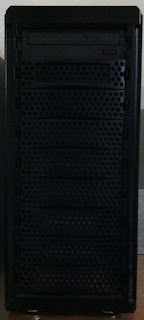
This system also had all of my media and other files stored on it and as a result was 24/7, to address this issue I decided that I also need a storage solution, a NAS (network attached storage) was the answer.
First thing is first, identify a storage solution. I decided to go with the QNAP TS-419P II Turbo NAS this accompanied with 4 X Seagate Barracuda 2TB ST2000DM00 drives should do the trick.
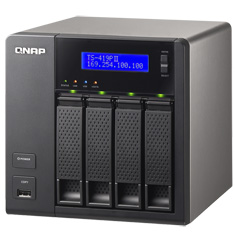
Later on I discovered while this was great and works very well, I should have spent the additional few hundred dollars and went for the QNAP with the Intel processor, this would allow me to install more applications onto the NAS.
With the NAS now in place it was time to complete data transfer, I had a few ways to do this.
1. Remove the drives and plug directly into the NAS and transfer the data.
2. Create a robocopy script to complete this.
3. Or install a file copy tool to assist with data transfer.
I went with option 3 and installed teracopy onto the existing HTPC and started the copy, this was left over night, the nice thing with this program as it has fault tolerance and provides a report at the end to ensure all data is copied correctly, the next day it was time to test if the having the data on the NAS was going to work, I have a gigabit network and assumed there would be no issues. I changed the locations within XBMC to point to the NAS and attempted to stream a Blu-ray that I purchased and ripped to HDD, this streamed with no issues and was able to skip forward with no buffering. First little win!
I use a basic folder structure for my media and find this to be a very effective way in storing my data
Movies> (%movie%)
TV Shows> (%show name%) > Season % and file name example Suits.SE01E01
This works very well for XBMC scrapers to gather the correct information, you can use tools such as The Renamer to complete the changing of file names for you.
http://www.therenamer.com/
The next step was to identify the parts needed to build the new HTPC, I wanted something small, made very little noise and also looked good, there are many options to do this such as a hacker Apple TV, zotech box etc but I decided that building my own was an easier way to get exactly what I wanted.
My parts list consisted of
Intel Core i3 2100
Corsair Vengeance CMZ8GX3M2A1600C9B 8GB (2x4GB) DDR3
Sony BC5540H01 Internal Slim SATA Blu-Ray Reader Combo
OCZ Agility 3 120GB SSD
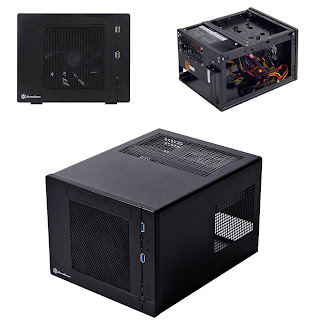
Silverstone SG05 Black Cube with 450W
Asrock Z77E-ITX Mini ITX Motherboard
All my parts were purchased through https://www.pccasegear.com
First off was the case this was nothing special but a simple, attractive and functional case
Next was the motherboard, this motherboard provided good bang for buck features but the main requirements were that it needed to have on board graphics which were capable of 1080p output, optical or coax out and a gigabit network (standard on boards now) a bonus with this board was that it had built in wireless!
I decided that being that it was only ever going to be a HTPC an i3 processor would do just fine, this along with 8GB ram and a SSD hard drive should be pretty fast and turns out it is with a 10 sec boot from cold.
Now the hardware was sorted it was time to build, I installed my 64bit version of windows, drivers, updates etc then XBMC, after this was installed I added the library locations into XBMC which pointed to my NAS. I then removed the background and set it to solid color and restarted the machine, set my password for my account and then set it to automatically login with my password by doing the following
Press the Windows key + R on your keyboard to launch the “Run” dialog box.
Type in control userpasswords2
Press Enter. The User Accounts window will display.
Uncheck the option “Users must enter a user name and password to use this computer”
Click “OK”
You will then be prompted to enter the current password and confirm it.
After doing so, you will no longer be prompted to enter your password upon login
Upon reboot I noticed since I had removed the background it took much longer to login to windows and I also wanted an almost seamless start into XBMC, so I started XBMC and took a screen shot of the starting logo and set that as my background, then I used a application to change the windows 7 logon background to the same as the desktop, added XBMC into the startup of the machine and rebooted, this was almost there and was starting to look good but I wasn't satisfied just yet.
I then went looking for away to change the windows splash screen logo, I finally found one which I will upload a link to this later on, once this was complete the result was remarkable with almost not hint of running windows at all.
http://www.julien-manici.com/windows_7_l...d_changer/
Next was to remove windows media center from the machine as it was no longer required and to change the registry settings to allow use of a media center remote control, I use one of these.
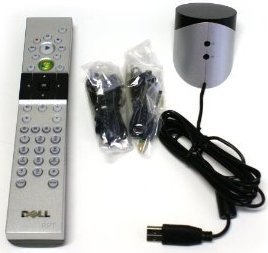
I wanted to be able use all of the the buttons on the remote to gain access to info of TV shows and movies, right click options etc, I had a lot of issues with using 3rd party add-ons to do this for me so i decided a reg change would be the way to fix it, after hunting around for a number of hours I stumbled across a nice little app which would complete what I need.
http://xbmccustomregis.sourceforge.net/index.html
This made me very happy now with a full functioning remote control for XBMC
All that was required was to install the AEON MQ3 skin and start to customize this to my liking, another thing of note was with this motherboard there was an ability to turn the HDD and Power lights off all together allowing a completely dark HTPC and no distractions while watching in low lighting levels.
On my current setup of my HTPC I run my video output through DVI to HDMI cable this seems to eliminate the issue of screen re-sized when the TV is turned off and PC is still running when using the windows platform and sound via optical or coax to the surround sound.
If like me you have just finished building your new HTPC only to find (forgotten) you have only one Optical in on your receiver there is away to fix it. I purchased one of these from ebay
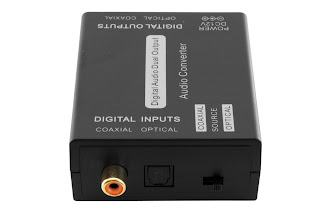
The total cost of this item was about $32 dollars (AUD) the package comes with the converter and the power supply, this allowed me to run from optical out on the motherboard to coax in on the surround sound receiver, $32 bucks is much cheaper than a new surround sound unit, money well spent!
Also this can be changed to run from coax out to optical input.
If all you want is a simple and functional XBMC media center I hope this blog has helped you out in some way, if you have any questions feel free to contact me.
you can also see this on my blog
This post will cover the process in which I used to create my HTPC running XBMC running on a windows platform. This is a simple build which does exactly what I require.
http://xbmc.org/
This all came about as my previous system was rather large, loud and well pretty dam ugly.

This system also had all of my media and other files stored on it and as a result was 24/7, to address this issue I decided that I also need a storage solution, a NAS (network attached storage) was the answer.
First thing is first, identify a storage solution. I decided to go with the QNAP TS-419P II Turbo NAS this accompanied with 4 X Seagate Barracuda 2TB ST2000DM00 drives should do the trick.

Later on I discovered while this was great and works very well, I should have spent the additional few hundred dollars and went for the QNAP with the Intel processor, this would allow me to install more applications onto the NAS.
With the NAS now in place it was time to complete data transfer, I had a few ways to do this.
1. Remove the drives and plug directly into the NAS and transfer the data.
2. Create a robocopy script to complete this.
3. Or install a file copy tool to assist with data transfer.
I went with option 3 and installed teracopy onto the existing HTPC and started the copy, this was left over night, the nice thing with this program as it has fault tolerance and provides a report at the end to ensure all data is copied correctly, the next day it was time to test if the having the data on the NAS was going to work, I have a gigabit network and assumed there would be no issues. I changed the locations within XBMC to point to the NAS and attempted to stream a Blu-ray that I purchased and ripped to HDD, this streamed with no issues and was able to skip forward with no buffering. First little win!
I use a basic folder structure for my media and find this to be a very effective way in storing my data
Movies> (%movie%)
TV Shows> (%show name%) > Season % and file name example Suits.SE01E01
This works very well for XBMC scrapers to gather the correct information, you can use tools such as The Renamer to complete the changing of file names for you.
http://www.therenamer.com/
The next step was to identify the parts needed to build the new HTPC, I wanted something small, made very little noise and also looked good, there are many options to do this such as a hacker Apple TV, zotech box etc but I decided that building my own was an easier way to get exactly what I wanted.
My parts list consisted of
Intel Core i3 2100
Corsair Vengeance CMZ8GX3M2A1600C9B 8GB (2x4GB) DDR3
Sony BC5540H01 Internal Slim SATA Blu-Ray Reader Combo
OCZ Agility 3 120GB SSD
Silverstone SG05 Black Cube with 450W
Asrock Z77E-ITX Mini ITX Motherboard
All my parts were purchased through https://www.pccasegear.com
First off was the case this was nothing special but a simple, attractive and functional case

Next was the motherboard, this motherboard provided good bang for buck features but the main requirements were that it needed to have on board graphics which were capable of 1080p output, optical or coax out and a gigabit network (standard on boards now) a bonus with this board was that it had built in wireless!
I decided that being that it was only ever going to be a HTPC an i3 processor would do just fine, this along with 8GB ram and a SSD hard drive should be pretty fast and turns out it is with a 10 sec boot from cold.
Now the hardware was sorted it was time to build, I installed my 64bit version of windows, drivers, updates etc then XBMC, after this was installed I added the library locations into XBMC which pointed to my NAS. I then removed the background and set it to solid color and restarted the machine, set my password for my account and then set it to automatically login with my password by doing the following
Press the Windows key + R on your keyboard to launch the “Run” dialog box.
Type in control userpasswords2
Press Enter. The User Accounts window will display.
Uncheck the option “Users must enter a user name and password to use this computer”
Click “OK”
You will then be prompted to enter the current password and confirm it.
After doing so, you will no longer be prompted to enter your password upon login
Upon reboot I noticed since I had removed the background it took much longer to login to windows and I also wanted an almost seamless start into XBMC, so I started XBMC and took a screen shot of the starting logo and set that as my background, then I used a application to change the windows 7 logon background to the same as the desktop, added XBMC into the startup of the machine and rebooted, this was almost there and was starting to look good but I wasn't satisfied just yet.
I then went looking for away to change the windows splash screen logo, I finally found one which I will upload a link to this later on, once this was complete the result was remarkable with almost not hint of running windows at all.
http://www.julien-manici.com/windows_7_l...d_changer/
Next was to remove windows media center from the machine as it was no longer required and to change the registry settings to allow use of a media center remote control, I use one of these.
I wanted to be able use all of the the buttons on the remote to gain access to info of TV shows and movies, right click options etc, I had a lot of issues with using 3rd party add-ons to do this for me so i decided a reg change would be the way to fix it, after hunting around for a number of hours I stumbled across a nice little app which would complete what I need.
http://xbmccustomregis.sourceforge.net/index.html
This made me very happy now with a full functioning remote control for XBMC

All that was required was to install the AEON MQ3 skin and start to customize this to my liking, another thing of note was with this motherboard there was an ability to turn the HDD and Power lights off all together allowing a completely dark HTPC and no distractions while watching in low lighting levels.
On my current setup of my HTPC I run my video output through DVI to HDMI cable this seems to eliminate the issue of screen re-sized when the TV is turned off and PC is still running when using the windows platform and sound via optical or coax to the surround sound.
If like me you have just finished building your new HTPC only to find (forgotten) you have only one Optical in on your receiver there is away to fix it. I purchased one of these from ebay

The total cost of this item was about $32 dollars (AUD) the package comes with the converter and the power supply, this allowed me to run from optical out on the motherboard to coax in on the surround sound receiver, $32 bucks is much cheaper than a new surround sound unit, money well spent!
Also this can be changed to run from coax out to optical input.
If all you want is a simple and functional XBMC media center I hope this blog has helped you out in some way, if you have any questions feel free to contact me.
