Note: Snow Leopard 10.6.0 and 10.6.1 broke the IR interface, but 10.6.2 is supposed to fix this. In the meantime, if you are on 10.6.0 or 10.6.1, you must use a current SVN build of XBMC as of late October 2009 or better, version 9.11 alpha 2 or higher. Please see this thread for clarification.
Since I suggested such a guide and developer MaestroDD threw it back at me and asked me to write one, here is a step-by-step guide to setting up a Harmony One remote for use with XBMC on Mac OS X.
Note that a lot of this will repeat the great info already provided by Maestro in this thread, but with some additional notes and screenshots, etc. It is geared toward users of the current distribution version of XBMC for Mac OS X rather than the most-hard core modder types.
Here's what you need to know to start off:
A: Set up XBMC and OS X to work with the Harmony One
1. You must UNPAIR any Apple Remotes you have already paired with OS X in System Preferences -> Security -> General.
2. In XBMC's System Settings for Apple Remote, set it to Standard and not Universal Remote. On newer SVN builds or any version 9.11 or higher, set it to Multi-Remote.
3. If you are interested in the ability to launch XBMC using the Menu button on your Harmony One, enable the Always On setting. Please note that this will prevent the use of the Harmony One OR any Apple Remote by any other applications, including Front Row, Sofa Control, Remote Buddy, Plex, etc. If using a version of XBMC up until 9.04.1, you must also work around a known bug. See the end of the next section on how to do this.
B*: Set up the XBMC application
1*. If you are reading this after the release of the next version of XBMC following version 9.04.1, or are using a newer SVN build, skip this section.
2*. Quit XBMC.
3*. On versions of XBMC up until 9.04.1, download this beta version of the XBMCHelper.
4*. Replace XBMCHelper in the XBMC application package folder (/Application/XBMC.app/Contents/Resources/XBMC/tools/osx/) with the new version. If you do not know how to do this, select the XBMC application and control-click (right-click). The select "Show Package Contents" from the contextual menu and navigate to this directory.
5*. Make the version of XBMCHelper that you just replaced executable. Copy & paste this into a new Terminal window:
For those afraid of Terminal, there are applications that allow you to edit permissions (including 'execute') with a GUI, such as Super Get Info.
6*. On versions of XBMC up until 9.04.1, there was a bug that prevented XBMC from saving the system setting to always keep the universal remote on. If interested in correcting this (see below), then you must modify the contents of a preference file and make that file read-only. Here are the details.
C: Install a custom Keymap.xml file
1**. If you are using any version starting with 9.11 alpha 2 you can skip this section, as the correct keymap for the Plex configuration shown here is now the default. If you previously have installed this custom keymap file in your user domain (Step C5 here), you can now remove it if you choose.
2**. Quit XBMC
3**. Download my custom Keymap.xml file (based on the one provided by Maestro). The main difference is I mapped a number of additional functions to Function keys that are shown in the screenshots in the next section. (Note that the actual function key mappings are completely arbitrary but they correspond to what I used in the screenshots below).
4**. Unzip the file
5**. Copy it to your userdata folder (~/Library/Application\ Support/XBMC/userdata/)
D: Configure your Harmony One Remote
1. We'll assume you've installed the Logitech Harmony Remote software and have already used it to configure other devices.
2. Create a new device of type "Media Center PC", brand Plex, and type "Plex Player" into the box.
3. Create a new Activity using this Plex Player device and any other devices you need (TVs, amps, etc).
4. Rename this Activity something like "Watch XBMC"
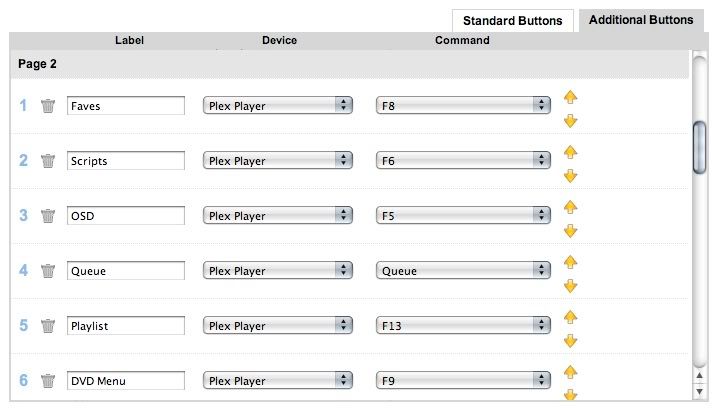
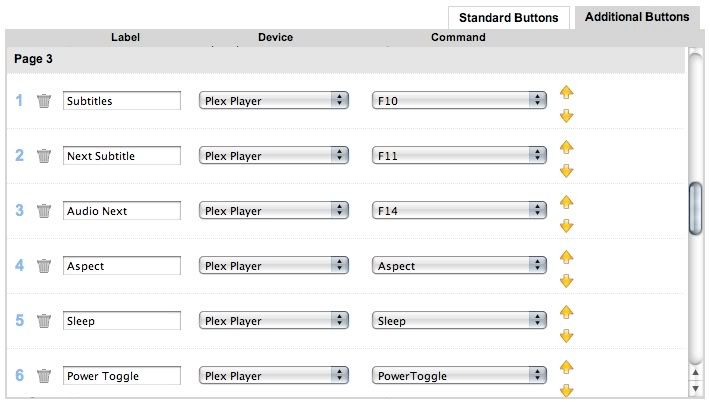
5. Customize the buttons for this Activity as shown in these screenshots.
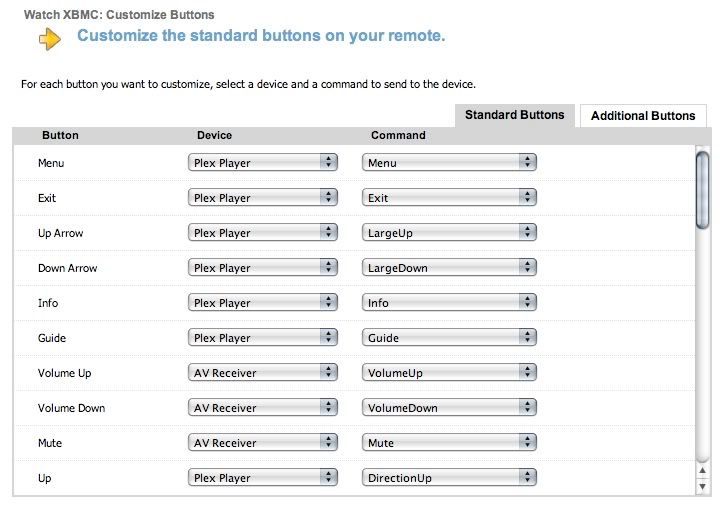

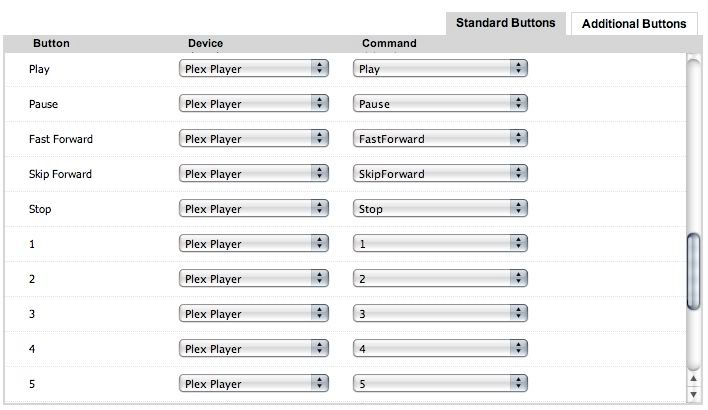
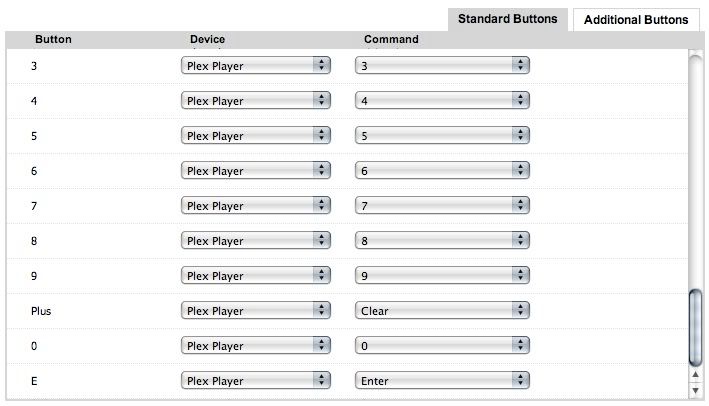
(See following post for remaining screen shots as each post is limited to 6)
6. Note a couple buttons mapped to my own AV Receiver you will want to adjust accordingly, and also you may want additional buttons for your other equipment.
7. Upload changes to remote
8. Hit the Menu button to launch XBMC (assuming you followed Step A3) or launch it from the Finder/Dock
9. Enjoy!
Since I suggested such a guide and developer MaestroDD threw it back at me and asked me to write one, here is a step-by-step guide to setting up a Harmony One remote for use with XBMC on Mac OS X.
Note that a lot of this will repeat the great info already provided by Maestro in this thread, but with some additional notes and screenshots, etc. It is geared toward users of the current distribution version of XBMC for Mac OS X rather than the most-hard core modder types.
Here's what you need to know to start off:
- Steps marked * should not be necessary after XBMC version 9.04.1 because the working XBMC remote-helper beta version will have already been included and a known bug will have been fixed.
- Steps marked ** should not be necessary after XBMC version 9.11 alpha 2.
- You will be installing and editting a custom Keymap.xml file (not necessary after version 9.11 alpha 2) and adding a Plex Media PC to your Harmony One Devices and customizing its buttons.
A: Set up XBMC and OS X to work with the Harmony One
1. You must UNPAIR any Apple Remotes you have already paired with OS X in System Preferences -> Security -> General.
2. In XBMC's System Settings for Apple Remote, set it to Standard and not Universal Remote. On newer SVN builds or any version 9.11 or higher, set it to Multi-Remote.
3. If you are interested in the ability to launch XBMC using the Menu button on your Harmony One, enable the Always On setting. Please note that this will prevent the use of the Harmony One OR any Apple Remote by any other applications, including Front Row, Sofa Control, Remote Buddy, Plex, etc. If using a version of XBMC up until 9.04.1, you must also work around a known bug. See the end of the next section on how to do this.
B*: Set up the XBMC application
1*. If you are reading this after the release of the next version of XBMC following version 9.04.1, or are using a newer SVN build, skip this section.
2*. Quit XBMC.
3*. On versions of XBMC up until 9.04.1, download this beta version of the XBMCHelper.
4*. Replace XBMCHelper in the XBMC application package folder (/Application/XBMC.app/Contents/Resources/XBMC/tools/osx/) with the new version. If you do not know how to do this, select the XBMC application and control-click (right-click). The select "Show Package Contents" from the contextual menu and navigate to this directory.
5*. Make the version of XBMCHelper that you just replaced executable. Copy & paste this into a new Terminal window:
Code:
chmod +x /Applications/XBMC.app/Contents/Resources/XBMC/tools/osx/XBMCHelperFor those afraid of Terminal, there are applications that allow you to edit permissions (including 'execute') with a GUI, such as Super Get Info.
6*. On versions of XBMC up until 9.04.1, there was a bug that prevented XBMC from saving the system setting to always keep the universal remote on. If interested in correcting this (see below), then you must modify the contents of a preference file and make that file read-only. Here are the details.
C: Install a custom Keymap.xml file
1**. If you are using any version starting with 9.11 alpha 2 you can skip this section, as the correct keymap for the Plex configuration shown here is now the default. If you previously have installed this custom keymap file in your user domain (Step C5 here), you can now remove it if you choose.
2**. Quit XBMC
3**. Download my custom Keymap.xml file (based on the one provided by Maestro). The main difference is I mapped a number of additional functions to Function keys that are shown in the screenshots in the next section. (Note that the actual function key mappings are completely arbitrary but they correspond to what I used in the screenshots below).
4**. Unzip the file
5**. Copy it to your userdata folder (~/Library/Application\ Support/XBMC/userdata/)
D: Configure your Harmony One Remote
1. We'll assume you've installed the Logitech Harmony Remote software and have already used it to configure other devices.
2. Create a new device of type "Media Center PC", brand Plex, and type "Plex Player" into the box.
3. Create a new Activity using this Plex Player device and any other devices you need (TVs, amps, etc).
4. Rename this Activity something like "Watch XBMC"
5. Customize the buttons for this Activity as shown in these screenshots.


(See following post for remaining screen shots as each post is limited to 6)
6. Note a couple buttons mapped to my own AV Receiver you will want to adjust accordingly, and also you may want additional buttons for your other equipment.
7. Upload changes to remote
8. Hit the Menu button to launch XBMC (assuming you followed Step A3) or launch it from the Finder/Dock
9. Enjoy!
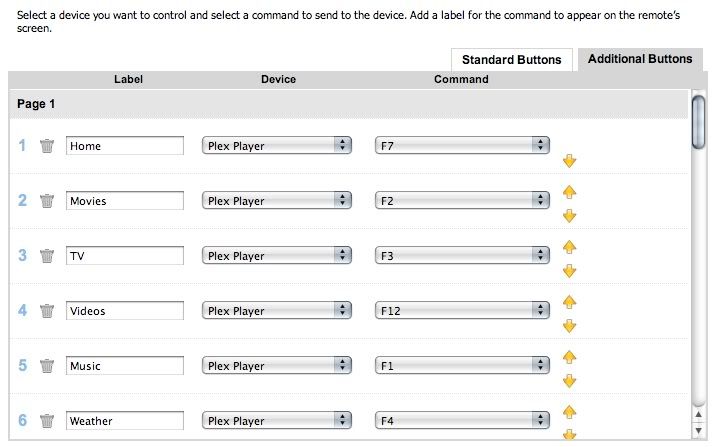


 " in the button configuration, "Enter (OK)" and "OK(OK)". Now everything works perfectly, thanks alot guys!!
